Let me begin this post by quoting the New York Times:
“Lego building is now as ubiquitous a leisure activity for adults as doing puzzles.”
Joshua Lyon, writing for “Wirecutter”
With that…clarification?…excuse to use a pull quote?…out of the way, I think I can say with near-absolute confidence that I get just as much joy out of building Lego now as I did decades ago. And while I’m not the sort of AFOL who builds MOCs or nerds out at conventions, I will still happily spend minutes/hours/days assembling a brand new set.
My favorites are the so-called Modular Building Series.

But I’ve also enjoyed putting together official Lego renditions of familiar objects such as a Fender guitar or a classic manual typewriter.

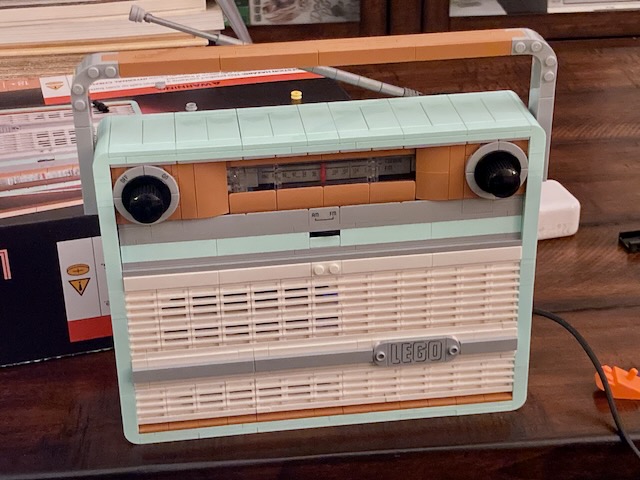
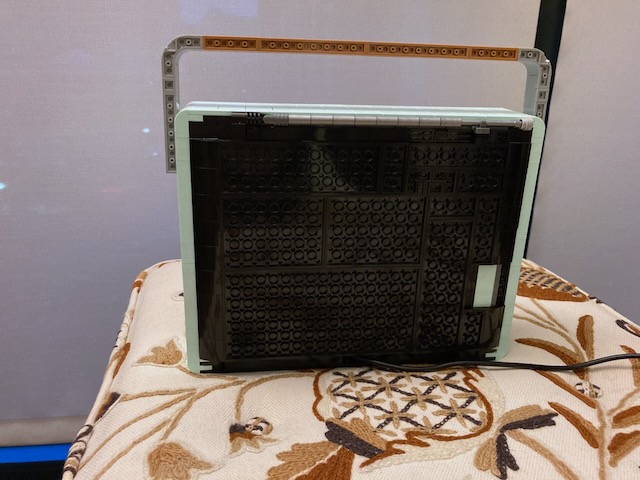
Most recently, I had the opportunity to build Item #10334, also known as the Lego Icons Retro Radio.
It’s a very cool set in its own right, but what lands it a spot here on my blog is the opportunity it provided to embark on a nifty electronics/computing project.
The Problem
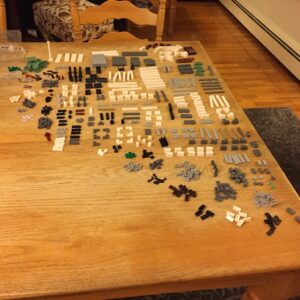
Clocking in at just over 900 pieces, the Retro Radio would seem to be one of Lego’s less intense undertakings when you consider the plethora of parts and intricate techniques typically involved in, say, the Modular Buildings; at first glance, one might even argue that the model is little more than a pretentious box.
However, as it turns out, there is a surprisingly elaborate contraption under the hood made up of Lego Technic parts.

This series of axles and gears and such allows the tuning knob to really move a needle back and forth along the frequency dial. Meanwhile, the on/off knob, which features a delightfully tactile “click,” engages and disengages a secondary mechanism that repeatedly pushes a button on a “sound brick” as you move the needle. Each push of the button activates one of several randomized, pre-recorded sound clips. This adds a great “play” element to the model (in multiple senses of the word), but it also got me wondering:
Could there be a way to turn this thing into something closer to an actual radio?
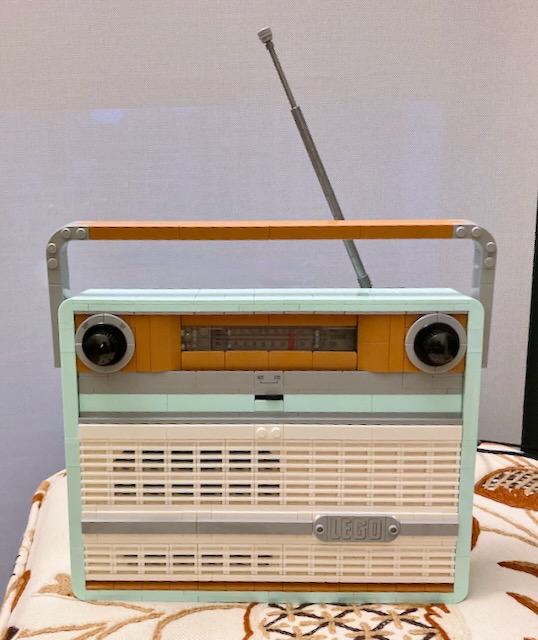
Well, technically, Lego kind of already solved that problem. Removing the model’s back panel reveals a sort of spring-loaded cradle that you can clip a phone into. So all you have to do is pull up a playlist on Spotify (or Apple Music or whatever), pop in your phone, and boom! You’ve got yourself a “radio”!
That’s clever and all, but it does mean having to sacrifice access to your phone for the duration of your listening session, which is less than ideal if you want to, say, skip a song, switch to a new playlist, or send a text to your friend about your cool new toy.
The Objective
As I thought about it some more, an idea began to crystallize. What if, instead of using my phone, I could semi-permanently mount some dedicated electronics inside to handle the music playback?
I quickly came across a blog post by U.K. freelance writer Sean McManus, who did just that using a Raspberry Pi. His particular innovation was to replace the sound brick with a similarly shaped contraption built out of normal Lego pieces onto which he glued a simple push-button. He wired the button to the Pi, along with a tiny sound card and speaker, positioned the button in the exact spot the sound brick had occupied, and then wrote a Python program that played his own, personalized selection of music and sound effects each time the model’s existing button-pushing mechanism happened to do its thing.
I considered at first trying to emulate this project but ultimately decided to go my own route. While I really appreciated how McManus managed to integrate the existing Lego control knobs with the electronics, I didn’t feel like dealing with glue or a soldering iron—or trying to find the necessary Lego pieces to build my own sound brick.
Plus, what I really wanted was the ability to play any music at all, not just a predetermined collection of clips. So, what I finally set out to create was a pint-sized wireless speaker system.
As for my criteria, the system needed to be:
- Tiny enough to hide inside the Retro Radio (ideally without removing any parts)
- Easy to connect to remotely from a phone or computer for the sole purpose of streaming music or other audio
- Buildable without glue or solder
- Self-contained (no need to repeatedly open up the Lego model to access the electronics or to “log in” to any components for administrative tasks)
The Solution
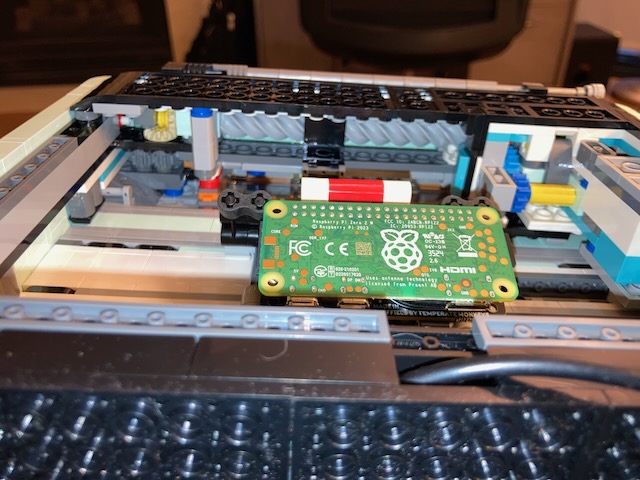
Although my main goal diverged from McManus’s project, his write-up gave me a great place to start. In fact, like McManus, I chose to use a Raspberry Pi as the “brains” of the operation and an add-on board from “Maker Goods” purveyor Pimoroni to provide the audio capabilities. But where McManus opted for a full-sized Raspberry Pi and a separate speaker, I decided to go for a more compact solution.
The model of Pi I chose (the flavor, if you will) was the Zero 2 W. While the original Pi form factor is roughly the size of a credit card, the Zero line is advertised as only 65mm x 30mm (that’s approximately 2.6” x 1.2” for us Americans). In other words, it’s small!
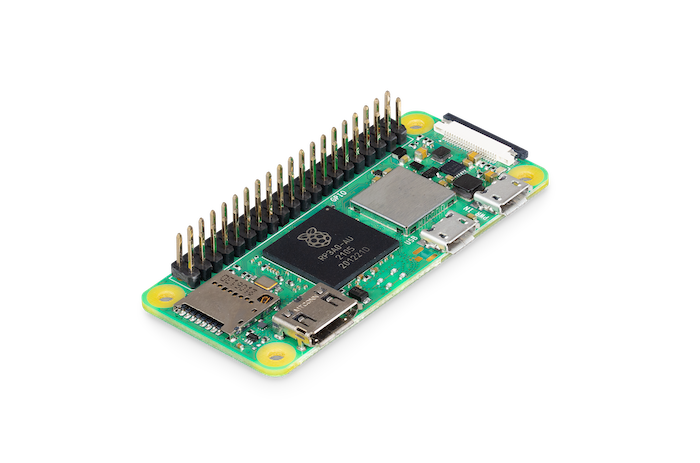
It may not be as powerful as its larger brethren, but the Zero 2 W still includes built-in WiFi and Bluetooth, perfect for streaming music from one device to another. And because I would not need to log in and run any sort of desktop environment, I suspected I could get by just fine with the Zero’s diminutive 1Ghz processor and 512MB of RAM.
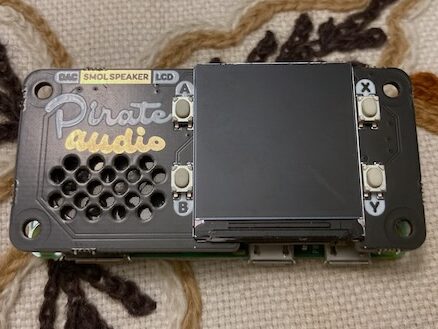
To handle the sound output, I selected the Pimoroni Pirate Audio Speaker. It’s a clever device that packs all the necessary components for audio output—a DAC, amplifier, and 1W speaker—onto a single board the exact same size as the Pi Zero.
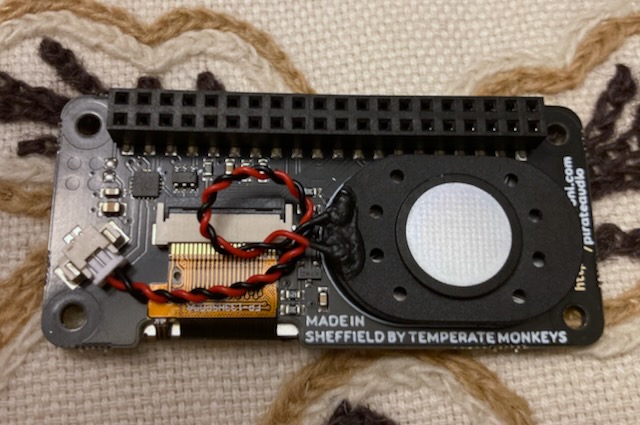
The board also includes a 1.3” color LCD and four tactile buttons. While I wouldn’t be needing any of those for this project, I figured they could come in handy in the future (if only I hadn’t managed to break the screen less than a week after buying it).
The Pirate Audio board attaches to the Raspberry Pi via its 40-pin GPIO interface and requires only a teensy bit of configuration to get it working. (The Pi Zero typically comes without the GPIO header attached; I bought one from my local electronics shop that had it pre-soldered to the device to help meet my aforementioned specifications.)
With all the hardware in place, the last piece of the puzzle (or pie?) is the software. Ideally, I wanted to be able to connect my phone or computer to the speaker setup using Bluetooth or, since I’m an iPhone/Mac guy, the AirPlay protocol, which operates over WiFi. I experimented with this sort of thing years ago, so I already knew that there were open source tools out there for handling this. For AirPlay support, the gold standard seems to be a project called Shairport Sync, which provides a mostly all-in-one, reverse engineered implementation of Apple’s proprietary protocol. For Bluetooth, perhaps because it’s a more open standard, the options are a bit more varied, but they all ultimately require cobbling together several different utilities to get the job done. (More on this later, if you’re interested.)
Finally, because it’s what I am most familiar with, I chose to install all of this on top of the standard Raspberry Pi OS (a Debian-based Linux distribution). I went with the Lite version to keep space and resource requirements to a minimum.
The Outcome
Strangely enough, one of the most challenging parts of the operation was attaching the sound card. I expected the Pi’s GPIO pins to slide right into the sockets on the Pirate Audio board’s header. Instead, this operation required a fair bit of force, which likely contributed to my having accidentally cracked the panel (a misfortune to which I believe I alluded in an earlier parenthetical—alas!)
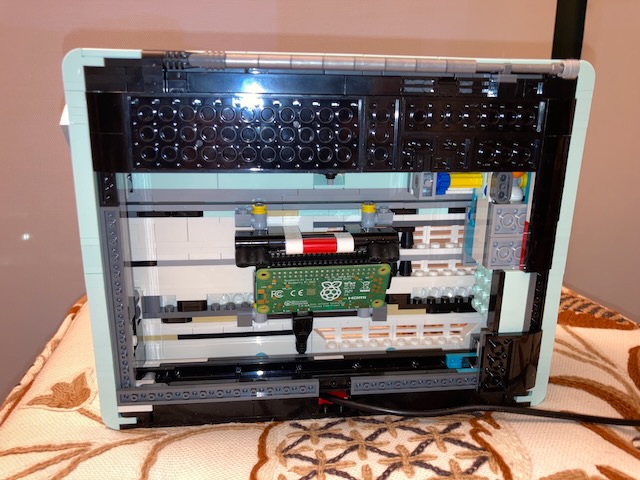
The only other physical task was to fit the assembled device into the Lego model, which turned out to be quite easy thanks to its small size. There’s even already a convenient gap in the back panel through which you can route the power cord. (You just have to reposition a single, structurally insignificant piece, as McManus noted, to widen the space a bit.)
The rest of the project was a not-particularly-enthralling-in-verbal-form process of downloading, compiling, installing, configuring, and testing various software components until finally, a working Bluetooth/AirPort speaker was born. (Don’t worry, I’ll share all the gory details in the next section for those who are still interested.)
The actual results were, well, pretty much what I expected. Even at maximum volume, the sound from the 1W speaker is meek at best. I would describe it as “serviceable” when playing rock and pop songs, but if you try like I did to throw something at it with a wider dynamic range, such as Dvořák’s Symphony No. 9, you may have to strain to hear the quieter sections. That said, the quality, lacking in anything resembling bass or oomph, seems somehow appropriate when emanating from what is, essentially, a toy made entirely out of plastic, so I kind of consider that to be a feature rather than a bug.
I expected to have the most trouble getting AirPlay to work, but Shairport Sync ended up working incredibly well. My fiancée encountered some hiccups with the sound periodically cutting out when she tried it from her own phone, but I think this might have been an issue with the WiFi signal in our apartment rather than a problem with any of the software.
Bluetooth playback, meanwhile, seemed to be less spotty—when we could get our devices to connect in the first place. The very first time either of us would try to pair a computer or phone to the Pi, everything would go great. But if we disconnected a device and then tried to re-connect, that’s when things started to go wrong. It’s a mild annoyance that can thankfully be solved by resetting the Pi and telling the relevant phone/computer to forget the speaker.
…Or we can just use AirPlay!
I doubt this tone- and volume-challenged Lego creation is something I’ll use as a speaker all that regularly, but I do appreciate how a model that could be a great conversation starter in its own right has had its novelty factor cranked up to 11!
The Takeaway
If you’d like to try recreating this project yourself, this section is for you! I’m not going to go into all the minutiae, but I’ll walk you through the process I followed, point out a few challenges I ran into, and link to some step-by-step guides for installing the necessary software.
To streamline this as best I can, I will assume you are already reasonably familiar with the Raspberry Pi and have spent some time on a Linux command line before.
If you’re really only here for the bird’s eye view, feel free to just move right along!
Read More…
Initial Setup
As with any Raspberry Pi project, the first step is to flash an OS to a micro-SD card. There are, of course, a number of ways to do this, but I particularly like the official Raspberry Pi Imager because it lets you do some basic setup ahead of time, including giving the Pi a hostname, configuring WiFi, and setting it up to accept SSH connections.
After the device finishes booting up for the first time, you’ll want to log in over SSH and make sure that all the latest updates are installed. (You could theoretically hook up a keyboard and monitor to access the Pi directly, but I find the remote connection to be more convenient.)
As for hardware configuration, this is just a matter of adding three lines to /boot/firmware/config.txt—one to make the audio board recognizable by the Pi’s firmware, one to turn on a GPIO pin used to activate the onboard amp, and another to turn off the Pi’s built-in audio (to avoid any issues with software choosing the wrong output device).
dtoverlay=hifiberry-dac
gpio=25=op,dh
dtparam=audio=off
(See the Pirate Audio GitHub repository for more information, but be forewarned that some of the instructions are a bit out of date, and most of them are about using the LCD screen or Pimoroni’s suggested audio playback software, neither of which are required for this project.)
It’s best to reboot the Pi after making these changes. As for me, when it was done rebooting, I took a moment to run the raspi-config tool to expand the SD card’s file system. The tool also allowed me to make sure the “snd_rpi_hifibery_dac” component was detected and set as the default audio device.
Sound Test
Once all the hardware is configured and OS maintenance is complete, you can test whether the speaker works by running the following command: speaker-test -c 1 -t wav. This, thankfully, worked for me on first try. My dog was a bit concerned about the disembodied voice proclaiming, “Left speaker…left speaker…,” on loop, but otherwise, all was good!
AirPlay Support
Now, it’s finally time to start installing some software. A lot of it needs to be compiled yourself, but the process requires fairly minimal manual effort.
As I mentioned earlier, the key to AirPlay support is an open source solution called Shairport Sync. This project is very well documented, with detailed, step by step build instructions that walk you through all the commands that need to be run. I ran into one tiny snag, which was that I needed to add `libglib2.0-dev` to the list of dependencies to install.
After that, the instructions are fairly straightforward, especially if you choose to omit support for the AirPlay 2 protocol and avoid adding any configuration flags other than the ones used in the default walkthrough.
My first time through, I went with the basic approach. For the sake of experimentation, I later went back and added all the bells and whistles, which meant compiling and installing a helper daemon called NQPTP (required for some sort of fancy timing system that is evidently integral to AirPlay 2), a library providing support for the Apple Lossless codec (totally overkill for a tone-challenged 1W speaker, but hey, why not?), and another library called libsndfile (necessary for some more very much unnecessary fanciness). Again, none of that is strictly necessary.
One configuration flag that you don’t want to leave out is --with-systemd. This ensures that the Shairport daemon can be easily started at boot time without the need for logging in or any other user intervention. All you have to do is run systemctl enable shairport-sync at the conclusion of the install process.
Once I had this all compiled and installed, within a few moments of rebooting the Raspberry Pi, “Lego” showed up as a speaker option on all of my Apple devices, all of which were able to connect without any fuss. The only real issue I encountered was that I could barely hear anything at first. I was able to resolve this, however, by—wait for it—raising the speaker’s volume via the connected device! (You may wish to spend some time, as I did, exploring the additional options available in Shairport Sync’s configuration file, but once again, based on my experience, this should not be strictly necessary.)
Bluetooth Woes—I Mean, Support
Audio
The final challenge is Bluetooth. This part is definitely a little more complicated. The most important component is a project called the Bluetooth Audio ALSA Backend (BlueALSA for short). This is probably an oversimplification, but BlueALSA is essentially a bit of glue that gets the software components that support the Bluetooth hardware to talk to the software components that support the audio hardware.
As with Shairport Sync, BlueALSA needs to be compiled from source before installing, but it too has a step-by-step walkthrough. There are a lot of configuration flags you can play with, but I ended up skipping all of them except for --enable-systemd. As with Shairport, this option makes it easy to run BlueALSA as a background service without having to be logged in.
This isn’t mentioned in the official walkthrough, but to actually enable Bluetooth audio support at startup you need to run sudo systemctl enable bluealsa followed by sudo systemctl enable bluealsa-aplay. This activates two system services that work together to forward incoming Bluetooth audio over to the sound system.
Authentication
But of course, even that’s not enough to get this all working. There also needs to be a way to handle the Bluetooth authentication process—the complicated handshake that we all know so well, mostly thanks to how often it fails. (Have you ever had to have one Bluetooth-enabled device “forget” another Bluetooth-enabled device?)
There seem to be a number of ways to handle this, but I liked the solution documented by none other than a user going by “DrFunk” on the Raspberry Pi forums. Basically, you need to install an “agent” that hangs out and waits for Bluetooth connections. Once it detects one, it automates the process of accepting/trusting that connection so that you don’t have to log into the Pi and do so manually.
My advice: just skip all the way to Step 4 and follow the instructions to install “bluez-tools” (not to be confused with a certain beloved children’s television show) and create a service to start the unsurprisingly named bt-agent at runtime. If you’d like some extra security (instead of blindly auto-trusting all connections), you can also follow Step 5 to add a PIN. I also recommend following Step 7.1, which disables a volume control protocol that could add some additional complications.
Once I did all that, I was, in fact, able to use the Pi Zero as a Bluetooth speaker in addition to an AirPort speaker—with some caveats.
Annoyance
One unfortunate complication that I never quite figured out was that I ran into trouble any time I tried to disconnect a device from the Pi and then reconnect. The only way to fix this was to have both the source device and the Pi forget one another and then re-start the pairing process, so Bluetooth on this device continues to be a work in progress.
Turning the Music Down—er, Off
Even with AirPlay working nicely and Bluetooth kinda-sorta working, there was still one final problem to overcome: the Raspberry Pi does not have an on/off switch, and even if it did, the goal is to keep the thing hidden inside an enclosed Lego model. In a perfect world, I should be able to just pull the plug like I would with a normal radio, but doing that to a running computer, which at any moment might be writing to its storage medium, could lead to data corruption and eventual system failure.
To overcome that, I decided to use a nifty feature in the raspi-config utility that automates the process of setting up an “overlay” filesystem. This is a clever trick that makes the Pi’s memory card effectively read-only by putting a temporary RAM disk in between the fixed storage and the operating system. Any changes to the file system are written to the RAM disk instead of the underlying storage (i.e. the SD card) and are simply lost when you pull the plug. The SD card, meanwhile, theoretically remains in the exact same state during all subsequent boots as it was prior to enabling the overlay.
In addition to insulating the SD card from damage due to hard shutdowns, this also helps work around some of the Bluetooth finickiness since the Pi can now instantly forget all devices that have previously connected to it over Bluetooth as soon as the plug is pulled, preventing you (or me) from having to ever log back in to do this by hand.
Final Assembly
The last step, if you haven’t done this already, is to fit the Pi inside the Lego model.
If you route the power cord the same way McManus describes in his blog post, the tension created by the cord and the phone cradle will help keep the Pi in place. It’s not exactly a snug fit, but it’ll do. (If you’re feeling clever, you can probably whip up a more secure mechanism with your own Lego parts.)
With the Pi in place, you can put the back cover back on the model, fully enclosing the electronics and completing the illusion that this is a real A/C-powered radio.
Wrapping Up
I hope this project has inspired you to dig some old Lego sets out of your basement or just learn more about the awesome world of AFOLs and MOCs. Or perhaps you’re ready to find your own unexpected object to turn into a tiny speaker. As always, if you come up with a cool idea of your own, or you found this write-up helpful, I’d love to hear about it.
Until next time, thanks for following along!