A few years ago, my school district decided to adopt a new learning management system. After a decade or so of using Blackboard to post materials, collect assignments, administer quizzes, and so on, teachers would now be required to use Schoology.
Schoology was described to us—accurately, I should add—as a more modern platform. Indeed, the back-end interface for posting course materials, creating assessments, and basically doing anything as a teacher has been way more approachable than Blackboard ever was. I am required to use it every day, and I have to say I have found it far less infuriating to work with.
However, as is often the case with newer solutions to old problems, Schoology achieves this improvement (in part) through simplification. There are certain things that Blackboard did that Schoology simply cannot do. Some of this is by design; Schoology is not intended to be Blackboard. Some of it, I might charitably suggest, seems to have just not been implemented yet.
And then, once in a while, you come across a missing feature that just plain feels like a glaring oversight. One such limitation came up in a rather jarring fashion this year when our student government sponsors tried to use Schoology to run class elections.
This was a perfectly reasonable idea: elections require security, teachers could use pre-existing Schoology classes to enforce said security, and Schoology has a built-in assessment system that one might assume could be used to implement a poll.
Well…it turns out, that last part isn’t true. Schoology does have a built-in assessment tool. In fact (at least in our version), it actually has two: the “Test/Quiz” creator and the “Assessment” creator. The latter appears to be the newer version of the tool, intended to eventually replace the former. But the “Assessment” tool lacks one particularly useful feature: the ability to summarize the results for a multiple choice question.
Schoology’s older “Test/Quiz” tool will show you the percentage of students who chose each option for a multiple choice question. This can be a great way to find out what misunderstandings students have or to discover that a multiple choice question is poorly constructed. It also makes for a great way to conduct a very simple multiple choice poll.
The “Assessment” tool, however, can only show you the percentage of students who got the question correct. There is no user interface that I or my student government sponsor colleagues could find to provide the choice-by-choice breakdown.
That is not a fun thing to discover after you’ve already used Schoology to conduct an election!
But here’s the good news: there is a way—albeit a wonky one—to get this information! The trick is to use a little bit of computer code to do some very basic data scraping.
Objective
For this tutorial, we are going to use a little bit of JavaScript to determine how many students picked each possible answer for a single multiple choice question in a Schoology assessment.
Materials
This tutorial assumes that you already have an assessment of some kind created in Schoology using the “Assessment” tool as opposed to the older “Test/Quiz” tool. (As I mentioned earlier, the older tool already has the desired functionality baked in. If you know in advance that you need summary results, it may be easier to just use the older tool!)
For the sake of simplicity, this tutorial also assumes that you are trying to calculate results for a regular multiple choice question. (It’s possible to scrape the results for other styles of question, but some types may require different code.)
To do the data scraping, you will need access to any modern web browser. Edge, Firefox, Chrome, Safari, Opera, or any browser based on one of these should be just fine. I’ll be using Edge (running on a Mac) in the screenshots below.
Step 1: Open the Assessment
Start by finding an assessment you’d like go get results for.

Then, click on it. You should see the usual results screen that looks like this:
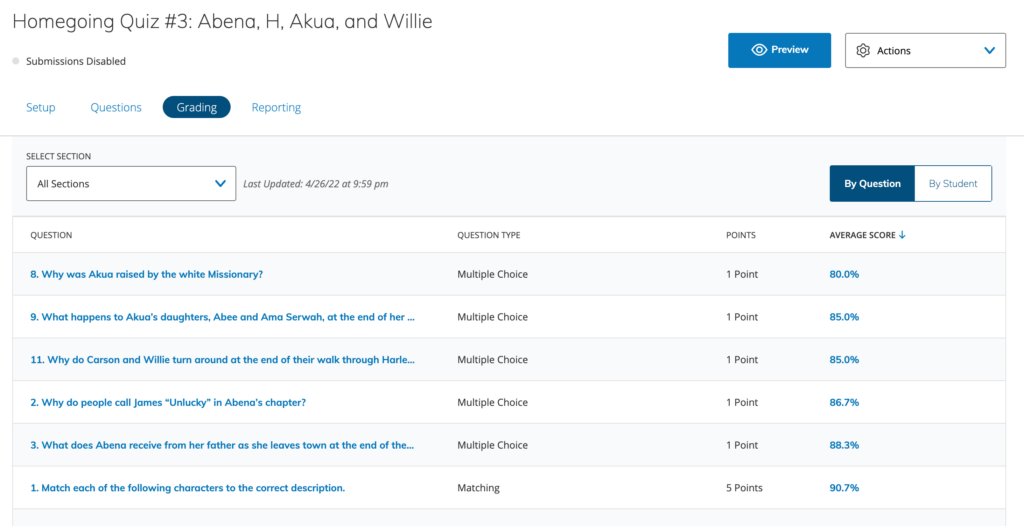
If you’re not seeing this screen on your end, make sure the “Grading” tab is selected.
Step 2: Go to the Results for a Specific Question
Now you need to decide which question you want to analyze. As you can see in the screenshot above, Schoology has chosen to sort the questions in the order of least successful to most successful. I’m going to go ahead and analyze Question #11, which it looks like 85% of my students got right.
Once you’ve decided which of your questions you’d like to analyze, click on the percentage score for that question.
You should now be on a page that shows you how each individual student answered the question.
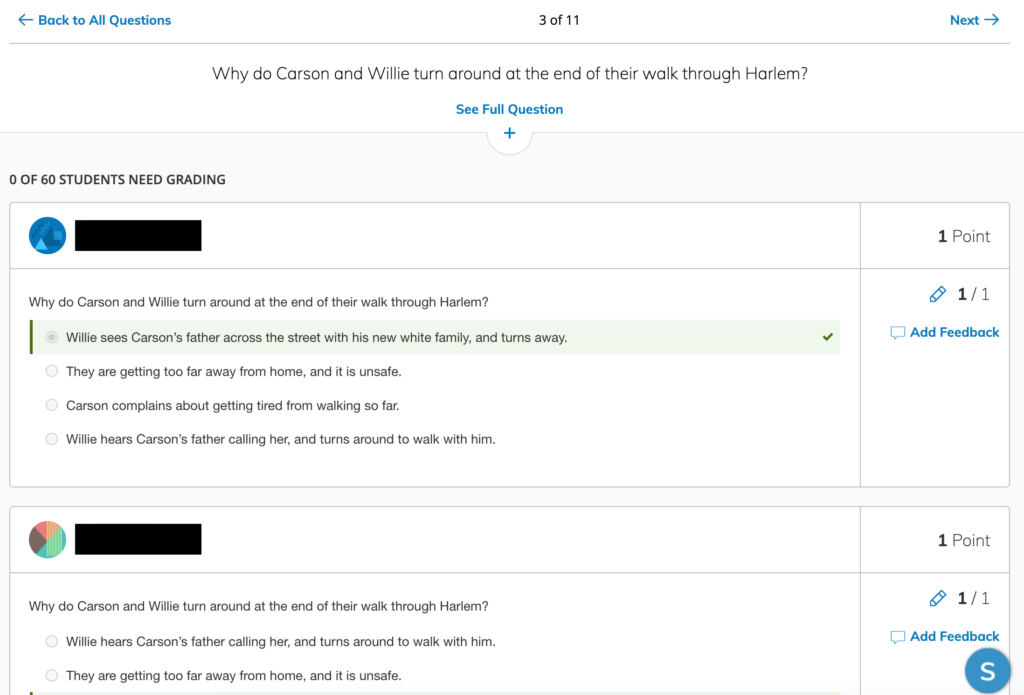
Step 3: Make Sure All the Results Have Loaded
In order to make the page load quicker, Schoology only retrieves a few results at a time. But for our trick to work, we need to load the results for every student. To do this, you will need to scroll all the way down to the bottom of the page. Depending on the size of the class, additional results should begin loading one or more times as you scroll.
Before proceeding, make sure you see the last student in your class (alphabetically) at the bottom of the page.
Step 4: Open the Browser’s JavaScript Console
Now comes the fun part. In order to scrape the data, we need to use some computer code. Specifically, we’re going to use JavaScript, which is a language used for manipulating the content on webpages.
JavaScript is used pretty much everywhere on the Internet. These days, it can even be used to power web servers. But the cool thing about JavaScript is that traditionally, the code is intended to run directly in your web browser.
Whenever your browser retrieves a page from the internet, it asks a server somewhere in the world to send it a particular resource that can be found in a particular location (i.e. a URL, which happens to stand for “uniform resource locator”). That resource is just a bunch of text with a bunch of instructions embedded within it in the form of HTML. The browser then uses its knowledge of HTML to render the page into what you actually see on your screen.
In addition to HTML, some of the instructions on that page are in the form of JavaScript. If the browser encounters any JavaScript, it uses a built-in JavaScript “engine” to process those instructions, which are often used to make the page do things like display new content, make stuff move, submit information in the background, and so on.
In order to help web developers test their JavaScript, most browsers in addition to the JavaScript engine also include a JavaScript console. The console is typically used to display log and error messages that don’t need to be seen by a regular user. But it can also be used—usually for debugging purposes—to manipulate an open webpage by manually issuing arbitrary JavaScript commands. This is the capability that we’re going to take advantage of to do our data scraping.
So, what you need to do now is open the JavaScript console. The method is different depending on the browser you’re using, but the quickest way is usually to use a keyboard shortcut.
This discussion board lists the keyboard shortcuts to open the console in various web browsers on a Mac or PC. Go ahead and find the one that applies to you. If you’re having trouble, here a couple of tips:
- If you’re using a relatively recent version of Microsoft Edge, the keyboard shortcuts should be the same as Chrome. (Microsoft’s original Edge browser was a home-grown replacement for Internet Explorer, but the new Edge browser is actually a modified version of Chrome.)
- If you’re using Safari, you will need to first enable the “Develop” menu. There are instructions for this on the page I linked to.
If you have successfully opened the console, you’ll most likely see something that looks a little like this pop up either to the side of your webpage or right below it. (Note: The console may look a little different in different browsers, but it should still function similarly.)
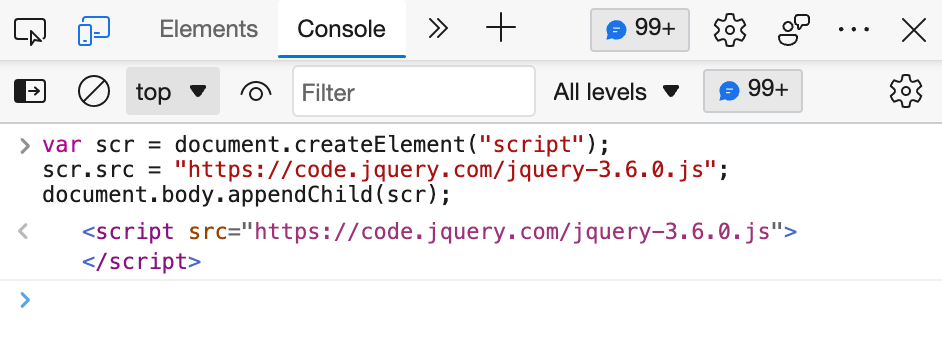
Step 5: Paste in Some Code
It’s time to get nerdy! First, copy the code you see below to your clipboard.
var scr = document.createElement("script");
scr.src = "https://code.jquery.com/jquery-3.6.0.js";
document.body.appendChild(scr);
Then, go back to your Schoology window, click on the console, and paste in the code. It should look something like this:
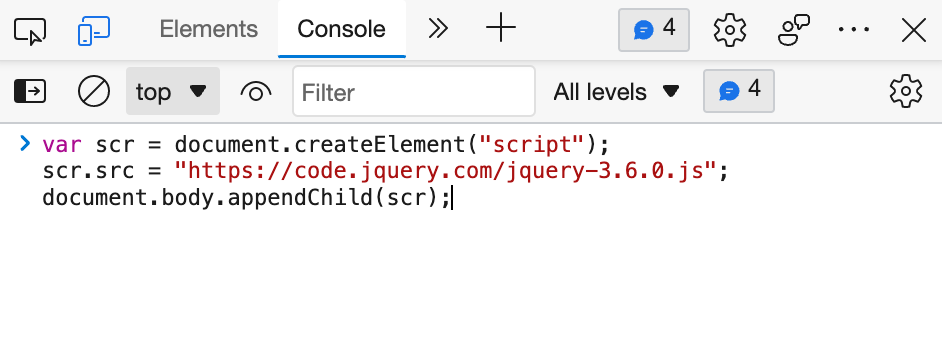
After you’ve pasted the code, press Enter
What you have done is injected a piece of JavaScript into the webpage. Instead of doing something to the page, however, this piece of JavaScript loads an external library called jQuery, which provides some JavaScript commands of its own that make it very easy to scrape and manipulate the data on the page. In the next step, we’re going to make use of some of those command.s
Step 6: Paste in Some More Code!
Even though all we’re doing in this next step is pasting in some more code, it’s very important that it be done separately. We needed to load that special library (which we did in the previous step) before we could actually use it.
So, here’s the next bit of code:
$("input:checked").siblings(":contains(PHRASE)").length;What this code is going to do is to tell the browser to count how many times a given phrase appears in a selected answer choice. In other words, it’s going to do exactly what we set out to accomplish: it will make the browser tell you how many time a student chose a particular answer.
After you paste the code into the console, but before you press Enter, you need to go back and edit it. Where the code says PHRASE, change that to be an actual word or phrase that only appears in one of the answer choices. (Make sure not to delete any of the punctuation, such as the parentheses or quotation marks.)
Now, you can press Enter.

A number should appear immediately below the line. This number is what we’ve been looking for. In the example above, I can see that five students chose the answer choice containing the phrase “Willie hears.” I know there are 30 students in the class, so only about 17% of my students picked this particular wrong answer.
Step 7: Repeat the Previous Step as Needed
To find out how many students chose each of the remaining answers, simply repeat Step 6 as many times as needed, substituting in a word or phrase from a different answer each time.
If your numbers don’t add up right (e.g. they add up to more students than you have in that class), you probably picked a word or phrase that appears in more than one answer. And if you keep getting a result of 0 when you know you should be getting an actual number, make sure you’ve pasted the code in correctly and that you’ve typed the word or phrase exactly as it appears in the question.
Wrapping Up
You now have a process for automatically counting the number of students who picked a particular answer for any given question. You can go back and repeat the process if you want for additional questions.
This method is admittedly not the fastest process in the world, but it’s still probably quicker than counting the answers individually. And in the case of the student government election that I began with, where hundreds of students voted, this technique was definitely a lifesaver.
The one downside, which I alluded to above, is that this technique only works for traditional multiple choice questions. Finding a bit of code that will count up the answers for other question types involves analyzing the webpage’s HTML source code to figure out how the information is structured, crafting a jQuery “selector” (the bit of gibberish that appears inside the parentheses after the dollar sign in the JavaScript) that can match the desired information, and adding any code needed to perform additional manipulations.
For example, here’s some really messy code I came up with in a pinch to try to count the number of times a given name was selected in a drag-and-drop poll:
$(".lrn_response_input .lrn_item").map(function() { return $(this).text() }).get().filter(name => { if (name == "STUDENT") { return true; } else { return false; } }).length;Looking back, I’m certain that one could have been done more simply. As they say in textbooks, I’ll leave it as an exercise for the reader to figure out how.
(I’m kidding, of course.)
Until next time, happy scraping!