For several years, one of the many hats I wore as a teacher was that of National Honor Society adviser. Among the responsibilities that came with this role was organizing an annual induction ceremony.
Some NHS inductions (like the one I experienced as a teenager) involve an elaborate candle-lighting ritual. Our school opted for a streamlined approach.
Each of the society’s officers would deliver some prepared remarks, a guest speaker would give an inspirational keynote, and we’d announce each inductee’s name as if it were a graduation. We’d conclude the event with a recitation of the NHS pledge and then wish all the proud families a good night. All told, it took about 90 minutes.
Normally, when announcing the names, we’d invite each student up onto the auditorium stage to receive a certificate. But then…the pandemic happened.
Like everything else, the ceremony went virtual. But let’s face it: no one comes to the NHS induction for the speeches (even though we did continue including them in the ceremony). What the parents in attendance really want is to hear their kids’ names and see them walk across that stage. The solution? An induction slideshow!
Sharing a slideshow over Zoom is easy enough, but you know what I did not want to do? Create all those slides, each with a student’s name and photo, by hand. This wouldn’t be a big deal for, say, a dozen students, but our chapter inducted over 100 each year!
After some investigation, I determined that this problem could be solved with two tech tools I already used quite frequently in my journalism classroom: Microsoft Excel and Adobe InDesign.
Objective
In the following tutorial, I’ll walk you through how to create an awards slideshow suitable for a graduation, induction ceremony, or other event where you want to individually project each recognized individual’s name and face. These same techniques could also be used for other resources, like certificates or photo directories, that require merging text and images from a list into a pre-made template.
Materials
This tutorial should work on any Mac or Windows-powered PC capable of running Adobe InDesign.
To follow along, you’ll need the following tools:
- Adobe InDesign: This desktop publishing app may not be your first thought when trying to create a slideshow. In fact, there are dedicated apps like Keynote, Google Slides, and PowerPoint that are far more suited to the task, but none of them has built-in data-merge capabilities. InDesign does! This tutorial assumes you are already familiar with creating a document and adding simple elements like text boxes and image frames to the page.
- Adobe Acrobat Reader: The easiest way, in my opinion, to share the finished slideshow is as a PDF, and Adobe Reader makes it very easy to display the PDF like a slideshow. But really, any PDF viewer that can display single pages in full-screen format will do the trick.
- Microsoft Excel or Google Sheets: You’ll need to use your favorite spreadsheet app to do some basic data manipulation and create the info file necessary for InDesign to do its magic. I’ll mostly be using Excel for my examples, but Google Sheets works just as well. Plus, any formula that works in one app will usually also work in the other.
- List of student information: The list can be in any format that you can easily open, import, or paste into your spreadsheet app. (You can either create this yourself or obtain it from your school’s student information system.) At minimum, you’ll want columns for each student’s name. If there is any additional information you want to include on the slide, such as the student’s grade or teacher, you’ll want to have columns for those things, too. And if there are any details (e.g. an ID number) that might help you match a student’s name to the relevant photo, it would be helpful to include that information as well.
-
A folder of student images: For this to work as efficiently as possible, the images need to have a predictable naming format. Something like
[lastName]_[firstName].jpgor[idNumber].jpgwould be ideal. If that’s not possible, you can still follow this procedure with randomly named files. You’ll just have to manually enter each of the filenames into the spreadsheet, which of course, does somewhat defeat the purpose of automation.
Step 1: Gather and Format Your Data
If you’re working with an existing Excel file or Google Sheets document, go ahead and open it in whichever app you are using. Otherwise, do what you need to do to import or paste the data into a new document.
Once you’ve gotten your data in front of you, delete any columns you don’t need and perform any manipulations necessary to clean up the data.
For example, let’s say my initial spreadsheet, which has been exported from the student information system, looks something like this:
| A | B | C | D | E | |
|---|---|---|---|---|---|
| 1 | Name | Grade | ID Number | Address | Teacher |
| 2 | Henderson, Kaitlyn | 10 | 123456 | 123 Somewhere St. | Ms. A |
| 3 | Murray, Jaxon | 9 | 123457 | 456 Anywhere St. | Mr. B |
| 4 | Wright, Lila | 11 | 123458 | 789 Wherever Pl. | Mr. B |
| 5 | Garcia, Kian | 12 | 123459 | 321 Nowhere Ct. | Mx. C |
I don’t need grades, addresses, or teacher names for my slideshow, so I’m going to delete those three columns. I also like to have the ID number at the very beginning. So now my spreadsheet looks like this:
| A | B | |
|---|---|---|
| 1 | ID Number | Name |
| 2 | 123456 | Henderson, Kaitlyn |
| 3 | 123457 | Murray, Jaxon |
| 4 | 123458 | Wright, Lila |
| 5 | 123459 | Garcia, Kian |
This is closer to what I need. Unfortunately, my school’s student information system often exports names in “Last, First” format, but I want the names in the slideshow to look like “First Last.” So I’m going to use the text-to-columns feature that I described here to split up the names into two columns. (I’m also going to rename the ID column because things are always a bit easier, in my experience, when field names are just a single word.)
Now my data looks like this:
| A | B | C | |
|---|---|---|---|
| 1 | ID | Last | First |
| 2 | 123456 | Henderson | Kaitlyn |
| 3 | 123457 | Murray | Jaxon |
| 4 | 123458 | Wright | Lila |
| 5 | 123459 | Garcia | Kian |
This is just what I need to be able to put each student’s name on a slide.
Step 2: Add the Image Filenames
Rather than somehow try to put the images themselves into your spreadsheet, all you need to do is add the filenames. You can type or paste each of those filenames in manually if needed. However, ideally, as long as the filenames follow a predictable pattern, you can generate them automatically using a formula.
For example, when you export the photos from the student information system, let’s say the filenames look something like this: “HENDERSON_KAITLYN.JPG”
That’s a predictable format; it’s always the last name, followed by an underscore, followed by the first name, a period, and the file extension. Oh, and let’s not forget that everything is in all-caps!
I can recreate this filename in an empty cell at the end of Kaitlyn’s row using the following formula:
=UPPER(B2 & "_" & C2 & ".jpg")If you need a refresher on Excel formulas, here’s a quick breakdown:
- The equals sign tells Excel that this is a formula and not a piece of data.
-
UPPER()is a function that converts any text you give it into uppercase. - The letters and numbers (e.g. B2) refer to a particular cell by row and column, respectively.
- Anything in quotation marks (like “_” and “.jpg”) is interpreted as a “string” of arbitrary text.
- The ampersands are used to concatenate (or stick together) two pieces of text.
So if you type all that into a cell and hit the Enter key, it should immediately display HENDERSON_KAITLYN.JPG
Now, what if the image filenames follow a different pattern? For instance, my school’s photography vendor would label the photos by student ID number. This was actually really convenient for us because it made it very easy to import the images into our student information system. And because I already have the ID number for every student, it’s also very easy for me to add these filenames to the spreadsheet. Here’s the formula for the first row:
=A2 & ".jpg"This is just a simple concatenation, which gives us the following result: 123456.jpg
I’ll leave it as an exercise to the reader to figure out how to calculate the appropriate filenames for different schools and situations. Hopefully, these two examples serve as a useful starting point.
Assuming you’ve gotten this far, there is still a minor problem here. The issue is that although we have successfully generated a filename, for this to work in the end we also need to know the location of the image in the computer’s file system. This means we need to adjust the formula to also indicate the file’s “path.”
To take care of this on your end, you’ll need to follow either Step 3a or Step 3b below, depending on which operating system you’re using.
Step 3a: Add the Full Path to the Image (Windows)
First, make sure all your images are in the same folder.
Then, if you’re using Windows, you can get that folder’s location by selecting one of the images in the computer’s file browser, right-clicking on that file, and choosing “Properties” from the context menu.

In the Properties window that should appear, look for the “Location” field. In the example above, the location is displayed as C:\Users\dan\Desktop\students. You should be able to highlight this location with your pointer, right-click, and select “Copy.” Then, you can temporarily paste it somewhere in your spreadsheet or another document to refer to later.
One you’ve pasted that location somewhere, you’ll need to add an additional backslash to the very end. Now, it should look something like this: C:\Users\dan\Desktop\students\
Now that you have properly formatted the location, you can use it to update the image formula in your spreadsheet. For example, when using Windows, my own updated formula looks like this:
="C:\Users\dan\Desktop\students\" & A2 & ".jpg"And when I hit Enter, the result will look like this: C:\Users\dan\Desktop\students\123456.jpg
Step 3b: Add the Full Path to the Image (macOS)
First, make sure all your images are in the same folder.
Then, if you’re using a Mac, browse to that folder in the Finder. Next, click on any image from that folder, hold down the Option key, and select “Copy [filename] as Pathname” from the Edit menu. This will store the path to the image on the macOS clipboard. In order to use this stored path, you’ll need to temporarily paste it somewhere in your spreadsheet or another document.
In my case, when I paste the path from the clipboard, it looks like this: /Users/dan/Desktop/students/123456.jpg.
This is actually more information than we need, and for it to work in InDesign, the formatting needs to be adjusted. To get this cleaned up, start by removing the filename (e.g. “123456.jpg”) from the end of the line. Then, remove the slash from the very beginning of the line. Finally, change all the remaining slashes into colons. In my example, the end result would look like this: Users:dan:Desktop:students:
If you’ve done it correctly, there will always be a colon at the end of the line!
Now that you have properly formatted the location, you can use it to update the image formula in your spreadsheet. For example, when using macOS, my own updated formula looks like this:
="Users:dan:Desktop:students:" & A2 & ".jpg"And when I hit Enter, the result will look like this: Users:dan:Desktop:students:123456.jpg
Step 4: “Auto-Fill” the Image Formula
Okay, sorry for the bifurcation of Step 3. From here on out, the steps are all the same, regardless of your computer.
So the next thing we need to do is take that formula we just created for our first row of data and copy it into the rest of the rows. To do that, just double-click the little box that appears in the bottom-right corner of the cell. (I’ve circled it in the screenshot below.)

You can do the same thing in Google Sheets, but instead of a square, you’ll be double-clicking a little circle in the corner:

This convenient operation is called “Auto Fill,” and the end result should look something like this:
| A | B | C | D | |
|---|---|---|---|---|
| 1 | ID | Last | First | |
| 2 | 123456.jpg | Henderson | Kaitlyn | C:\Users\dan\Desktop\students\123456.jpg |
| 3 | 123457.jpg | Wright | Jaxon | C:\Users\dan\Desktop\students\123457.jpg |
| 4 | 123458.jpg | Murray | Lila | C:\Users\dan\Desktop\students\123458.jpg |
| 5 | 123459.jpg | Garcia | Kian | C:\Users\dan\Desktop\students\123459.jpg |
Step 5: Give the Photo Column a “Special” Title
If you’re paying close attention, you may have wondered whether I “forgot” to label the column with my file paths. The truth is I decided to make this its own step because you need to do something a bit unusual here.
In order for InDesign to recognize a column as a list of image file paths (rather than ordinary text), the column’s label needs to begin with an “at sign” (e.g. “@Photos”). So in theory, our spreadsheet would need to look like this:
| | A | B | C | D |
|---|---|---|---|---|
| 1 | ID | Last | First | @Photos |
| 2 | 123456.jpg | Henderson | Kaitlyn | C:\Users\dan\Desktop\students\123456.jpg |
| 3 | 123457.jpg | Wright | Jaxon | C:\Users\dan\Desktop\students\123457.jpg |
| 4 | 123458.jpg | Murray | Lila | C:\Users\dan\Desktop\students\123458.jpg |
| 5 | 123459.jpg | Garcia | Kian | C:\Users\dan\Desktop\students\123459.jpg |
Google Sheets will have no problem with this, but Excel will get upset and pop up an error message if you try to do that.

The problem is that the @ symbol has a special purpose in Excel. Thankfully, we can get around this by adding a single apostrophe to the very beginning of our entry: '@Photos. This apostrophe tells Excel to treat the entire cell as ordinary text. After you press Enter, the apostrophe will be hidden, and you’ll just see @Photos. At this point, your spreadsheet should resemble the example above.
Step 6: Export Your Data
Now that the data is all set up, we need to save it in a format readable by InDesign.
Unfortunately, InDesign can’t read native Excel files. So we’ll need to use something more generic: CSV, which stands for “Comma-Separated Values.” A CSV is just a plain text file representing a table of data where each row appears on its own line and each column is—you guessed it!—separated by a comma. The first row of a CSV typically includes the names for each column. And that’s really all there is to it.
Because this is such a basic file format, it’s actually rather easy to create a CSV using Excel or Google Sheets. In Excel, go to the File menu and choose Save As. The Save dialog will look a little different depending on what operating system you are using and what version of Excel you have. But somewhere in there, you should see an option to choose the file format.
What you see in the list of options may also vary, but one of them should be named something like “Comma Separated Values (.csv)” or “CSV (Comma delimited)” depending on your operating system, Excel version, and which type of Save As dialog you’re looking at. (As you’ll see in a moment, Microsoft’s conventions are remarkably inconsistent.)
Note: Don’t choose any option that looks like “CSV UTF-8 (Comma delimited) (.csv)”—even if it appears higher up in the list or is labeled a “Common Format.” It won’t work! InDesign can only read a standard, “old school” CSV file. And yes, I learned this the hard way.
Here’s what the selector—and the proper choice—looks like in Excel on my Mac:

And in Windows, it may look like either of the following:


Regardless of what your Save As dialog looks like, give the file a name, make sure CSV is selected, and click “Save.”
If you’re using Google Slides, the process is a little more straightforward. First, go to the File menu. (Make sure you’re using the Google Sheets app’s File menu—the one that appears at the top left of the webpage itself—rather than your browser’s File menu. If you don’t see it, it’s possible that your menus are hidden. In that case, try clicking the little down arrow that appears at the end of the Google Sheets toolbar, or you can press Ctrl+Shift+F to toggle between hidden and unhidden states.)
With the File menu open, hover over Download and choose Comma Separated Values (.csv). Depending on your web browser, the file should begin downloading right away, or you may be asked what you want to do with it. I trust that you know how downloads work in your browser, so do what you need to do.
Step 7: Find or Create a Design for Your Slides
We’re done with data and formulae. Now, it’s time to get creative! This step is all about figuring out the background for your slide. You don’t have to put any student information or photos on the slide yet; you just need to add any colors, designs, or boilerplate text (i.e. static information, like the school or organization name) that you want to appear in the same spot on every slide.
You can create your slide from scratch directly in InDesign, or you can use a pre-made design.
For example, when I created my NHS induction slideshow, I really wanted to use this template from Slidesgo since I had used it for some previous NHS presentations. Unfortunately, Slidesgo templates only work in Google Slides and PowerPoint. My solution was to use the template to create a single slide in Google Slides with nothing on it except for the background design. Then, I downloaded that otherwise “blank” slide from Google Slides as a PDF. Finally, I created an InDesign file with the same dimensions as the PDF (10 × 5.63 in.) and just placed the PDF right onto the canvas.
Note: If you decide to do something like this, double-check the template’s license agreement to make sure you’re allowed to use the content in that way, and be sure to follow the content creator’s rules for attribution. For instance, Slidesgo requires non-paying users to include their provided “Credits” slide at the end of the presentation.
Whether you create your own or start with someone else’s design, make sure (for now) that your InDesign file has only a single page. (If you need to add an attribution slide, you can do that later.)
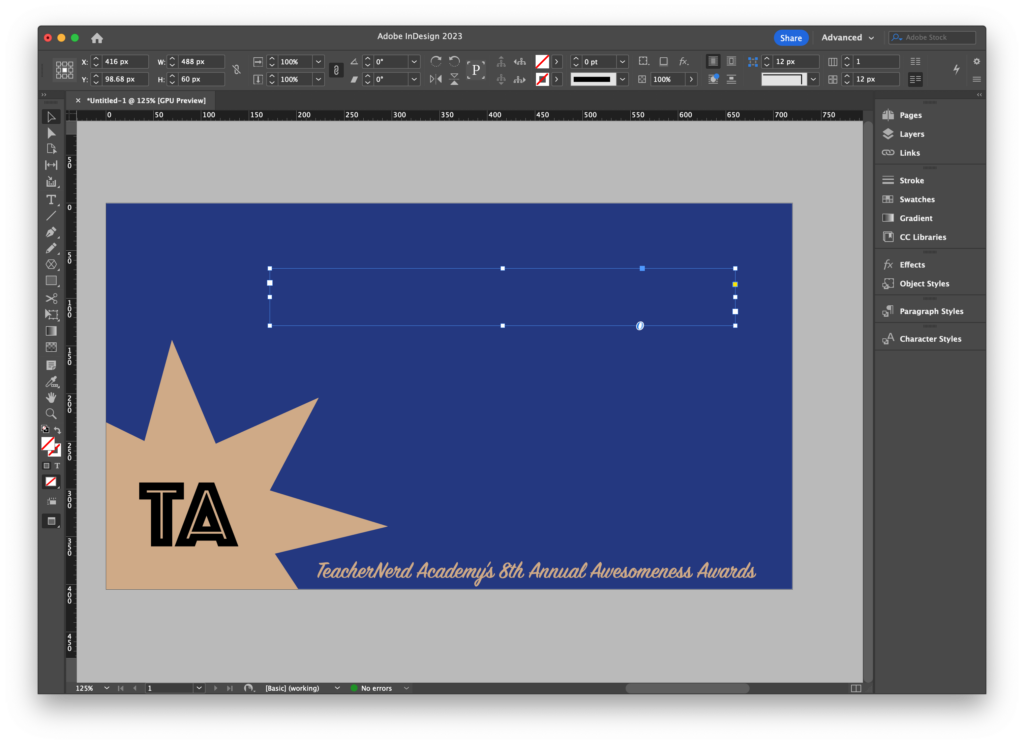
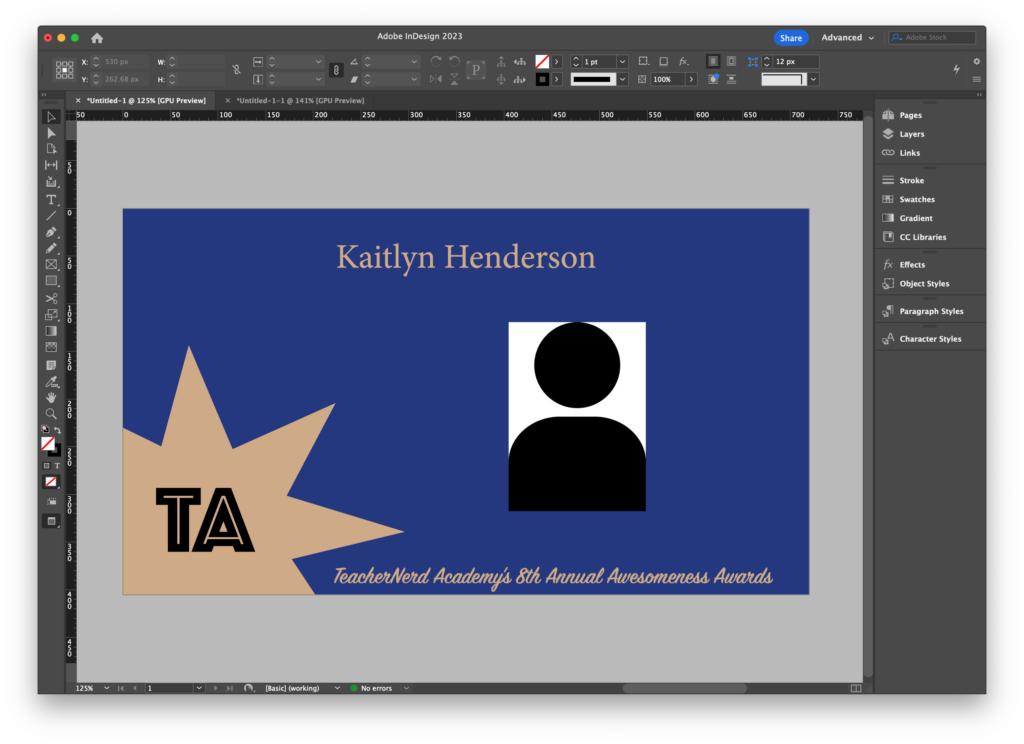
For argument’s sake, let’s say that you decided to create your slide from scratch and that it looks something like the following…er…masterpiece:

In this example, I want the blue-ish background, the star with the organization’s initials, and the event name to appear on every slide. So I’ve created a single-page InDesign document with just those details.
Step 8: Import the Data into InDesign
We’re getting pretty close to the end here, but before we can go any further, we need to import the spreadsheet data that we exported earlier. To do this, go to InDesign’s Window menu. Then, hover over Utilities and choose Data Merge. An unassumingly small—but powerful—panel should pop up. On my machine, it looks like this:
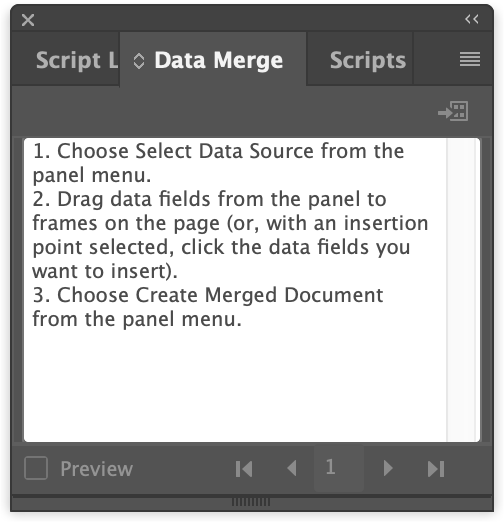
The panel pretty much tells you exactly what you need to do. But for now, let’s just follow Step 1: “Choose Select Data Source from the panel menu.” What it’s actually asking you to do is to click the button with the horizontal lines (sometimes referred to as a “hamburger menu”) in the top right corner of the panel. Then, you should see a menu option labeled “Select Data Source…” Choose that option. A file browser should appear. Use it to find the CSV file you created earlier, and finally click the “Open” button.
If the data was properly exported, the Data Merge panel should now look something like this:
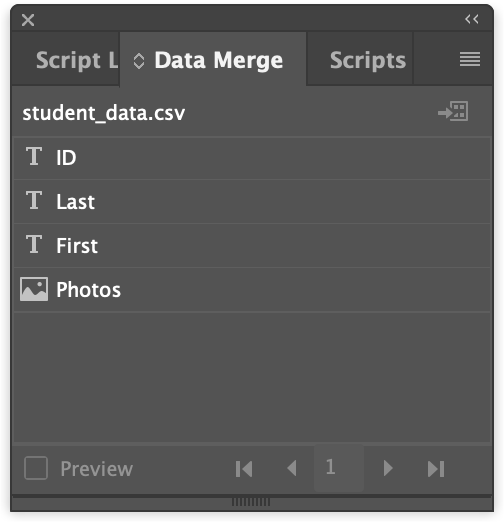
You should see a row for each of your fields. The “T” icon indicates a text field and the photo icon indicates, of course, a photo!
Step 9: Turn Your Slide into a Template
Back in Step 5, we took care of the static data—the stuff that appears on every slide without changing. Now, we need to add placeholders for dynamic data—the stuff (like student names and photos) that change on each slide.
To do this, you have to start by creating a text box for any piece of textual data you want to include. In my example, I only have one piece of textual data (the student’s name), so I’m just going to create a single text box. For the moment, you don’t need to put anything in your text boxes. They just need to exist.
Now, go back to the Data Merge panel, and use your mouse to click-and-drag each of your desired fields (i.e. each piece of dynamic data) into the appropriate text box.
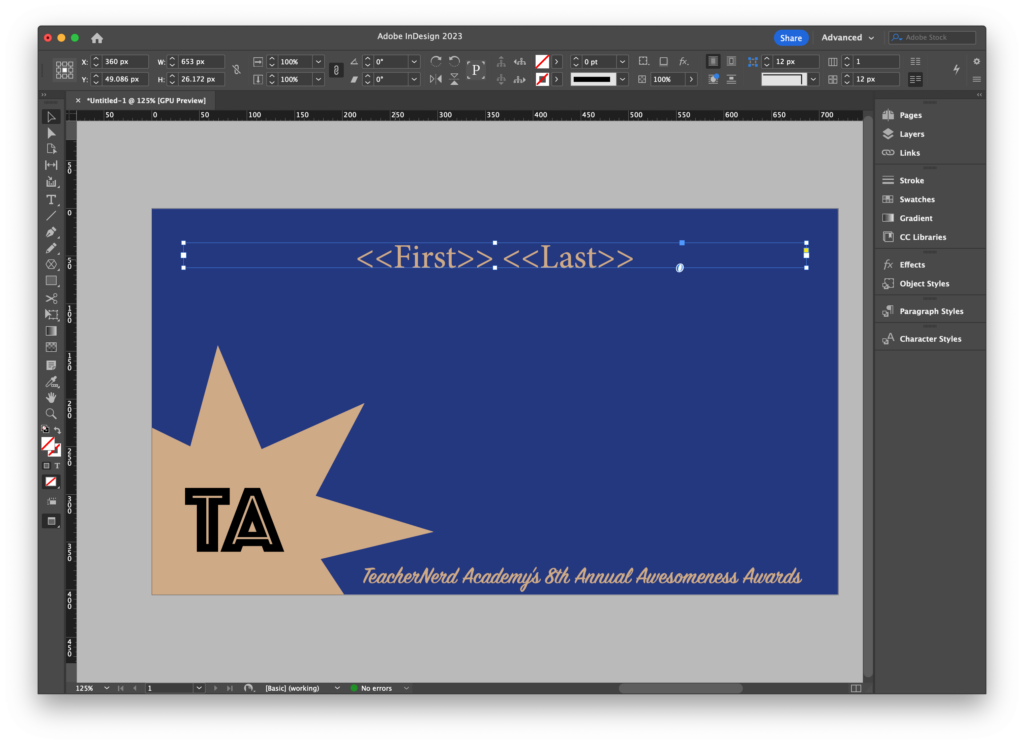
I’m going to start by dragging the filed labeled “First” into the box. As soon as I let go of the mouse, it shows up inside the box as <<First>>. I also need to include the student’s last name in that box, so I’m going to drag in the “Last” field as well. Now, I have <<First>><<Last>>. The final step (for me) is to add a space between these two fields so that the name isn’t all jumbled together. The result looks like this: <<First>> <<Last>>.
Note: Even though what you see on the screen may look like ordinary letters and angle brackets, you can’t just type in your field names. As Adobe explains in their own tutorial, you must drag the fields into the box.
After you’ve added your text fields, you can apply any formatting you’d like. I, for one, need to make the text much larger than the default font size and apply the proper color. You can do this the same way you’d style any other text in InDesign. One thing to keep in mind is to make the text box as wide as you think it will need to be to accommodate the longest names on your list.
Here’s what my text box looks like with the fields added and the appropriate formatting applied.
Once the text has been taken care of, you can add any photos you need to include. In my case, I just want to have a single image (the student’s portrait) on each slide.
Similar to before, the first step is to add an empty frame to the document.

And again, just like before, you’ll drag your photo field from the Data Merge panel right into the frame.
One thing to be aware of is that if you are editing the document in InDesign’s “Preview” screen mode, you won’t get much obvious visual feedback to confirm that you’ve successfully linked the field to the frame. However, if you switch back to “Normal” mode, you should see the name of your field (e.g. <<Photos>>) appear inside the frame.
Also, regardless of which mode you’re using, a little “1” will appear next to the field name in the Data Merge panel to indicate that something on Page 1 has been linked to it.

So feel free to look for either of those indicators to confirm that the photo field has been appropriately linked.
Step 10: Preview the Dynamic Data
Okay, time for the moment of truth. Let’s see if all of this worked!
Go back to the Data Merge panel and click the “Preview” checkbox in the bottom left corner. If all has gone according to plan, the placeholders on your slide should now show the actual text for the first person on your list. You should also, hopefully, see that person’s photo in your image frame.
You can use the forward and back arrows in the Data Merge panel to browse additional entries. This is a good way to make sure all the data fits correctly and that the correct photos have been associated with each name.
If it looks like one or more of the boxes are too small, you can make some adjustments right on the preview. (Note: If you’d rather not make a change to everyone’s slide, you can edit just that student’s slide when the whole process is complete. I’ll mention this later!)
If something doesn’t seem right (e.g. the data is mis-matched or the images don’t work), go back to your spreadsheet and see if you can figure out what went wrong. If you make any changes, just save the data as a CSV again using the same filename as before. Then, go back to InDesign, click on the hamburger menu in the Data Merge panel, choose “Update Data Source,” and see if everything links up correctly this time.
Step 11: Generate the Slides from Your Template
If you’re liking how things look in your preview, then it’s time to generate your slides.
You can start this process in either of two ways:
- Click on the hamburger menu in the Data Merge panel and choose “Create Merged Document…”
- Click the button (with the little arrow and some squares) that appears right below the hamburger menu. (If you hover your cursor over the button before clicking, you should see a tooltip that says, “Create Merged Document.”)
Regardless of which way you do it, a new dialog box should pop up.
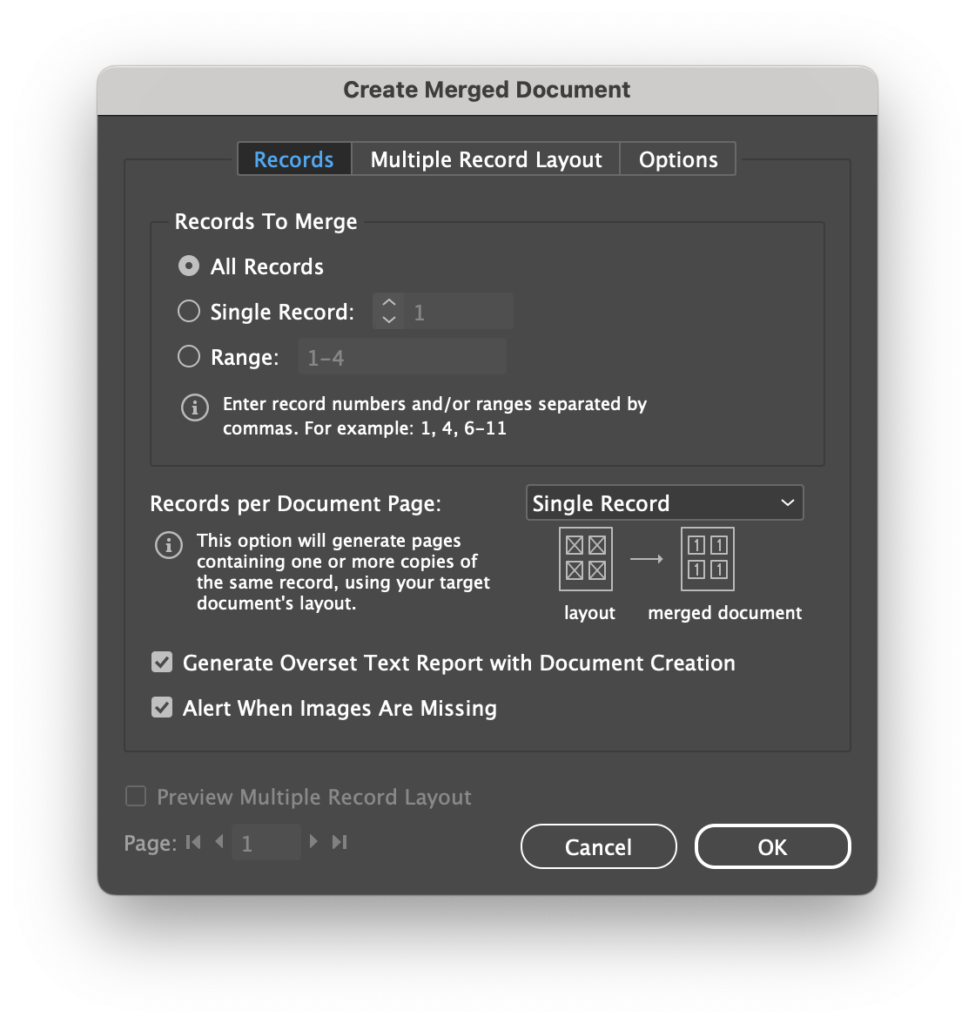
I was able to use the default settings. But just in case, make sure your settings look like the example above. Specifically, start by making sure the “Records” tab is selected at the very top. Next, under “Records To Merge,” make sure that “All Records” is selected. It is also vital that “Records per Document Page” be set to “Single Record.” (This setting is the one that ensures that we end up with a separate slide for each student.)
It’s not strictly necessary, but I also recommend checking the boxes labeled “Generate Overset Text Report with Document Creation” and “Alert When Images Are Missing.” These options will help you figure out if any of your slides will need some manual fixes (i.e. to remove overset text or deal with a missing photo).
Note: If you click on the “Options” tab, you can access a few additional settings concerning things like image placement, how to handle empty fields, and whether to limit the number of records per document. I stuck with the defaults for all of these, but you may want to take a look at the options just in case they’re relevant to your use case.
Once that’s all set up, go ahead and click “OK.” If you checked those two boxes I mentioned earlier, you might see a popup about missing images or overset text. Otherwise, when all is said and done, InDesign should have opened a new document, and each page of that document should be an individual student’s slide. Congratulations! You’ve generated your slideshow!
Step 12: Clean Things Up and Export to PDF
At this point, we’re basically done. However, you may need to make some individual adjustments to slides. For example, maybe you still have a student or two with a long name that got cut off. Now that you’ve generated the full slide deck, you can tweak those individual students’ slides without affecting the others. Or perhaps you chose to use a commercially available template that requires an attribution slide at the end. Now would be a good time to add that in.
When everything looks good and the slideshow is ready to be shared, the last step is to export it to PDF. This way, you can still display it even if the computer connected to the projector (or to a Zoom call) doesn’t have InDesign. (It would, however, be very helpful if that computer has a copy of Adobe Acrobat Reader, though other PDF-compatible applications may also work.)
So anyhow, to export to PDF, you’ll click on the File menu, hover over Adobe PDF Presets, and choose High Quality Print. (If you have some other preset that you’d prefer to use, that’s totally fine.) Choose a filename and location when asked. If you chose “High Quality Print,” you probably don’t need to change any settings when the options dialog appears. But feel free to look things over to ensure they make sense for your use case.
When you’re ready, click the “Export” button.
Wrapping Up
While a dozen steps, complete with copy/pasted file paths and awkward Excel formulae may seem like a lot of work, this pales (in my personal opinion) in comparison to the drudgery that would otherwise be required to create each individual slide, copy over the template for each student, type out or paste in each student’s name, find each student’s photo, and finally drop each of those photos onto the appropriate slides—especially as the group gets larger and larger. (Remember, my NHS induction included over 100 kids!)
When the time comes to present your slideshow, I think the easiest thing to do is to open the PDF in Adobe Acrobat Reader. In the View menu, make sure that Page Display is set to “Single Page View.” Then, in the View menu again, select Full Screen Mode. (Alternatively, you can press Cmd+L on a Mac or Ctrl+L in Windows.)
Now, you should be able to page through the slideshow the same way you would in Google Slides, PowerPoint, or Keynote: just tap the spacebar, use the arrow keys, or click the mouse. Hopefully, whoever is in your audience will be super impressed by all the work you obviously must have done to create 100 carefully personalized slides!
Postscript
While doing some research for this blog post, I came across a Microsoft support page noting the existence of “two known add-ins for PowerPoint that can help you merge data from an Excel workbook into a presentation file.” That support page leads to a forum post from 2017 that ultimately links to the following two plugins:
- Simple Merge, available for $19.99
- PPT Merge, available for $69.95
I can’t vouch for either of these tools or the people/companies that appear to be selling them. They both come from websites that look to be super-outdated, and it’s a little unclear from some of the information provided as to whether these plugins still work in the latest versions of PowerPoint or on the latest Windows operating systems. (One thing that’s clear is that neither of them work on a Mac.) But since Microsoft itself made a reference to them, I thought I should include them here in the interest of completeness.
Additionally, I also found a trio of blog posts on a site called Spreadsheet Dev that discuss how to use Google Apps Script to merge data from Google Sheets into presentations in Google Slides. These solutions require some actual coding, so they’re definitely not for everybody. It also looks like they’re only designed to work with text, not images. That said, I fully intend to try out this guy’s techniques and then see if I can tack on the ability to handle images. I’ll report back on this project in a future blog post.
Until then, may you merge merily!