Let’s imagine for a moment that you’re feeling a bit fed up with the state of the world and are yearning for the good old days of the 1990s when, because you were a kid, you were oblivious to much of whatever might have been wrong with the world at that point in time.
Now, suppose the epitome of 90s-era technology for you is taking a trip to your dad’s office in the big city, where his corporate computer was just better enough than the crummy one at home that you could reliably use it to play a really cool new game—namely, SimCity 2000. And finally, suppose you’d like to fulfill your craving for nostalgia by playing that game, which was designed for MS-DOS (an OS created in the 80s) on your brand new MacBook Pro (which was released in 2021).
Well, there’s a problem. Actually, a few problems (not the least of which is that I have too much time on my hands).
First, you can’t run MS-DOS on a Mac. Apple computers are designed to run macOS and macOS only. Okay, that’s not technically true. Ever since Apple switched to Intel processors, their Boot Camp tool has made it possible to run various versions of Microsoft Windows on their machines. And with a bit of finagling, you can install Linux distributions and other operating systems. Apple just doesn’t provide any support for it.
So…why not MS-DOS? The simple answer is, I’m not sure; I’ve never actually tried it. My suspicion is that it’s just too old. But even if it were possible at some point in time, it’s not anymore (at least, as we will soon see, not natively).
In 2020, Apple announced that over the next few years, they would transition their entire computer lineup away from the Intel processors the company had been using for the past decade. Instead, Macs would now be powered by a souped up version of the home-grown processors that Apple had been using in their iPhones and iPads for many years.
On the one hand, this was great news. Apple’s smartphone processors were known to be very powerful and energy efficient, and early reviews of the desktop/laptop versions confirmed that Apple’s tech was, in many ways, miles ahead of the competition. This played a big role in my decision to buy one of Apple’s new machines.
On the other hand, Apple’s decision posed a problem for oddballs like me that find it amusing to get their computers to do things they weren’t technically designed to do (like running operating systems that aren’t macOS on an Apple computer).
Here’s the problem: Intel’s modern, consumer-oriented processors (as well as those manufactured by its primary competitor, AMD) use an architecture often referred to as “x86_64.” This architecture has at its foundation the same basic instruction set, the collection of routines and commands baked into the processors’ circuitry, as the Intel processors (e.g. the 386, 486, and Pentium) used in the original “IBM-compatible” personal computers that dominated the 1980s and early 1990s—in other words, the kind of computers you can run MS-DOS on. (The The “64” in the name refers to how the architecture has been extended to support modern, 64-bit computing.)
Apple’s M-series processors, meanwhile, are built around an architecture or instruction set known as “ARM.” Trying to run software compiled for an x86-based processor (like MS-DOS or even most versions of Windows) on an ARM-based processor is like trying to drive a car on the ocean or attempting to breath without scuba gear underwater; the most basic assumptions about the environment are completely different.
Unfortunately, this incompatibility is so foundational that even popular tools for creating virtual machines, like Parallels or VMWare Fusion, won’t do the trick.
Virtualization software lets you share a singe host machine’s resources amongst several simulated client “machines,” but that only works if those clients can understand the host’s language and exist in the host’s hardware environment in the first place. So if you wanted to run, say, Windows in a virtual machine on a Mac with an M1 processor, you’d need a version of Windows that was built for ARM-based processors. This does actually exist—it’s what Microsoft uses in many of their Surface laptops and tablets—and you can install it in Parallels with just a few clicks.
But if you want to use your brand new MacBook Pro to run SimCity 2000 in MS-DOS, which is definitely not ARM-compatible, you need more than just virtualization. What you need is an emulator.
Objective
Unlike virtualization, which is used to share existing resources, emulation uses software to mimic (or pretend to be) a particular set of hardware that is not physically present.
In the following tutorial, I’m going to walk you through how to use an emulator to run MS-DOS on a Mac. (Incidentally, the same tools will also work on an Intel-based Mac.) I’ll also walk you through installing some drivers and tweaking a few settings to make it a bit more convenient to use and to ensure that you can actually install and run a fancy-shmancy late-era DOS game like SimCity 2000.
I recognize that the objective here is super niche. But it turns out it’s so niche that I actually struggled to find a good set of instructions for this. So in addition to providing an opportunity to talk a bit about processor architecture and the difference between virtualization and emulation (because, let’s face it, I’m a teacher and I love explaining things), hopefully this article can also serve as something of a definitive guide to this particular (albeit weird) task.
Materials
I tested this tutorial on my M1-based MacBook Pro. You should be able to follow it on any other M-series laptop or desktop as well. The software we’ll be using should work on Intel-based Macs too, but I haven’t explicitly tested it yet.
Besides the computer, you’ll need a few more things to get this to work:
- Emulation Software: We’ll be using UTM. This app bundles QEMU, an open source emulator that has been around forever, and extends it by providing a convenient user interface. You can buy UTM for for $9.99 on the App Store or download it for free from the developer’s website. You’re getting the same app either way; it’s just a question of whether you want to give some monetary support to the people behind it.
- MS-DOS Disk Images: The 100% most legal way to obtain these disk images is to create them from your own set of physical MS-DOS installation disks. What? You don’t have DOS installation disks lying around? Who are you?? Alright, look: I’m not going to just give you a link to pirated software. But if you’re the sort of person who figures some lawyer out in Redmond, WA is not going to come banging on your front door because you downloaded a piece of ancient software that no one is actually selling anymore, then I have one word for you: WinWorld. Do with that what you will. Oh, and if you’re trying to track down those, um, physical disks in your basement, I’ll point out that the version you really want to be on the lookout for is “MS-DOS 6.22 Plus Enhanced Tools,” and it would be mighty convenient if you used the version that comes on 3.5″ diskettes. (However, props to you if you manage to find some working 5.25″ floppies in your basement!)
- Drivers: At bare minimum, playing around with DOS will be a lot easier with a working mouse and the ability to mount CD-ROM images since so many programs and games were distributed that way. There are several drivers to choose from and a bunch of places where you can find them. I recommend going to Computer Hope and downloading oakcdrom.sys and mouse.zip. Put them somewhere safe, and I’ll explain what to do with them later!
Note: A more automated (and thus “easier”) way to run old DOS games in just about any operating system is a well-known emulator called DOSBox. I acknowledge the existence of this app and have even played with it myself. The following tutorial is for folks who want to get their hands a bit dirtier and experience the full process of installing and configuring the genuine MS-DOS operating system (plus an emulator) from scratch.
Step 1: Create a Virtual Machine
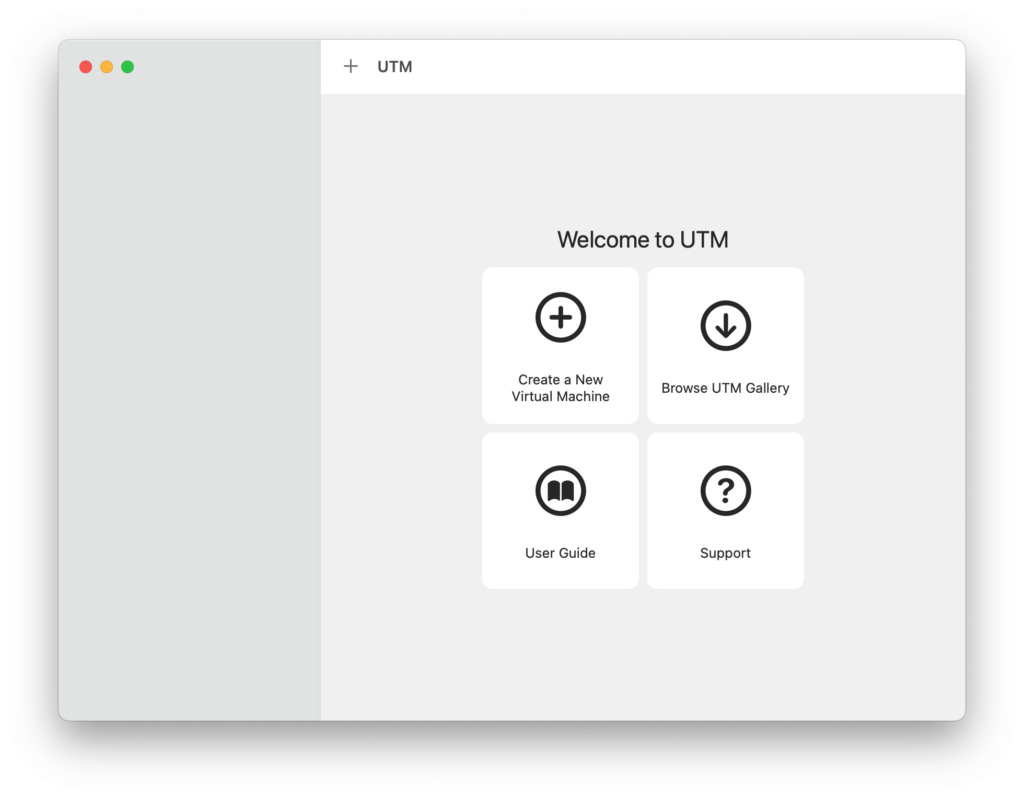
So we’re going to start by opening up the UTM app. If you’re running it for the very first time, it’ll probably look something like this:
Click on the box labeled “Create a New Virtual Machine.” Now, you should see two options: virtualize or emulate.
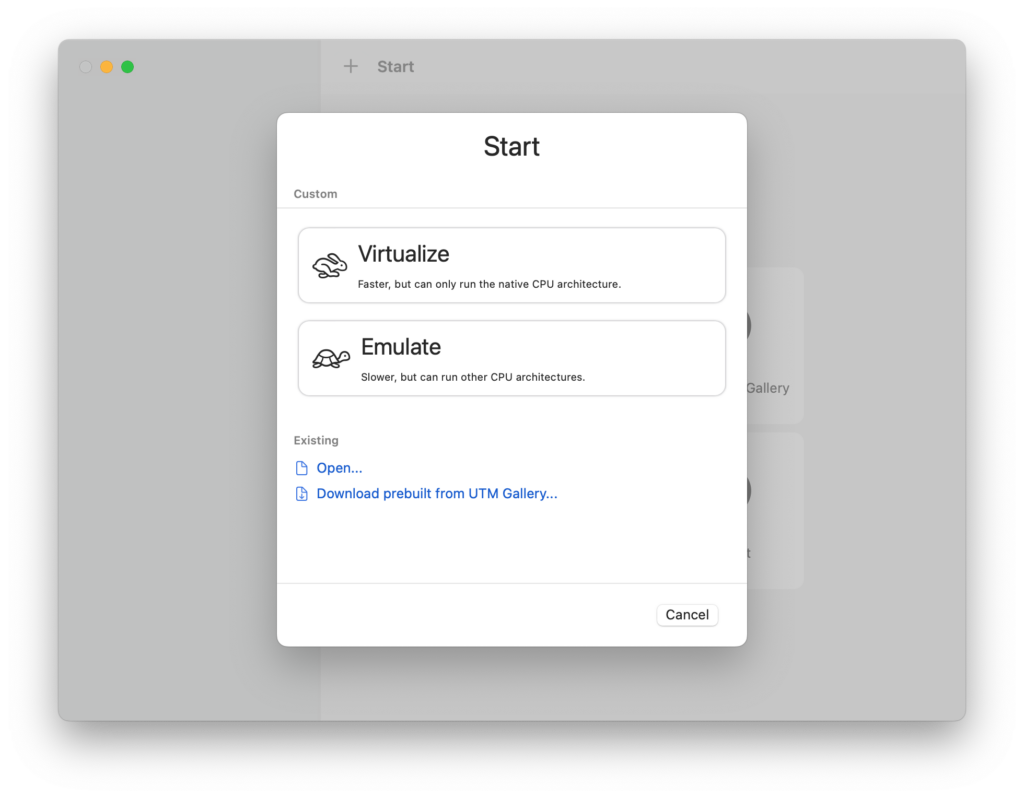
As we discussed earlier, for this project to work, we need to use an emulator, so go ahead and choose the “Emulate” option.
Next, it’s going to ask you what kind of operating system you want to install.
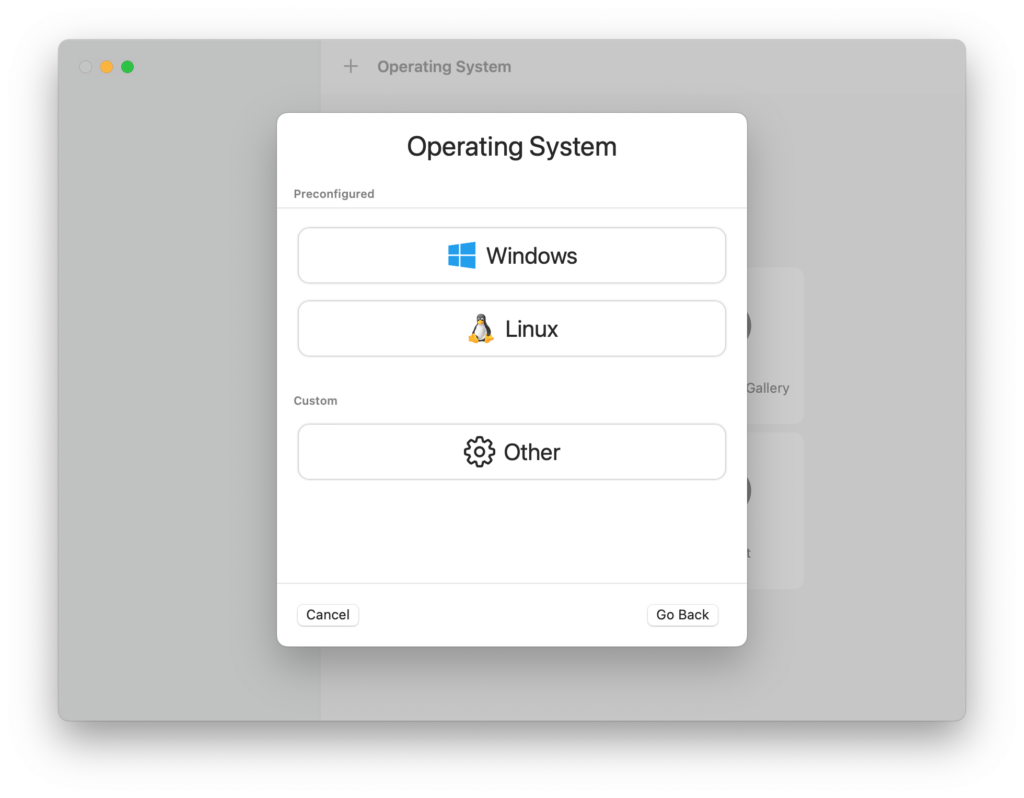
Since MS-DOS is definitely not on the list, we’re going to select “Other.”
Now, UTM should be asking us for a Boot ISO Image.
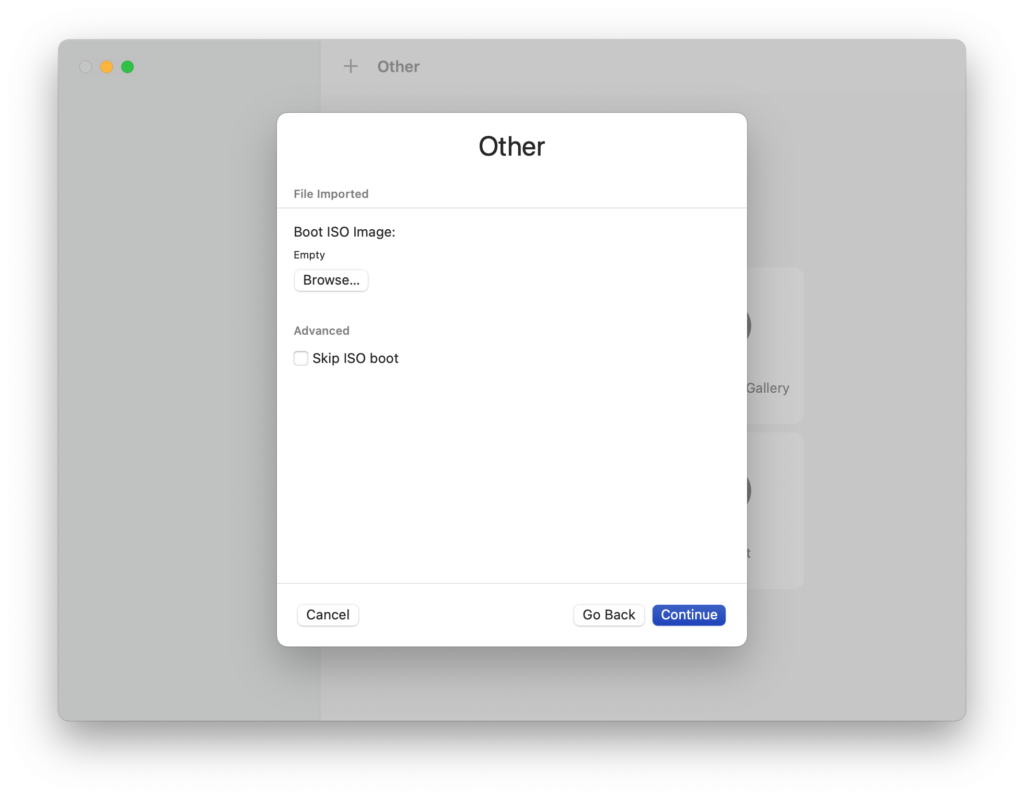
What it’s looking for is an image of a CD or DVD to install from, but we don’t have one of those. So we’re just going to click the checkbox next to “Skip ISO boot.” The screen should now look like this:
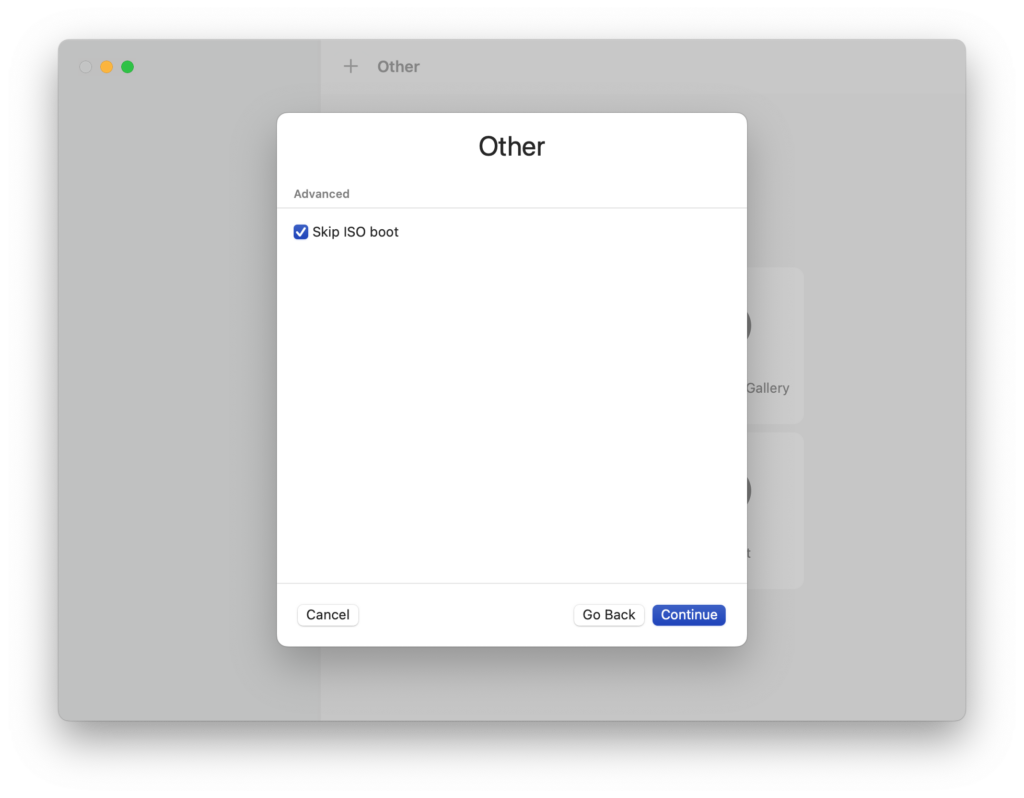
Go ahead and click “Continue.”
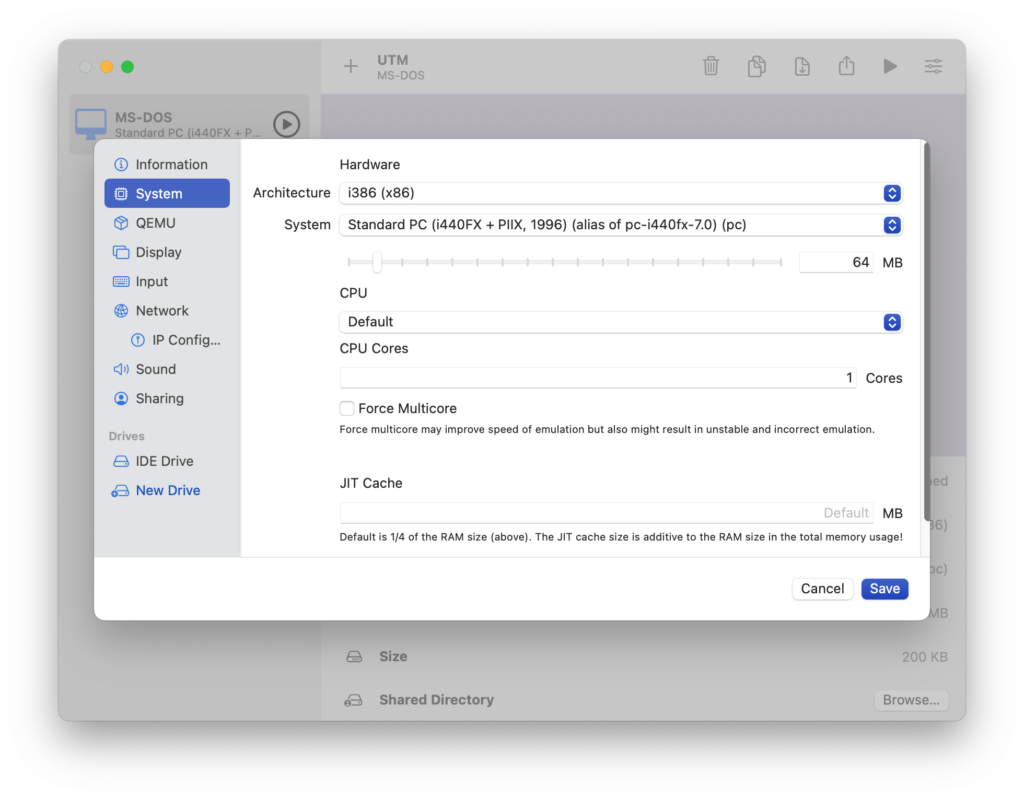
The next page asks about hardware.
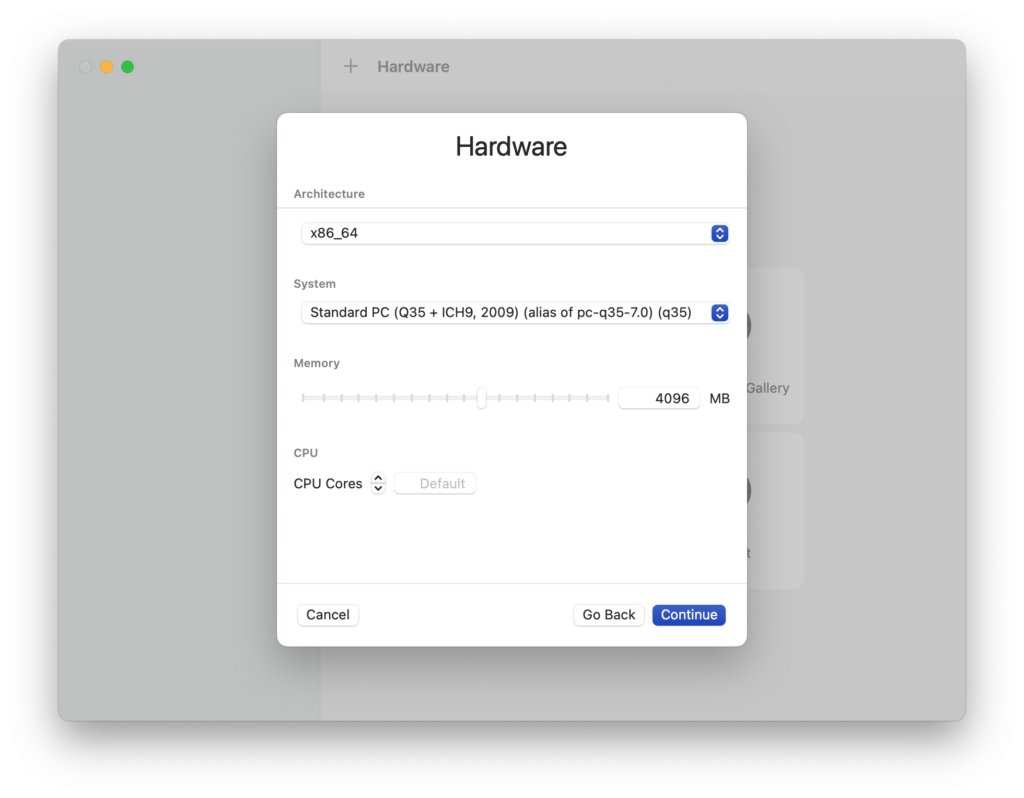
The default settings are too modern for us, so we’re going to make a few adjustments:
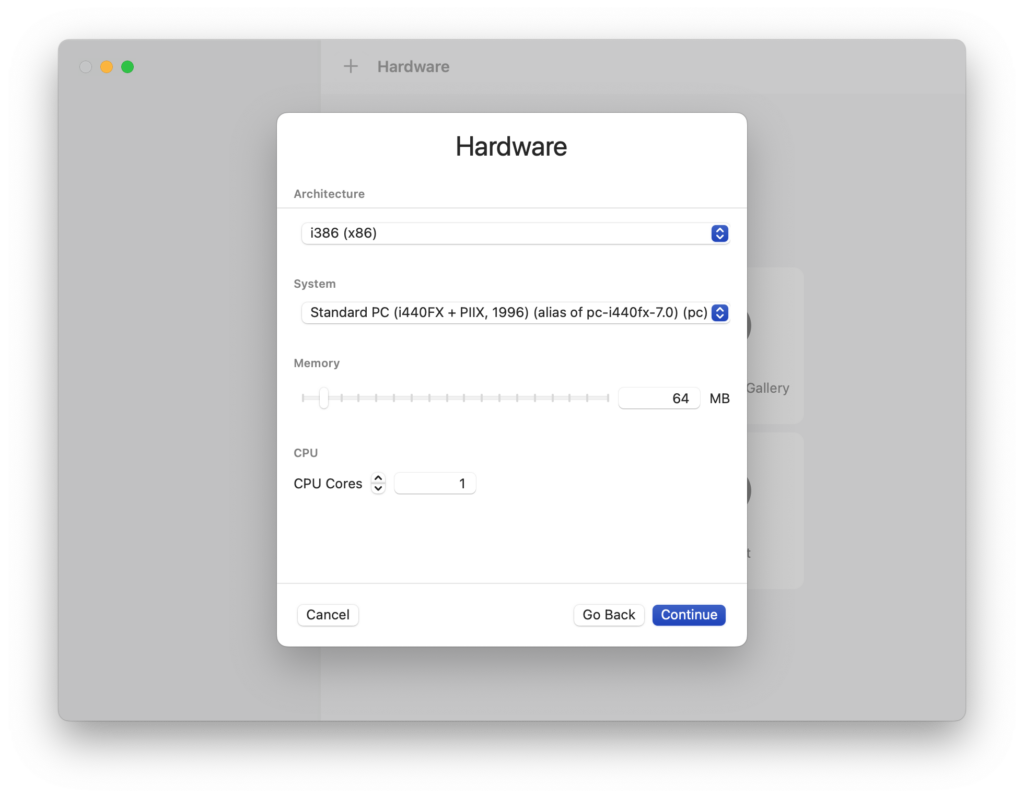
- Architecture: The default is “x86_64,” which describes the architecture of modern Intel and AMD consumer processors. This might work just fine since they are theoretically backwards-compatible with their predecessors, but just to be safe, let’s change this to “i386 (x86).” This should get the emulator to more closely mimic the less fancy processor architecture from the 80s and 90s.
- System: This setting tells the emulator what kind of chipset to mimic. Essentially, we’re telling it what sort of motherboard the pretend processor is being plugged into. By default, UTM wants to use a system that is once again too modern for us. We’re going to change it something based on much older components: “Standard PC (i440FX + PIIX, 1996) (alias of pc-i440fx-7.0) (pc).”
- Memory: If we don’t change this, the emulator will try to allocate way too much memory for our virtual machine. MS-DOS 6.22 can only recognize up to 64 MB, so let’s set this number accordingly.
- CPU Cores: I assume that “Default” means just one processor core, but just to be safe, let’s manually change that to “1.”
When all is said and done, our hardware settings should look like this:
Once again, let’s click “Continue.”
The following page asks us how large a virtual hard drive we want to create.
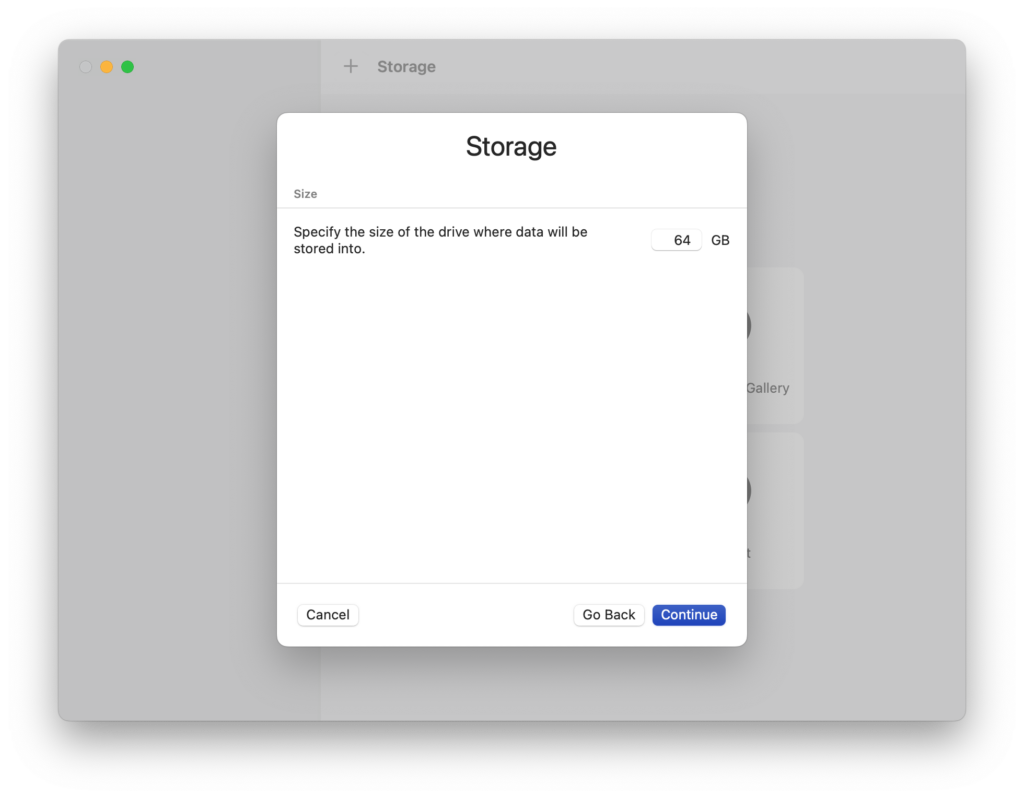
Although the default number is actually too large for DOS to handle, we’re going to leave it alone for now. UTM uses this setting to automatically create a virtual hard drive. Unfortunately, when using some older versions of UTM, I found that this drive got corrupted every time I shut down the machine. So just to be safe, we’re going to manually create the virtual hard drive later and attempt to adjust one of the advanced settings. For now, just click “Continue.”
The next page is titled Shared Directory.
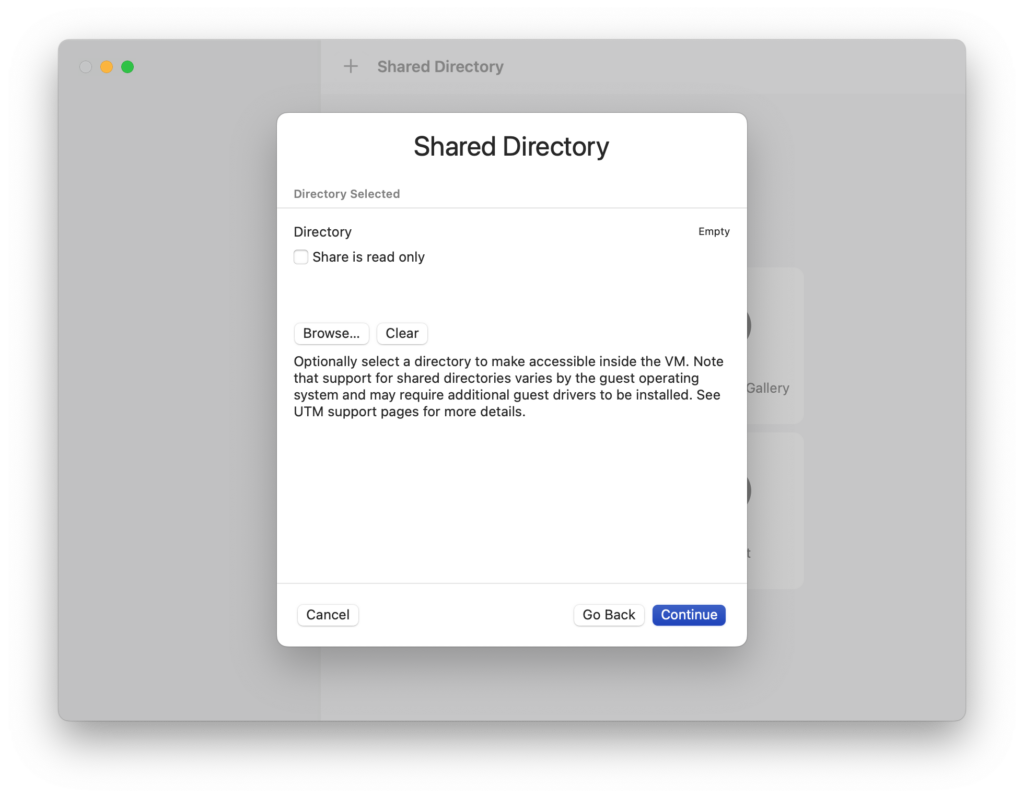
This functionality is designed to make it easier to share files between our host machine and our virtual machine, but I’m not convinced this is possible within MS-DOS. We’re just going to skip it and click “Continue.”
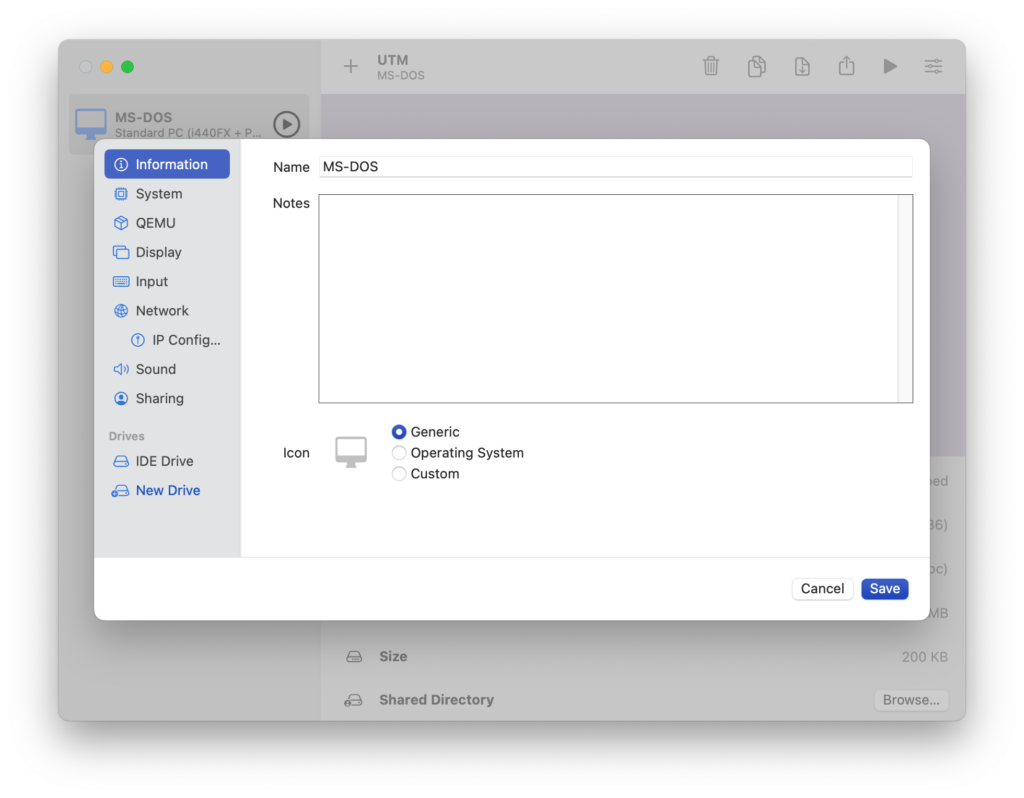
The final page shows us an overview of all the settings we chose.

There are two thing we should do here. First, let’s give the machine a more useful name, like “MS-DOS.” Then, we’re going to check the box labeled “Open VM Settings” because there are several more adjustments we need to make.

Once that’s done, we can click “Save.”
Step 2: Do Some Additional Configuration
We should now be looking at the virtual machine settings interface.
We’re going to use this to adjust some more “advanced” settings to ensure that our VM works as expected. Let’s start by clicking on System in the sidebar.
You’ll see some of the settings here that we chose earlier, but we’re going to make one additional adjustment. Right now, under, CPU, it should say “Default.” I’m not sure what kind of processor this machine actually defaults to, so we’re going to choose something more specific.
Let’s set the CPU to “486.”

Launched in 1989, the Intel 486 processor is the oldest piece of hardware on this list and was still in use when MS-DOS 6.22 was released in 1994.
Next, let’s click on QEMU in the sidebar.

On this page, we’re going to first uncheck the box labeled “UEFI Boot.” This will disable the more modern startup system that current computers use and force the virtual machine to use the legacy system that’s been around since the days of MS-DOS.
Then, just to be safe, we’re going to check the box for “Force PS/2 controller.” This will make extra certain that DOS is able to respond to our mouse and keyboard by ensuring that the machine emulates the PS/2 ports that these components used to plug into back before USB.
The settings should now look like this:
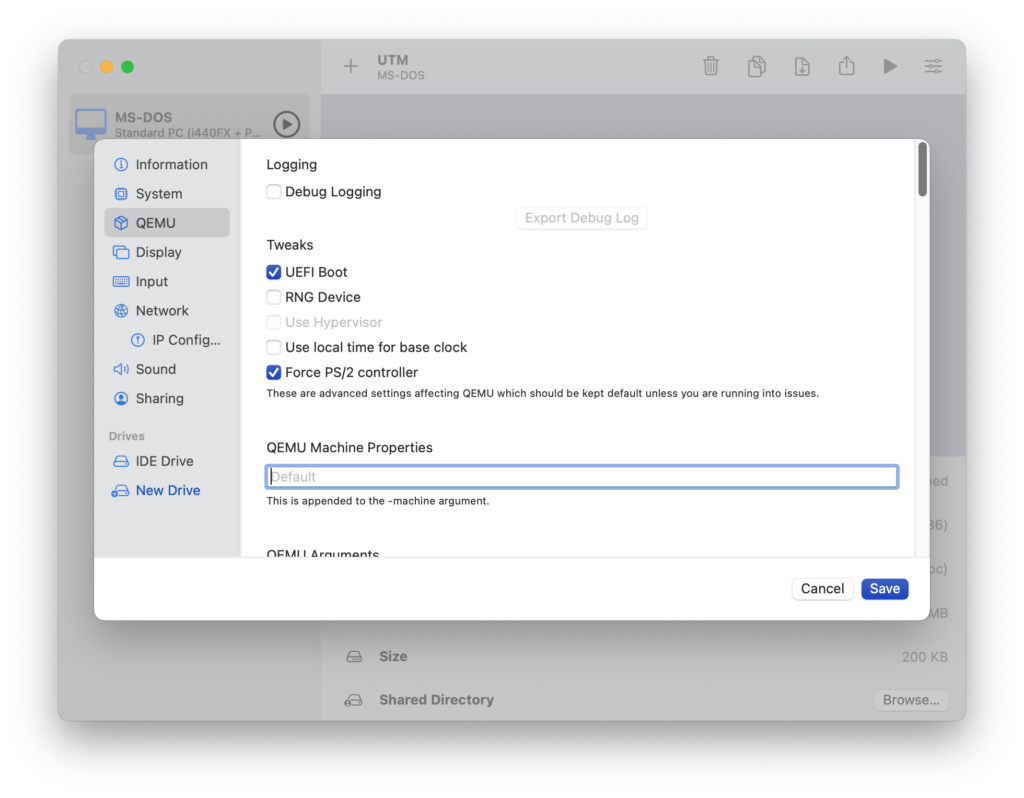
Everything else on this page can be left as is.
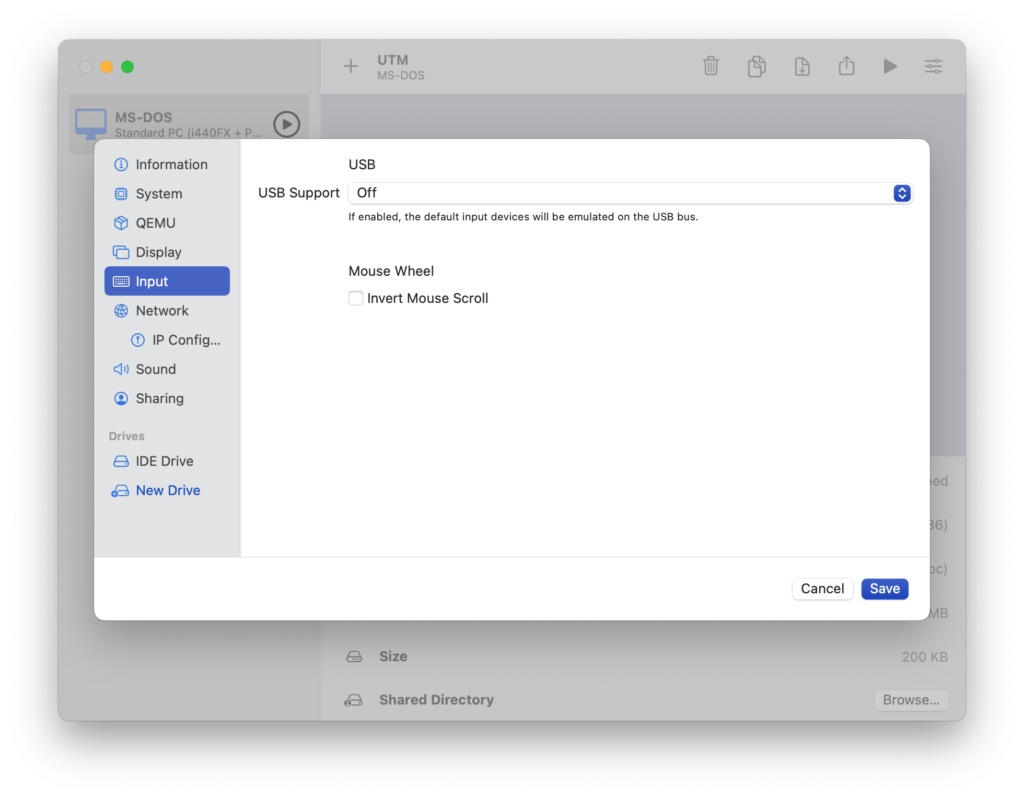
Now we’re going to go to the Input page.
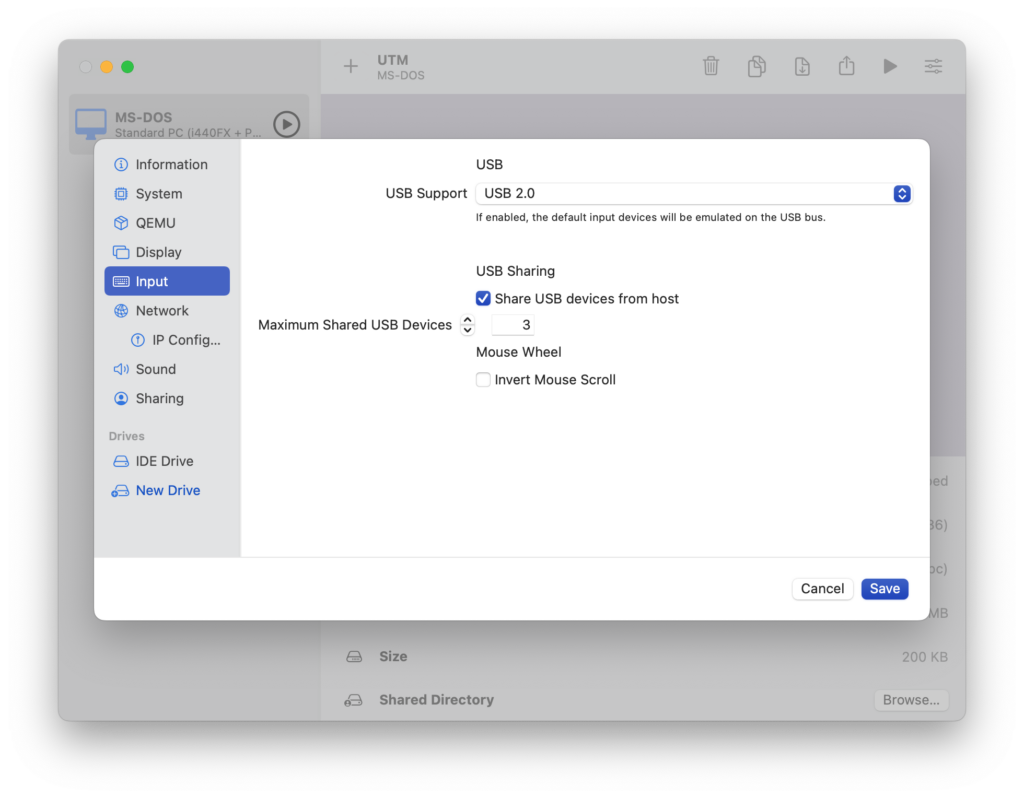
On this page we need to disable USB support. I’m not sure why this makes a difference, but all I know is that every time I tried to use DOS’s built-in file editor, the program would crash as soon as I tried to open a menu to save what I was working on. For some reason, once I disabled USB support, this stopped happening.
So, next to where it says “USB Support,” go ahead and select “Off.”
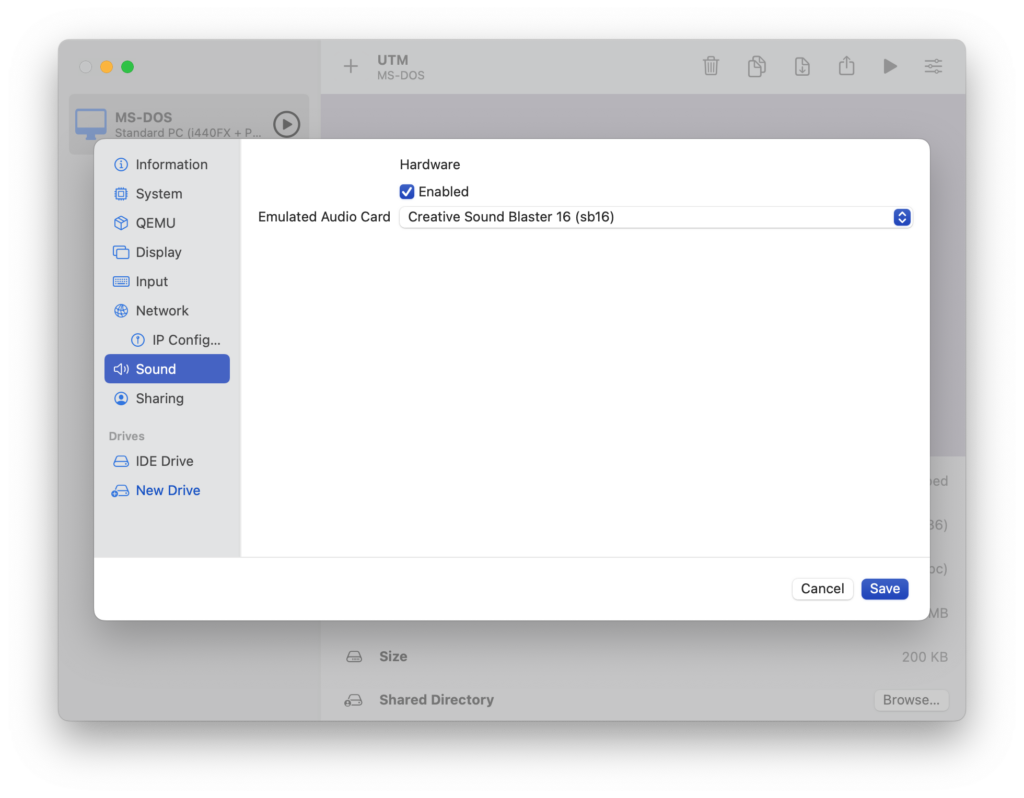
The next page we’ll take a look at is Sound. I have not yet tried to get sound to work, but my guess is that we should set the Emulated Audio Card to “Creative Sound Blaster 16” since that was a pretty typical device from the era.
The last thing we need to do is set up the virtual drives. At the bottom of the sidebar, you’ll see a section labeled “Drives.” Go ahead and select the first one.
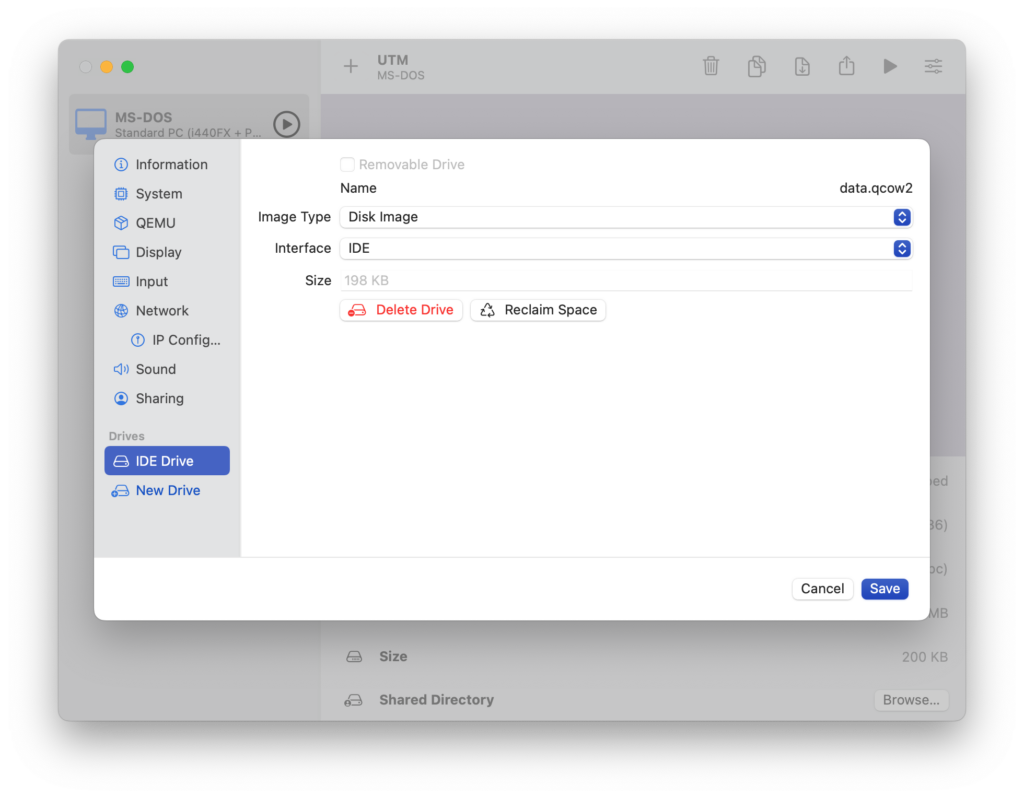
I mentioned earlier that UTM tries to automatically create a drive for us but that my testing found that this drive doesn’t work correctly. So we’re going to remove it by clicking the “Delete Drive” button.
Once we click that, the page we were looking at should disappear.
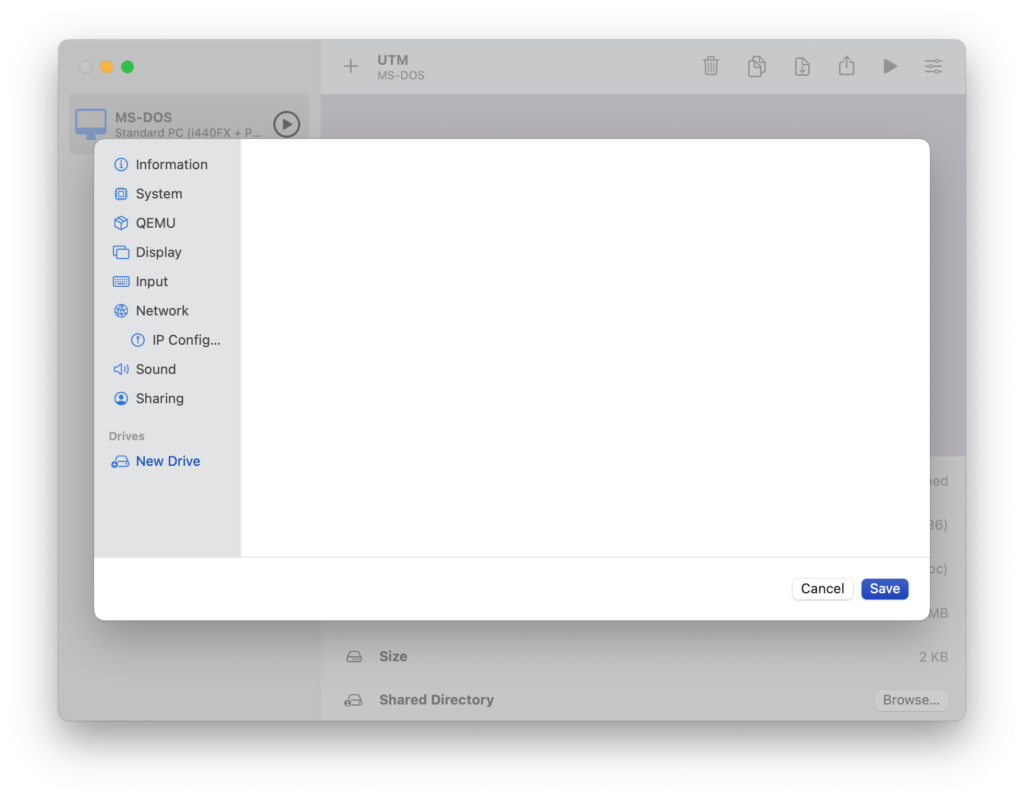
Now we need to select “New Drive” from the bottom of the menu, which should cause a little panel to pop up.
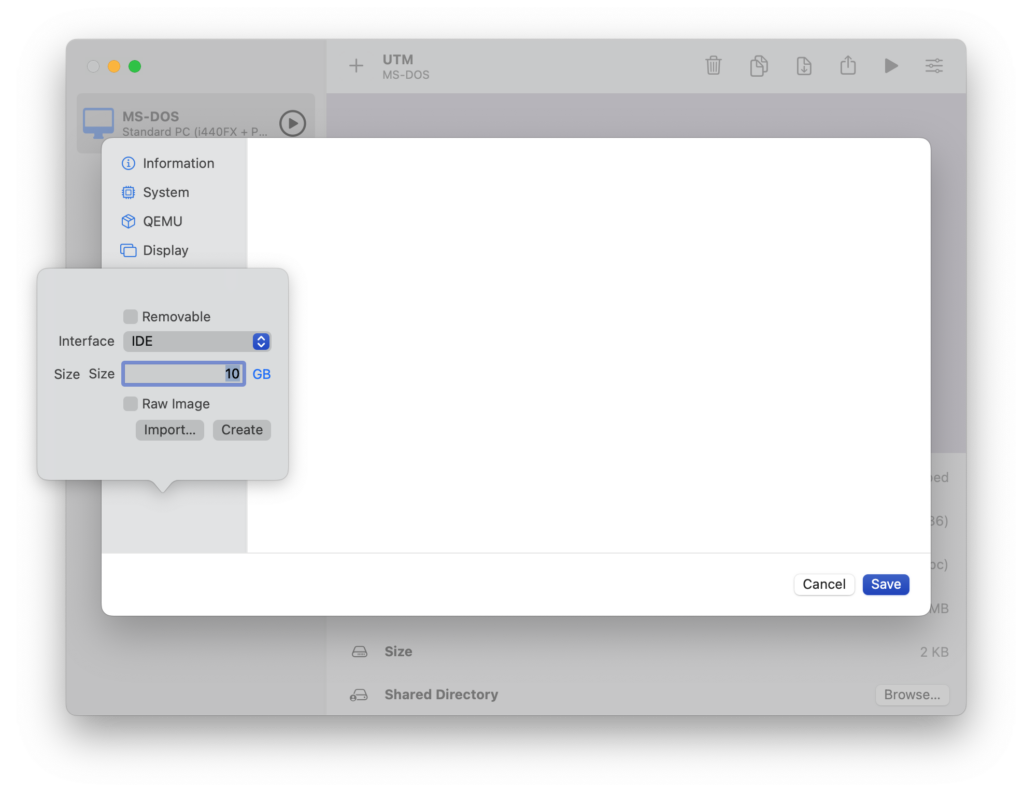
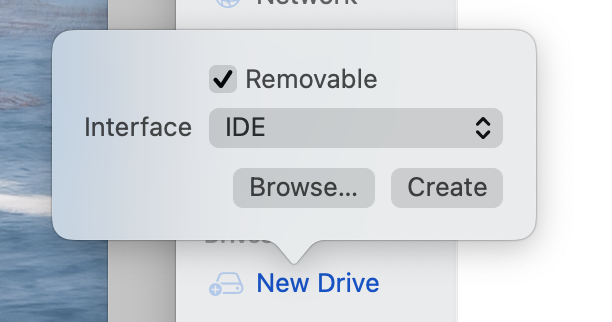
We’re going to start by creating a virtual CD-ROM drive. So check the box next to “Removable” and make sure that the interface is set to “IDE.”
Next, click “Create.”
The drive should now show up at the bottom of the menu. If you click it, you should see this:
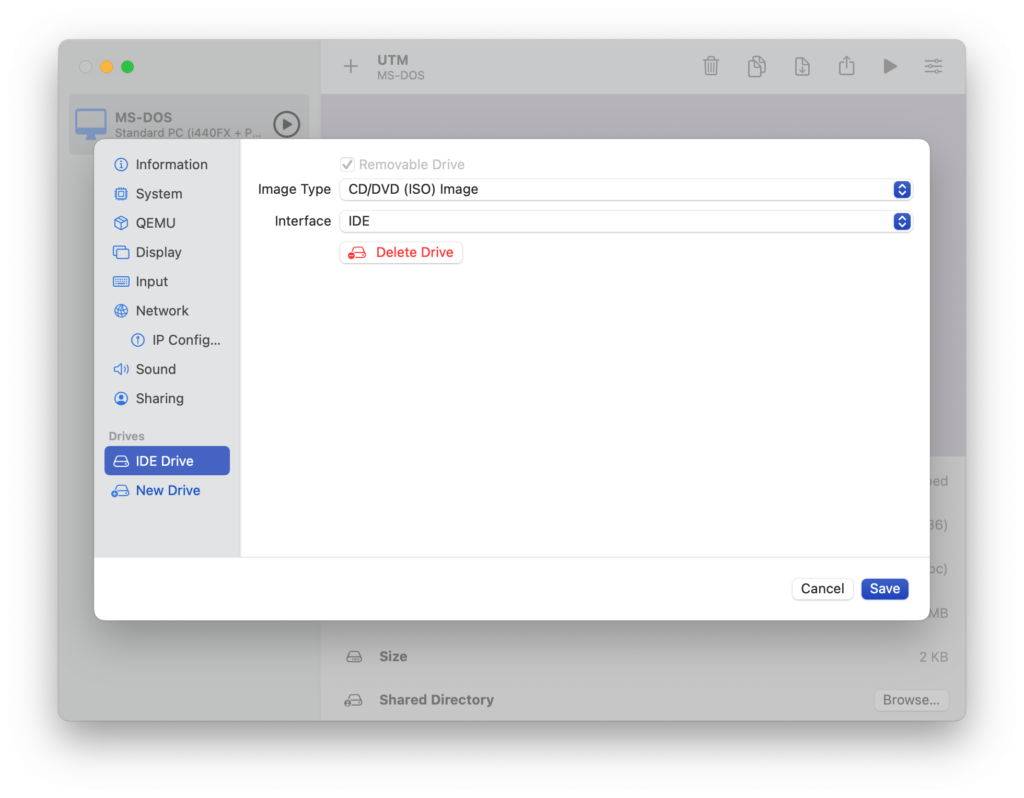
Make sure the Image Type is set to “CD/DVD (ISO) Image” and the Interface is set to “IDE.”
Now, we’re going to create a virtual floppy disk drive for our virtual computer. Click on “New Drive” again in the sidebar, and choose the exact same settings as before. Then, be sure to click on the newly created drive (the one at the bottom of the list). Your screen should now look something like this:

In order to make this virtual drive mimic a floppy drive, we need to change a couple settings. First, we need to set the Image Type to “Disk Image.” Second, we must change the Interface to “Floppy.” Our new settings should look like this:
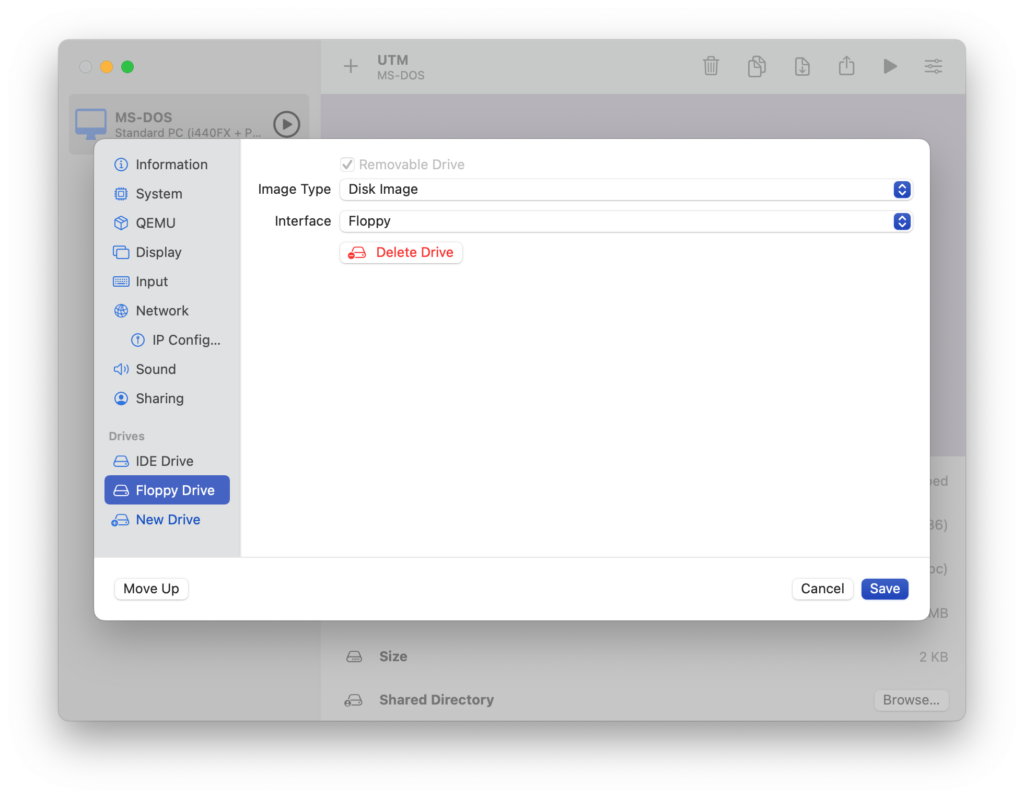
Notice that our drive’s entry at the bottom of the menu has changed to say “Floppy Drive.” Perfect!
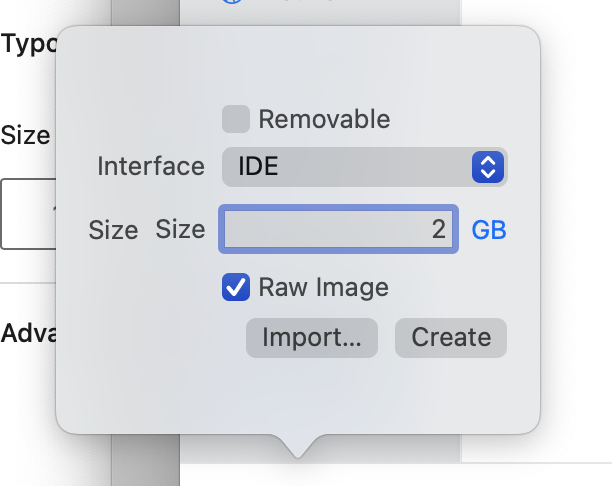
We have one last virtual device to create before we can fire up this virtual machine: the hard drive. Let’s click on “New Drive” one last time. But this time, we’re going to use some different settings. We’re going to leave the “Removable” box unchecked and make sure the interface is set to “IDE.” The size should be set no larger than 2 GB because MS-DOS 6.22 cannot recognize anything bigger than that.
Finally, we’re going to check the box next to “Raw Image.” This is the key setting that prevents the corruption issue I talked about before. (By default, UTM tries to save space on the host computer by creating a relatively small file to represent the hard drive and then growing it as additional space is needed. Something about this breaks our MS-DOS installation, so by selecting the “raw” option, we create a file the actual size of the hard drive which never needs to change.) The appropriate settings should look like this:
Note: Version 2.1.6 of UTM appears to have a bug that prevents the “Raw Image” checkbox from working. (It’s possible that other versions have this bug as well; I haven’t tested this extensively.) If you can’t check the box, don’t worry about it. The original bug that led me to include this step in the first place seems to have been fixed in more recent versions. I tested a virtual machine using the default settings in Version 2.1.6, and it worked just fine!
Once you’ve got your disk image configured, go ahead and click “Create.”
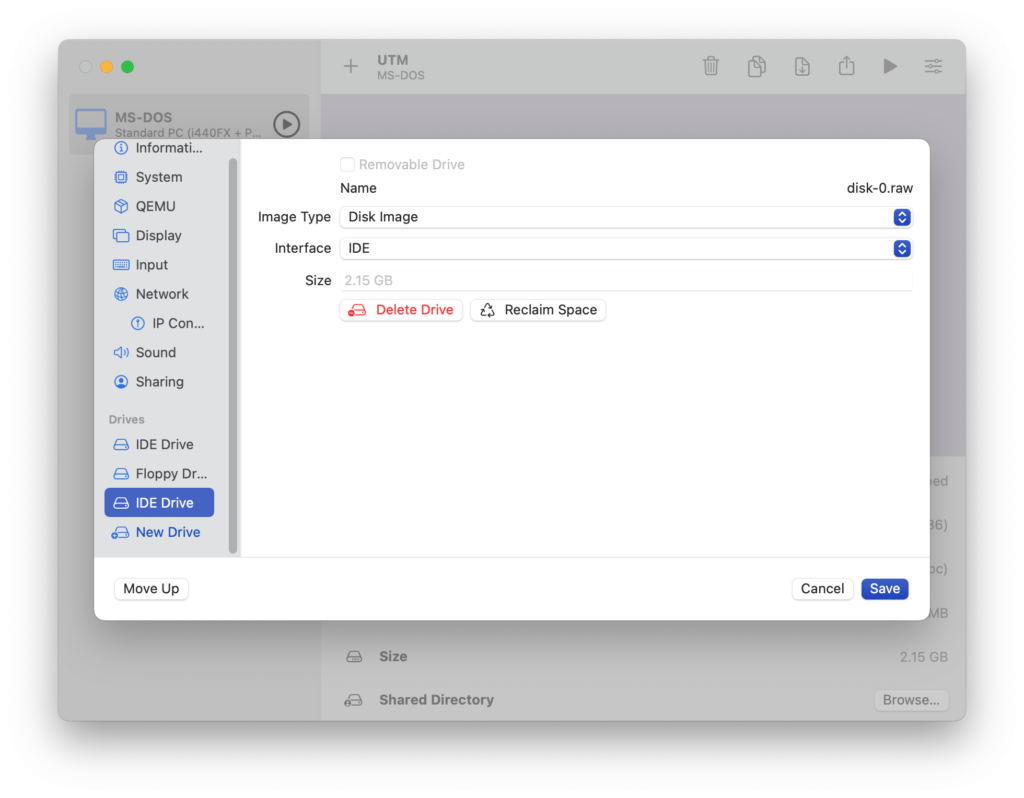
Now, if we click on the new drive in the menu, it should look something like the image below. (If you were unable to create a “Raw Image” due to the bug described above, your screen will look a little different. But based on my testing, it should still work.)
We are finally finished configuring the virtual machine, so let’s click the “Save” button in the bottom right corner.
Step 3: “Insert” Your Virtual Installation Disk
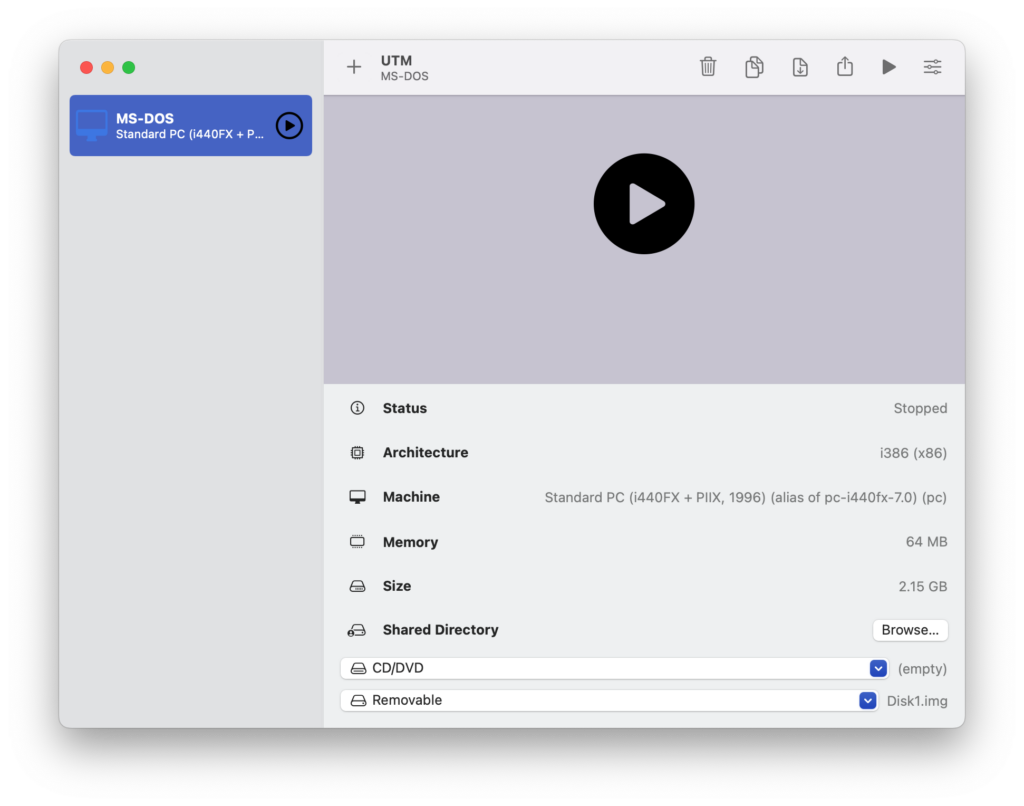
We should now be on a screen that looks something like this:
(If not, make sure the virtual machine is selected in the sidebar.)
We’re just about ready to actually get DOS running, but we’ve got just one more little step: We need to virtually insert our virtual installation disk into our virtual floppy drive.
To do this, we either need to make UTM’s window bigger or scroll down to the bottom of the page so that we can see two drop-down menus. One is for our virtual CD-ROM drive, and the other is for our virtual floppy drive. I’ve circle them in the screenshot below.

Click on the drop-down that says “Removable” and choose the “Browse…” option. This will open a file browser, which you can use to find your first MS-DOS disk image. My set came with three, so I’m going to choose the file named “Disk1.img.”
Once you’ve selected your disk image, its filename will show up next to the drop-down menu. (Look at the bottom-right corner of the image below, and you’ll see that it now says “Disk1.img.”)
Step 4: Launch the Virtual Machine
Note: We’re about to start up the virtual machine. If at any time you discover that your mouse has gotten “stuck” in the virtual machine’s window, press the CTRL+ALT or CTRL+Option keys on your keyboard to “release” it.
Okay, it’s time for the moment of truth! I count three different “play” buttons you can click to start this virtual machine. Any of them will work, but let’s use the one in the toolbar at the top of the window. (It’s the one shaped like a triangle.)
After we click the button, a new window will pop up. This window is our virtual machine’s display. You should see some status messages flash across the virtual screen, and eventually, the MS-DOS installer will appear. You’ll know it’s working if you see some classic gray-white text on a blue background.
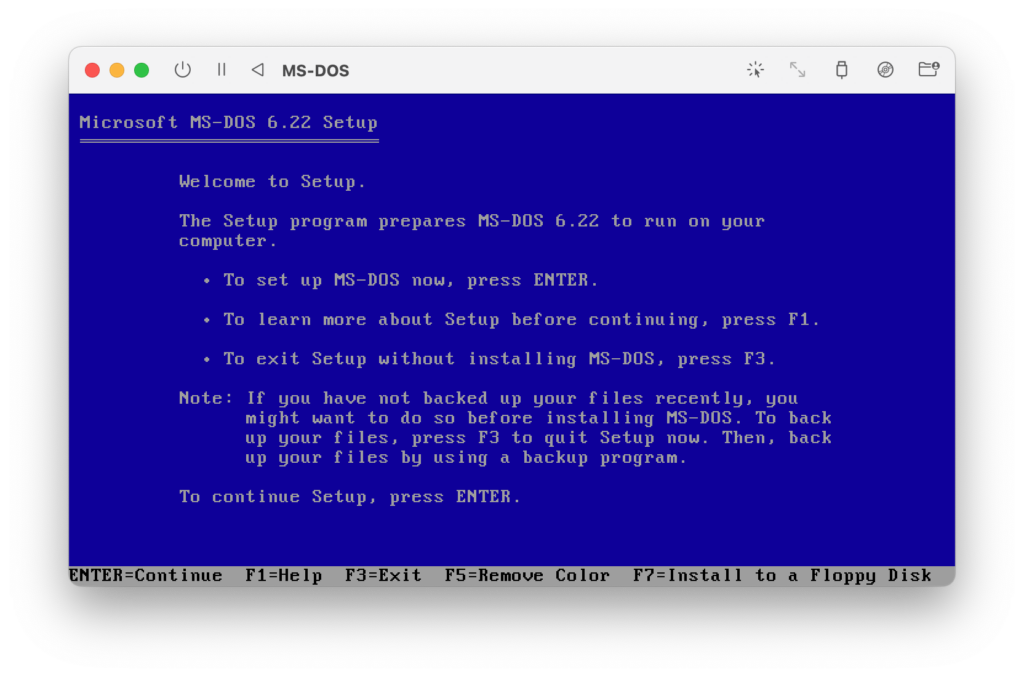
Step 5: Install MS-DOS
All we need to do now is press the Enter key, just like the instructions on the screen say, which should bring us to the following screen:
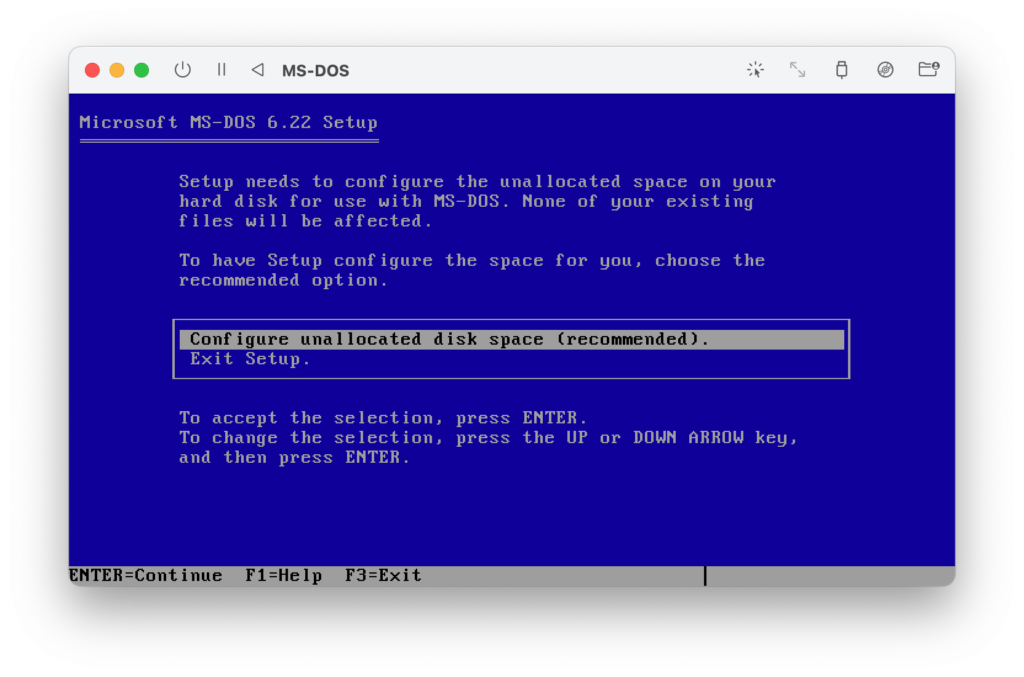
This step is telling us that we need to format the virtual hard drive. We just need to make sure “Configure unallocated disk space” is selected and press Enter again.
We’ll now see this helpful message informing us that the computer is about to reboot. (Remember: This is referring to the virtual computer.) It also says to “make sure Setup Disk 1 is in drive A.” We can feel pretty confident that this is already the case; otherwise, we would have never made it to this step!
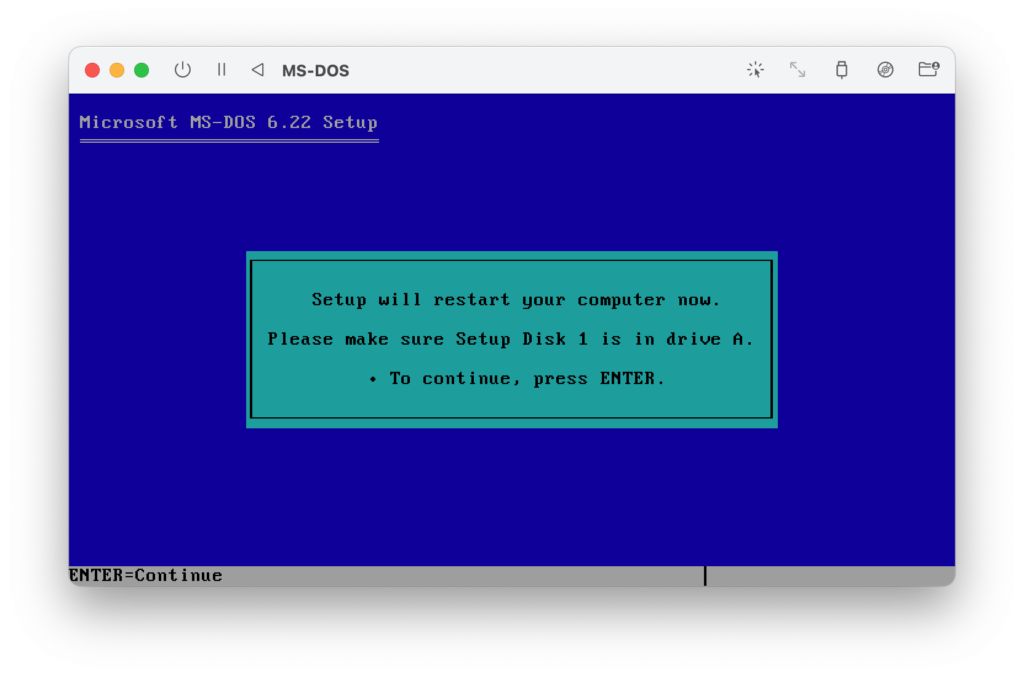
Press Enter one more time so that the installer can do its thing.
The virtual machine should reboot, and you should soon see a progress screen while the hard drive is formatted. Eventually you’ll get to a screen asking you to confirm some settings:
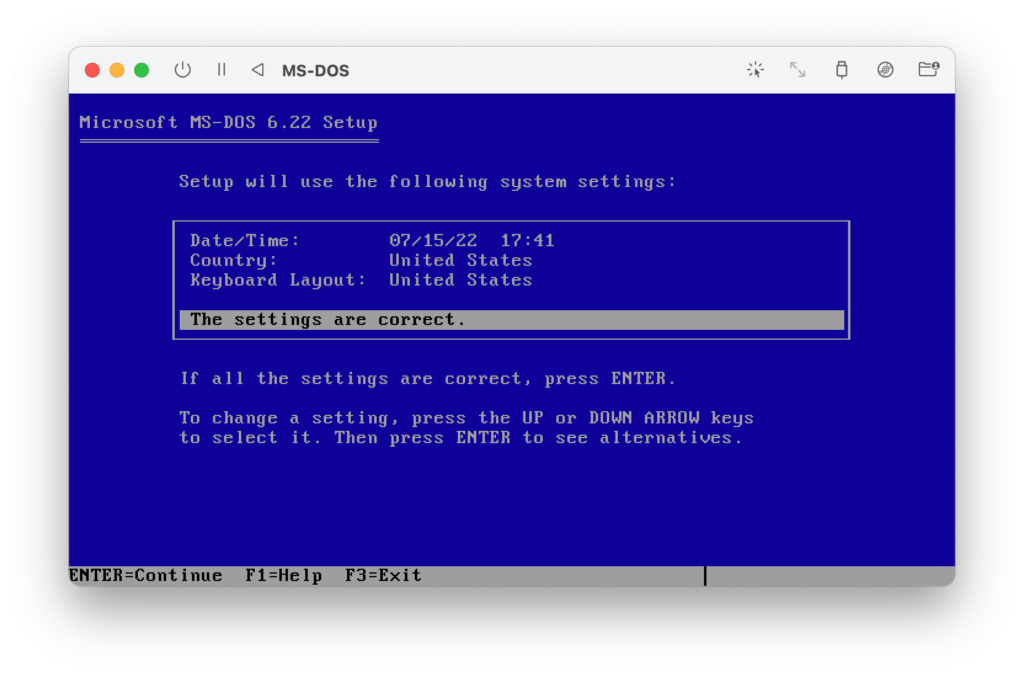
Make sure the Date/Time, country, and language are correct. (Remember that you can only use the keyboard to navigate this interface, so you’ll have to use the arrow keys.) Then, select “The settings are correct” and press Enter.
Now, the installer is going to ask you where to actually install everything.
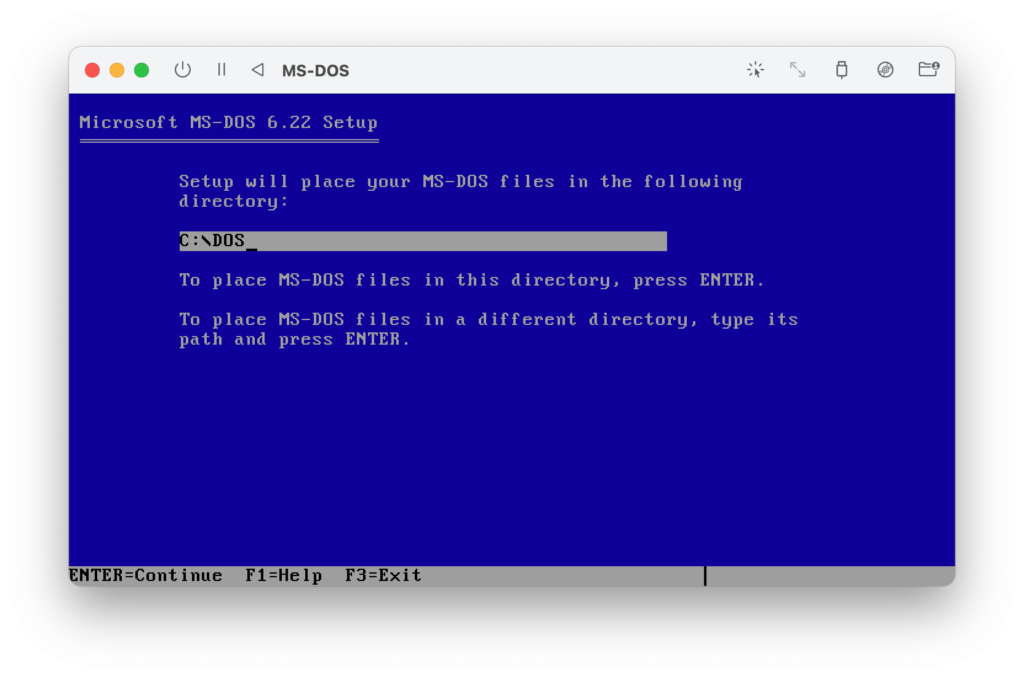
I actually find it pretty interesting that you can put your DOS files wherever you want, but for simplicity’s sake, let’s just stick with the default (“C:\DOS”). All we need to do here is press Enter.
Now, we should see a progress bar as files are copied to the virtual hard drive. Eventually, the progress will halt because we need to switch to the next install disk.
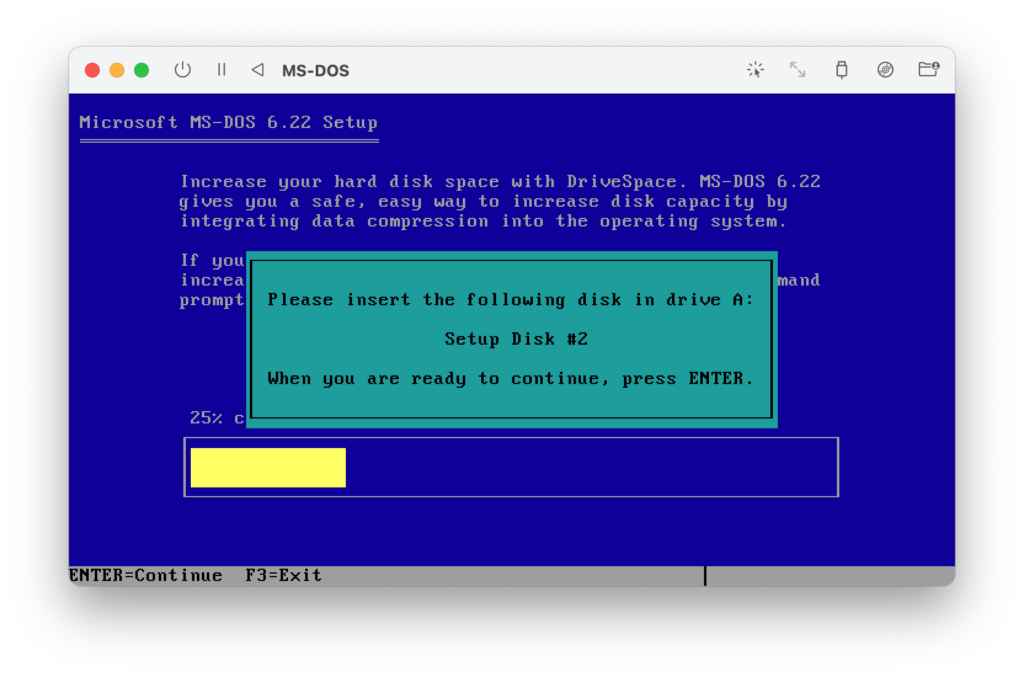
To switch the disk, we need to click the little icon in the toolbar that looks like a CD. This should pop up a drop-down menu. Hover over “Disk Image” and choose “Change.” This will open a file browser where you can find your next disk. Mine is called “Disk2.img.” Once the disk is selected, you can press Enter, and the installation should continue.
You will likely have to switch disks one more time before it’s over. Eventually, you’ll see a screen telling you to remove all floppy disks from their drives.
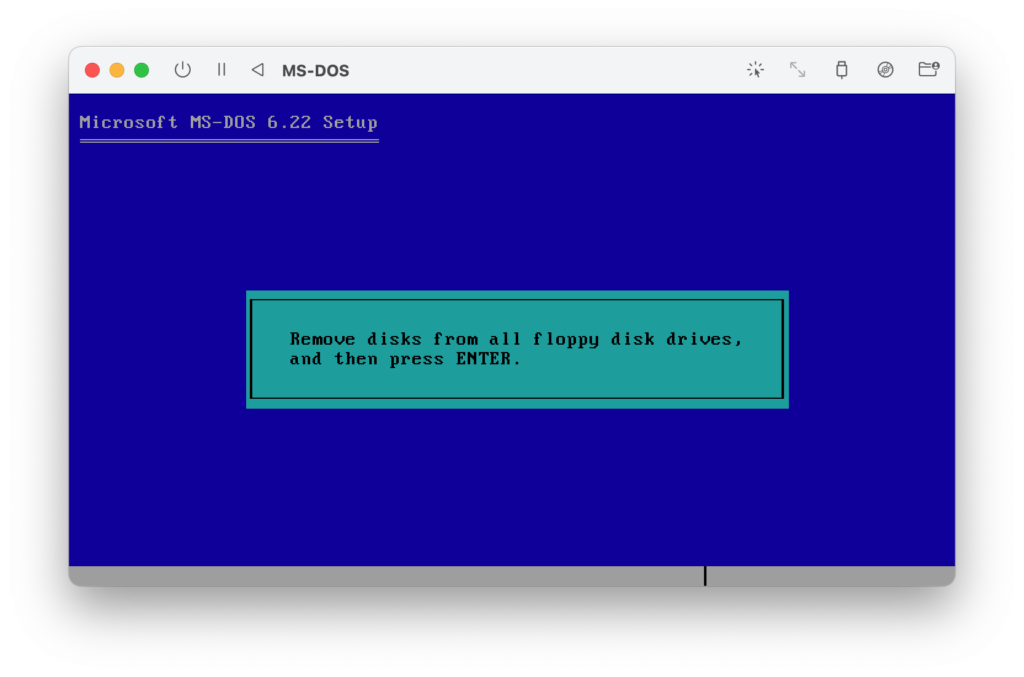
To eject the virtual floppy disk, go to that same menu we used to swap disks and choose the “Eject” option.
Once the disk is ejected, we can press Enter. The installer will essentially say good-bye to us and instruct us to press Enter one last time.
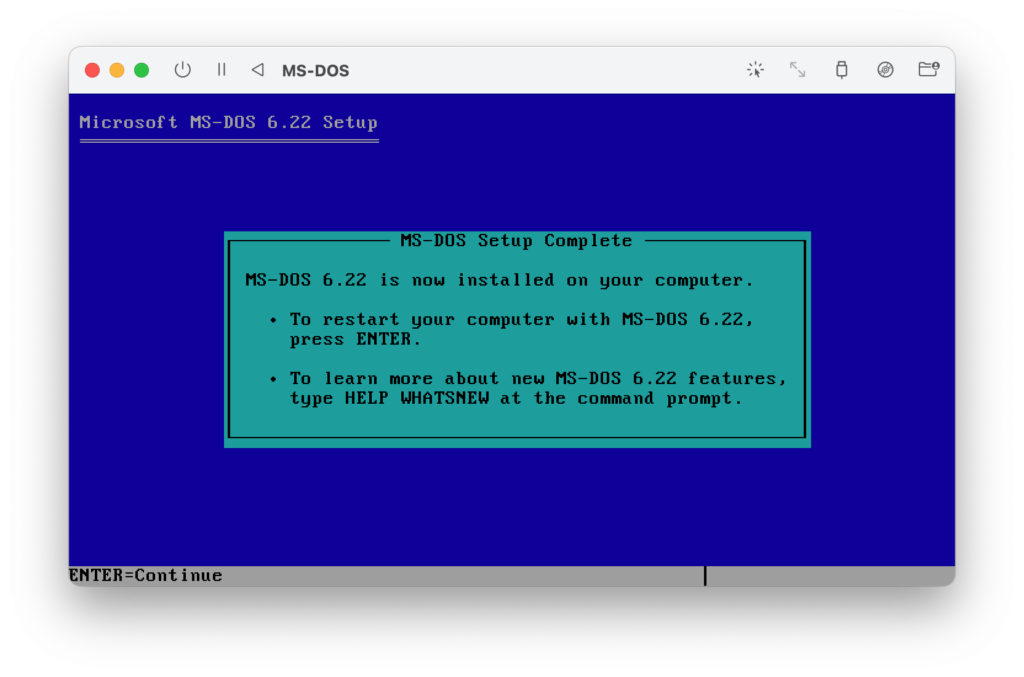
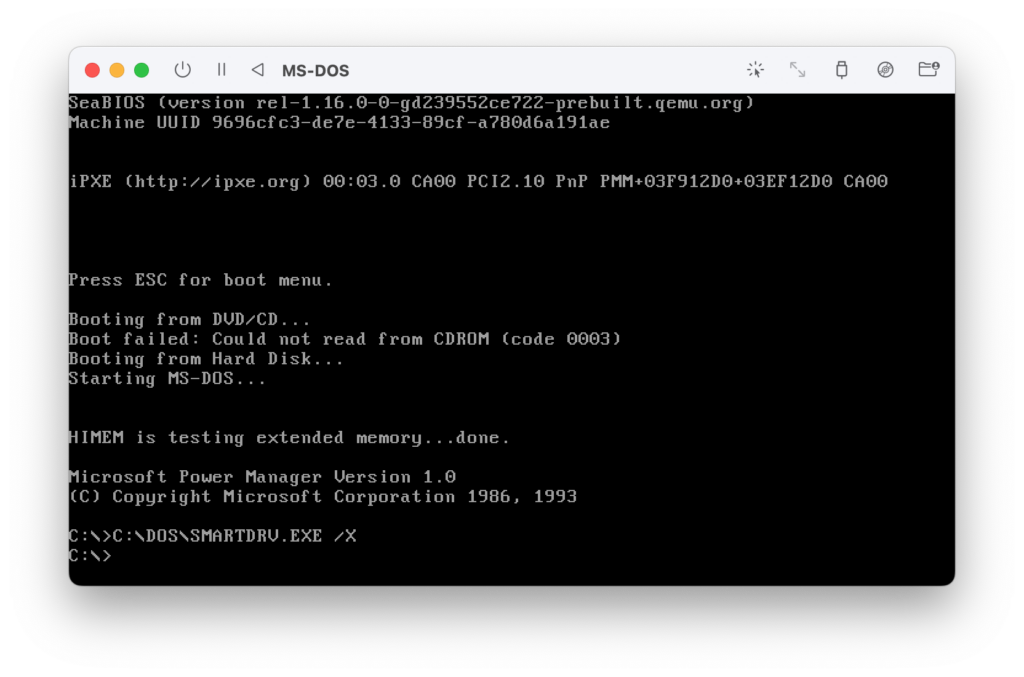
If we follow its directions, our virtual machine should reboot. And finally, if all has gone to plan, we should be greeted by the famous MS-DOS command prompt:
I take it all back. You really can run DOS on a Mac!
Step 6: Take a Trip Down Memory Lane
I could just end this tutorial here, now that I have sort of proved a point. But the real goal of this exercise was to be able to play a childhood computer game. So I’m going to walk you through a few more configuration steps.
We’re going to start by setting up extended memory. DOS originally could only deal with 640 kilobytes of memory, which is…not very much at all. As software applications got bigger and more complicated, and as newer hardware was developed to accommodate them, DOS needed to follow suit. However, DOS’s original memory limitations never technically went away. Microsoft and other developers basically just found ways to work around them.
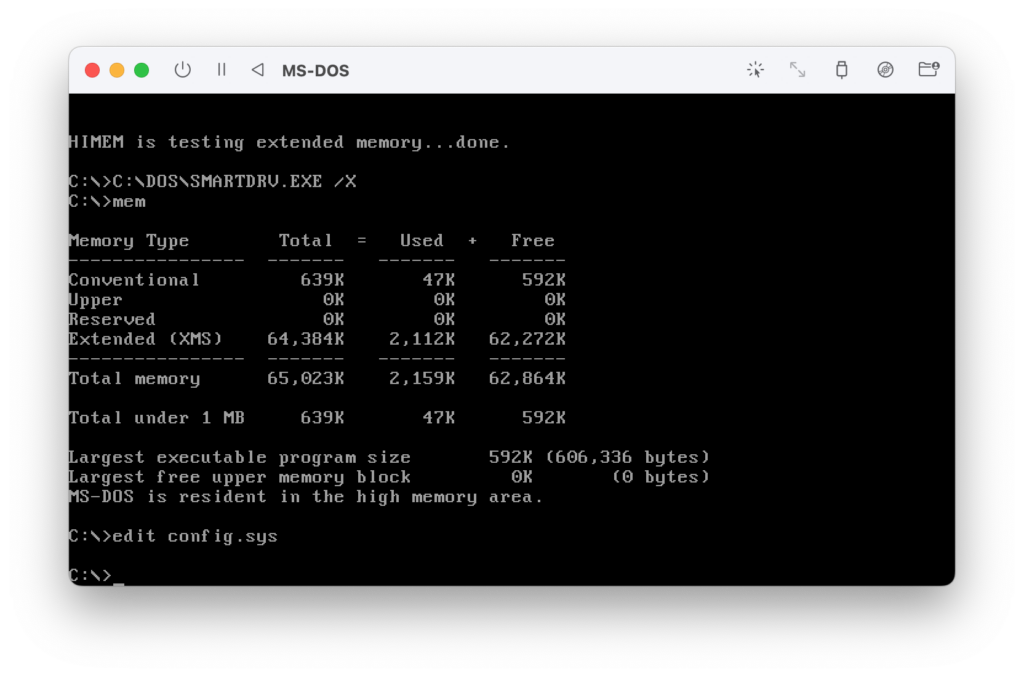
Explaining DOS memory management is probably beyond the scope of this tutorial, and frankly, I don’t fully understand it myself. But you can get an idea of what I’m talking about by typing in mem at the command prompt and pressing Enter.
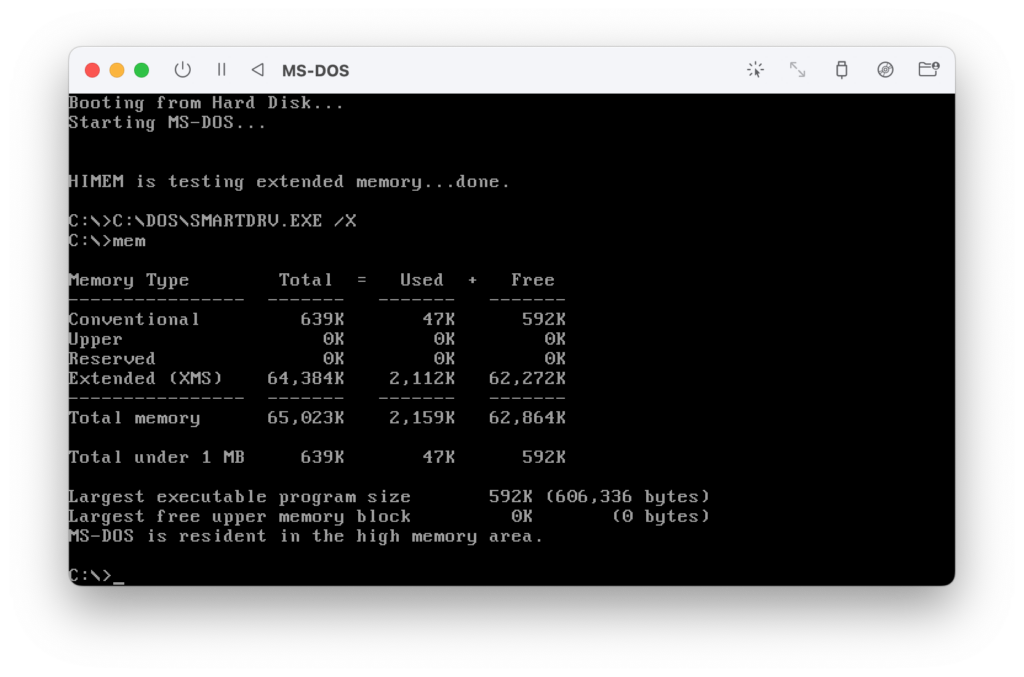
What this screen shows you is that DOS still only has 640K of “conventional” memory available. (It actually shows up as 639K in my VM. I’m sure that extra 1K is used for something important.)
All the rest of our memory is listed as “Extended (XMS)” memory. This memory exists because DOS 6.22 is set up by default to load a special driver, called HIMEM.SYS, that works some magic to make all this extra memory available.
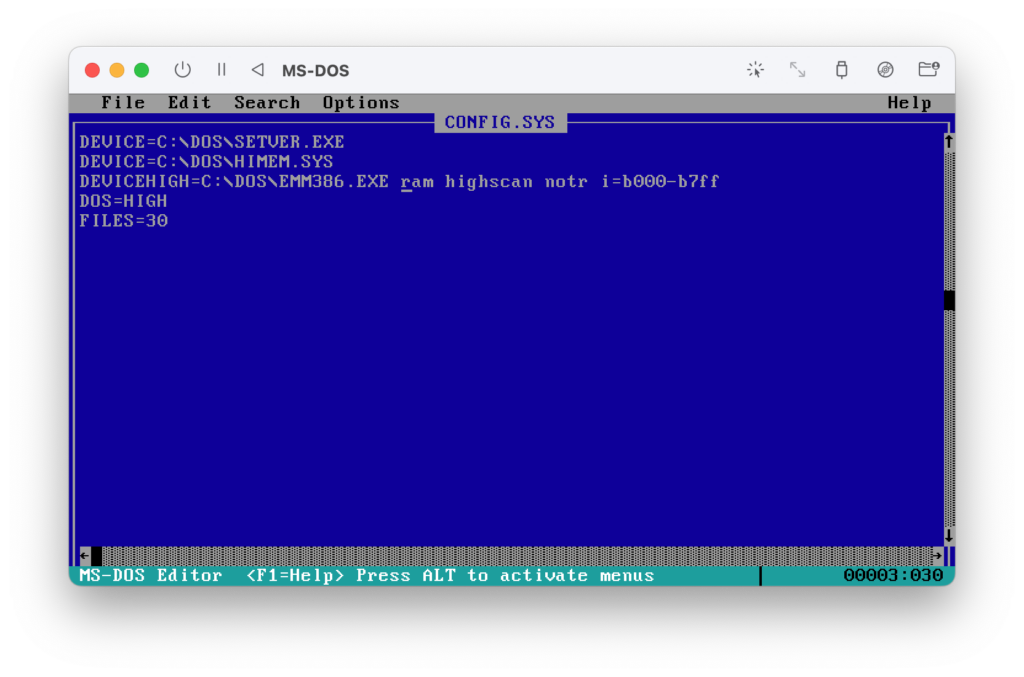
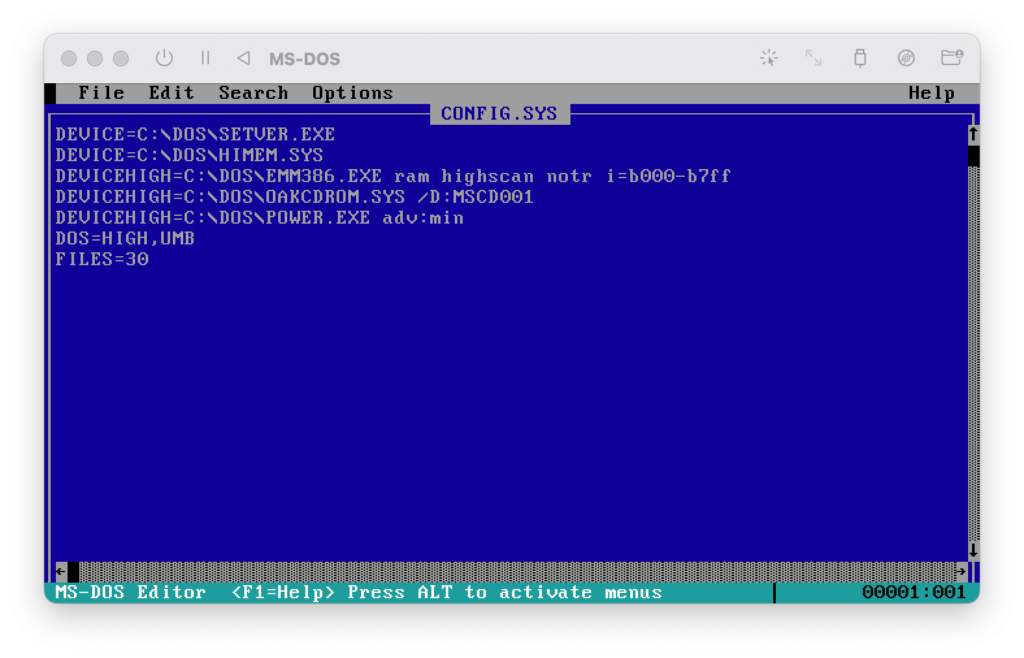
Let’s take a look at where it happens by typing in edit config.sys at the command prompt and pressing Enter. This should open up the beautiful (and very blue) MS-DOS file editor.
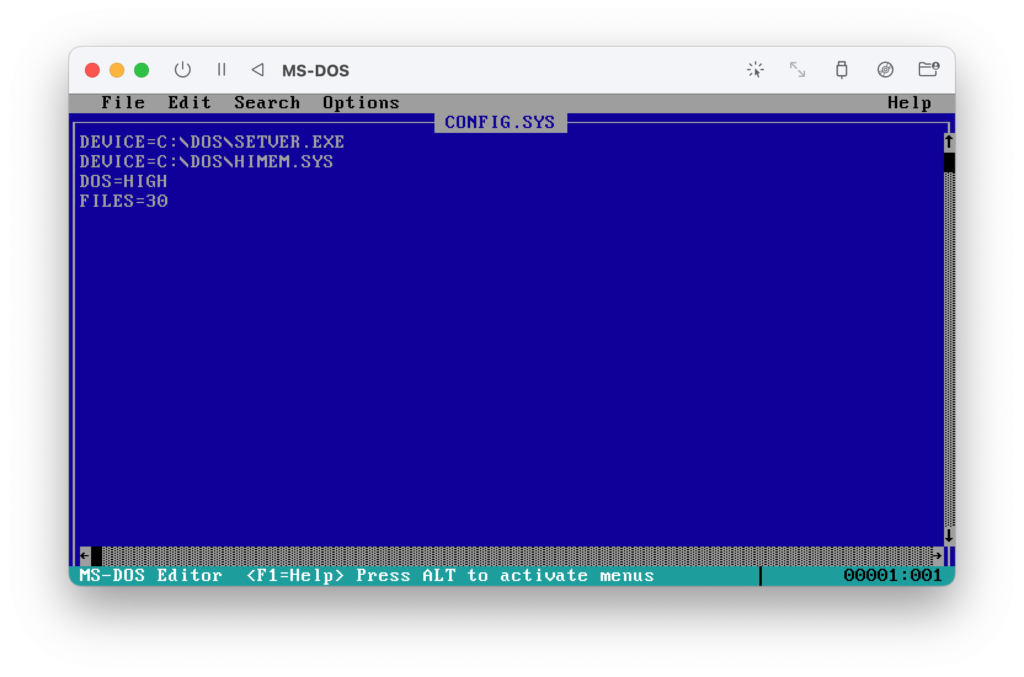
We’re looking at a file named CONFIG.SYS that lives in the root directory of the hard drive. At some point in DOS’s boot-up sequence, it loads this configuration file and follows the instructions contained within. Lines beginning with “DEVICE=” are used to load drivers that control system functionality. One of those drivers is HIMEM.SYS, which I mentioned above.
This HIMEM.SYS does a good job at sort of opening up access to the expanded memory, but apparently, if we want to actually use that extra memory, we need to load what’s called a memory manager. Fortunately enough, Microsoft includes one with DOS; they just don’t enable it by default. So we’re going to add the following line to the file immediately after the one for HIMEM.SYS:
DEVICEHIGH=C:\DOS\EMM386.EXE ram highscan notr i=b000-b7ffWe’re heading into some serious magic code territory here. The most important piece is DEVICEHIGH=C:\DOS\EMM386.EXE. This loads the expanded memory manger into the “high” memory area enabled by HIMEM.SYS. The rest of that gobbledegook is a series of options to tweak some aspects of how the memory manager operates. I borrowed those options from this incredibly informative tutorial, so if you want to know what they actually do, I would encourage you to check it out.
Anyway, once you’ve edited the file, it should look like this:
Next, we need to save our changes and exit the editor. If you’re using a Windows/PC keyboard, you’ll press ALT+F to open the file menu. If, like me, you’re using a standard Mac keyboard, you’ll need to press Option+F instead. (Apple’s Option key always corresponds to the ALT key.)
You should see the menu pop open like so:
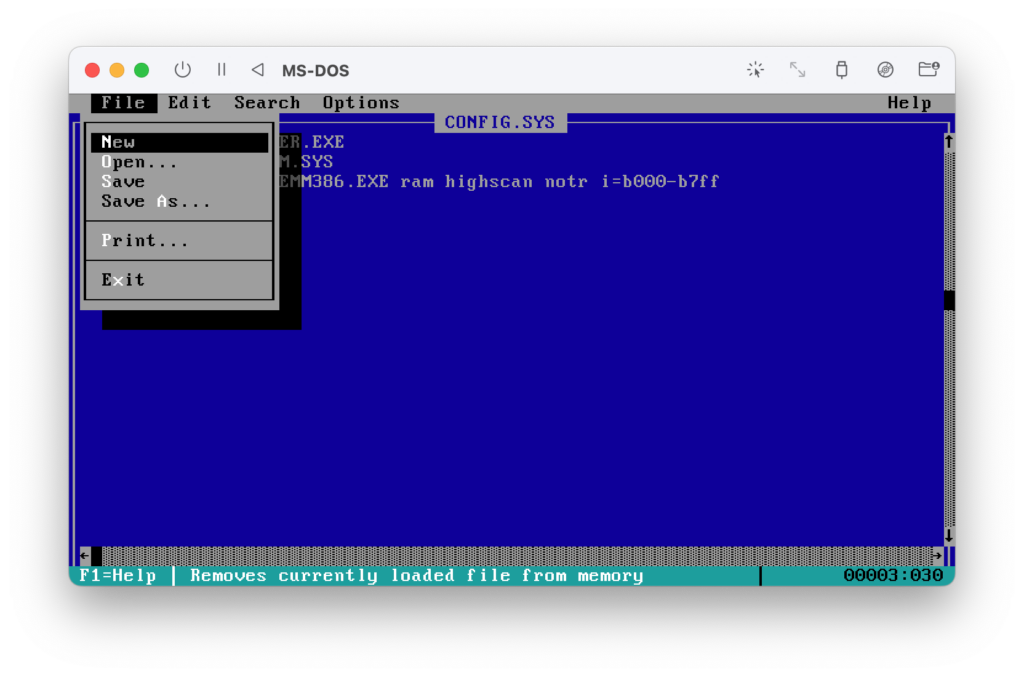
Now, you can use the arrow keys on your keyboard to navigate to “Save” and then press Enter. Or, you can speed things up by half a second and just press the S key. (Notice how it’s been highlighted to let you know that this is the shortcut.)
We should now open the file menu a second time (ALT+F or Option+F) and choose “Exit,” which will take us back to the command prompt.
To see if our changes worked, we need to reboot the computer. On a PC keyboard, we would press CTRL+ALT+DEL to reboot. On my full-length Mac keyboard (the kind that includes a numeric keypad all the way on the right), I can hold down CTRL+Option and then press the forward delete key (the one that appears above the arrow keys in the little cluster between the main keyboard and the numeric keypad). If you’re using a small Mac keyboard that doesn’t have a forward delete key, you’ll need to hold down CTRL+Option+Fn and then press the regular Delete key.
If you’ve properly performed the so-called “three-fingered salute” (though I guess it’s a four-fingered salute on small Mac keyboards), the virtual machine should reboot and eventually take you to a new command prompt.
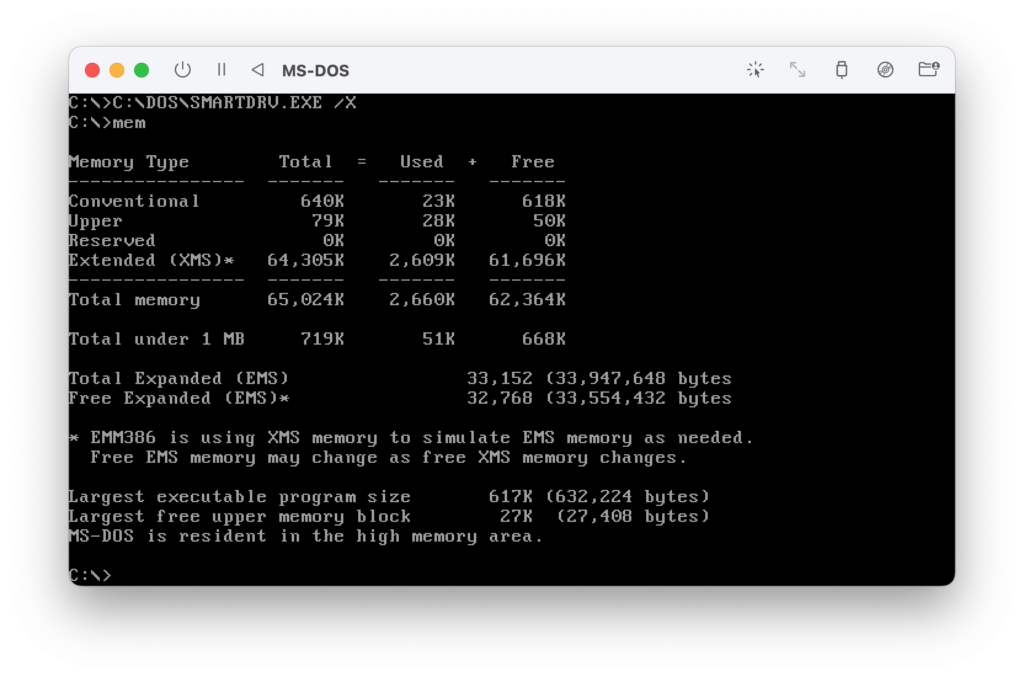
We can test whether our changes worked by typing mem once again, pressing Enter, and inspecting the output:

A couple things have changed: my missing 1K of conventional memory has actually returned, and now we see this note about how EMM386 is using XMS memory to simulate EMS memory. We don’t need to worry too much about what that nonsense means, but you can read up on it in the tutorial I linked above if you want.
We’re going to make one more change now to ensure optimal memory management. We’re going to type in edit config.sys again and press Enter so that we can tweak one of the lines in the file.
Find the line that says DOS=HIGH and change it to say DOS=HIGH,UMB. (“UMB” stands for “Upper Memory Block.”)
The actual details of what that does are a little hairy, but if you save the file, reboot the virtual machine, and run the mem command again, you’ll see that we now have some “Upper” memory available, more memory available “under 1 MB,” a larger “largest executable program size,” and a “largest free upper memory block” of 27K instead of 0.
These all seem like good things, so let’s move on!
Step 7: Manage the Power
So, I had no idea about this when I was a kid fooling around with DOS, but apparently the operating system actually has some power management features built in. I don’t know much about what they do, but I did learn from the tutorial I’ve mentioned a couple times that it’s a good idea to turn them on if you’re running DOS in a virtual machine. Apparently, this will prevent the virtual machine from using more of your host machine’s processing power than it needs to.
To do do this, we’re going to—surprise!—edit the config.sys file yet again. By now, you should know how to do this. So I’m just going to tell you to add the following line right after the one for EMM386.EXE:
DEVICEHIGH=C:\DOS\POWER.EXE adv:minThe file should look like this before you save it. Once you’re back at the command prompt, go ahead and reboot the virtual machine again.
You should now see a new piece of information show up after all the status messages indicating that the Power Manager has loaded.
Although that’s all you’ll ever see on the screen, I can confirm that this does actually do something. Prior to adding this command to my CONFIG.SYS file, the virtual machine was using 100% of my processor (according to Apple’s Activity Monitor) even when I wasn’t doing anything with it. Once I saved the config file and rebooted, the number dropped to the single digits. I certainly don’t want to make my computer work harder than it needs to, so I’m glad I discovered that tip.
Step 8: Create a Virtual Floppy Disk
Okay, things are progressing nicely. We now have a functional machine with some basic memory management and even power management in place. Wouldn’t it be nice if we could actually install some programs on this thing?
Well, to do that we need a way of actually getting stuff onto the machine. The most logical method would be to mimic the way we’d do this in 1995: a blank floppy disk!
To create a blank floppy, let’s open up the Terminal app on the host machine (in my case, my MacBook Pro).
Now, we need to type in the following command:
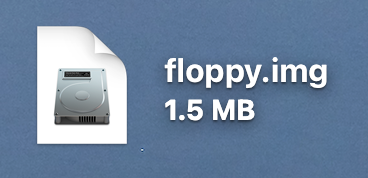
dd bs=512 count=2880 if=/dev/zero of=/Users/[username]/Desktop/floppy.imgNote: You’ll need to replace [username] in the command above with your actual macOS user name. If you’re not sure what your name is, just type whoamiin the terminal and hit Enter.
This command basically copies a whole bunch of zeros into a file the exact size of an old 3.5″ diskette (which, incidentally, could hold 1.44 megabytes of data—something I find just wild when I think about how many gigabytes of data I can fit on one of the tiny SD flash cards we use for the cameras in my journalism classroom). The file should appear on your desktop.
This disk image we’ve created is unformatted; we can’t do anything with it yet. So let’s format it!
The first step is to insert it (virtually) into our virtual machine. Just like when we were installing DOS, we can click on that little icon in the virtual machine’s toolbar that looks like a CD, hover over “Disk Image (floppy)” and choose “Change.” This time instead of an installer, we’ll choose the floppy image that now lives on our desktop.
Before you move on, double-check that the disk was selected correctly by clicking the icon again and making sure the name of the new disk (“floppy.img”) shows up in the menu.
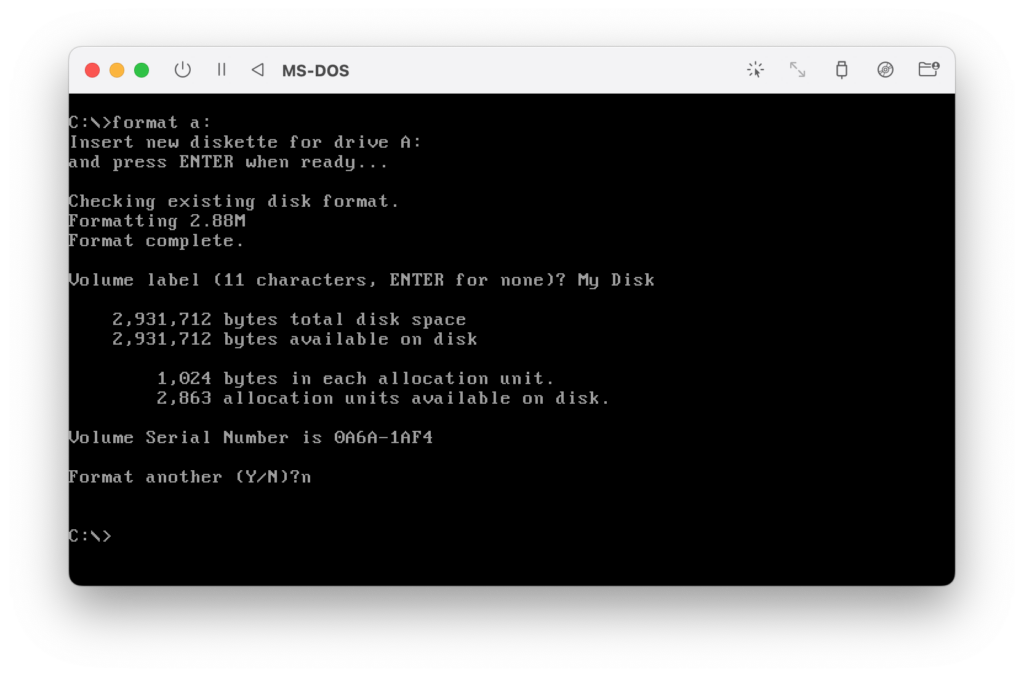
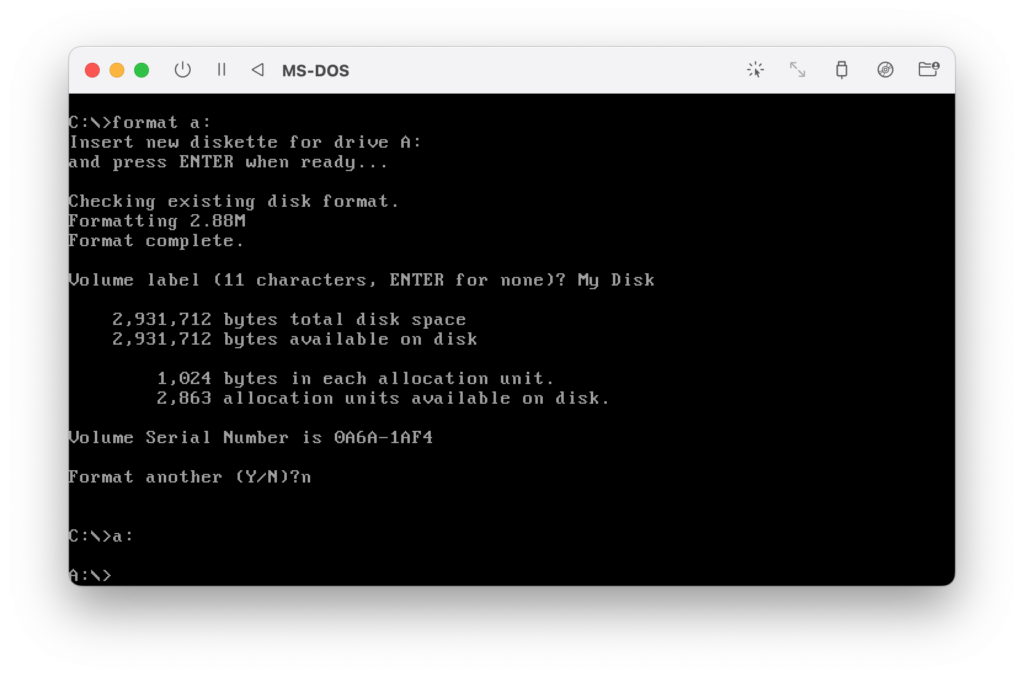
Now, let’s return to the DOS command prompt. We’re going to format our blank disk by issuing the following command:
format a:After you press Enter, you should a message asking us to insert a disk. (It turns out we’re one step ahead of things.)
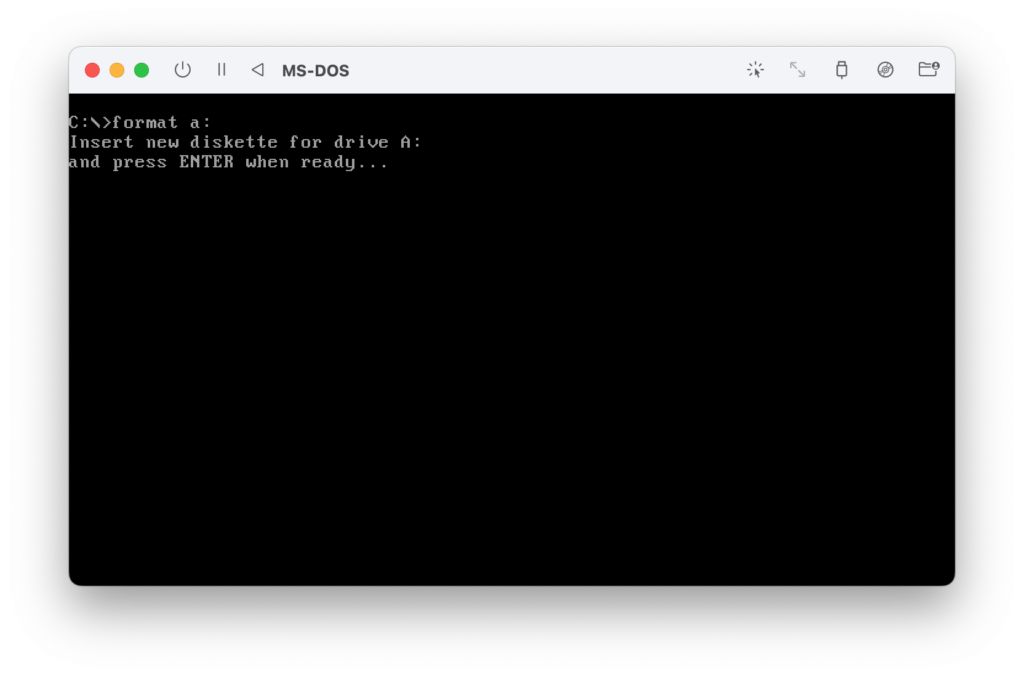
Press Enter one more time to begin the procedure.
The machine will churn for a bit and then ask for a label.
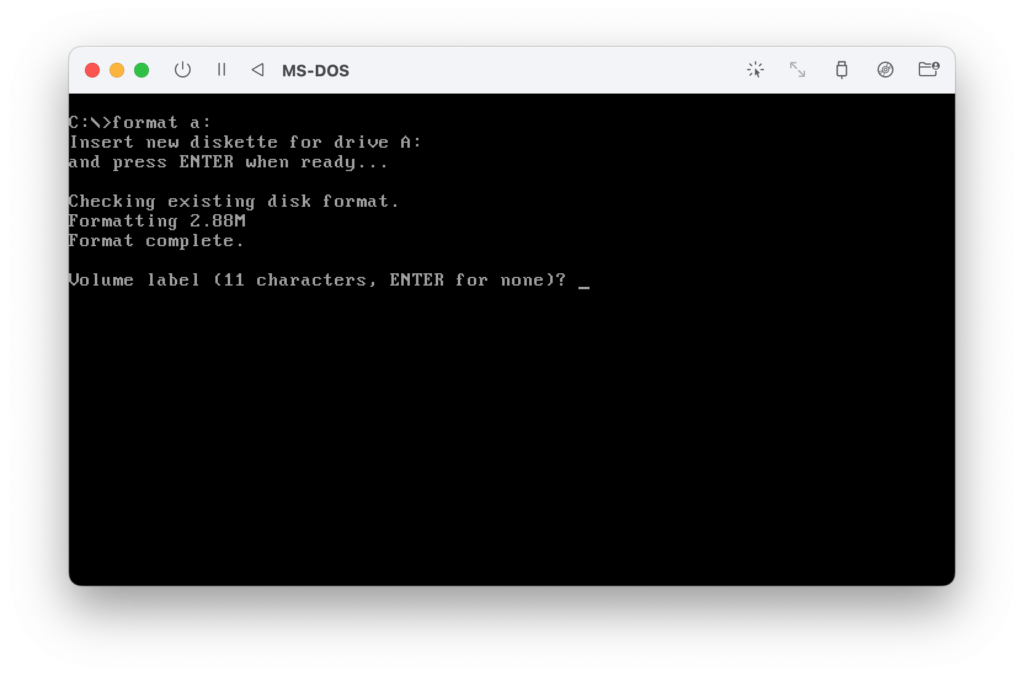
Call this disk whatever you’d like (as long as it fits within 11 characters), and press Enter. (I’m feeling creative, so I’m going to call it “My Disk.”)

When you see the prompt asking whether to format another disk, press N followed by Enter.
Now, we should be back at the command prompt.
Step 9: Access the Virtual Disk in macOS
Now that we have a (virtual) blank floppy disk at our disposal, we can use it to start adding some files to the virtual machine.
To place files on our virtual floppy disk, we start by double-clicking the icon on our host machine’s desktop.
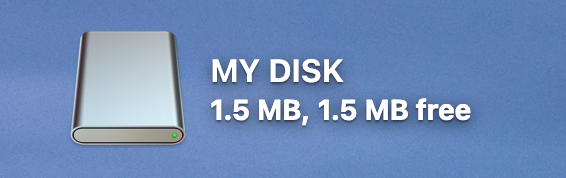
This tells macOS to mount the disk contained within the image file. On my computer mounted disks show up on my desktop like this:
Depending on how you have your computer set up, you might need to locate the disk in the macOS Finder. But however you do it, go ahead and open that disk.

Step 10: Add Some Drivers to the Disk
Okay, do you remember those two drivers I had you download back in the Materials section of this tutorial? It’s time to finally do something with them!
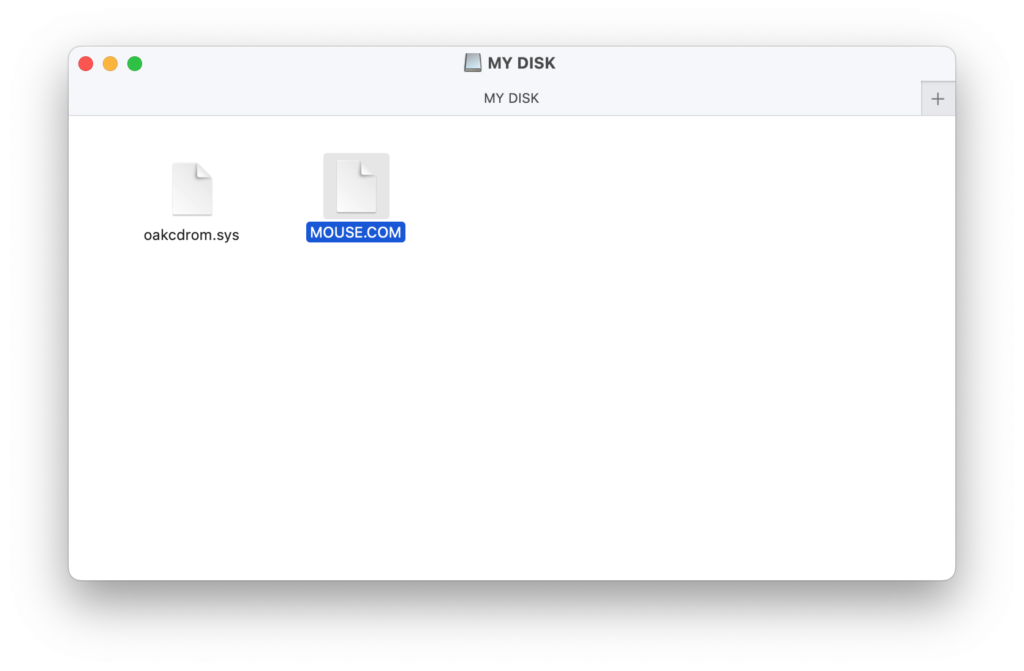
The first file was oakcdrom.sys. Let’s find this file and add it to the empty disk.
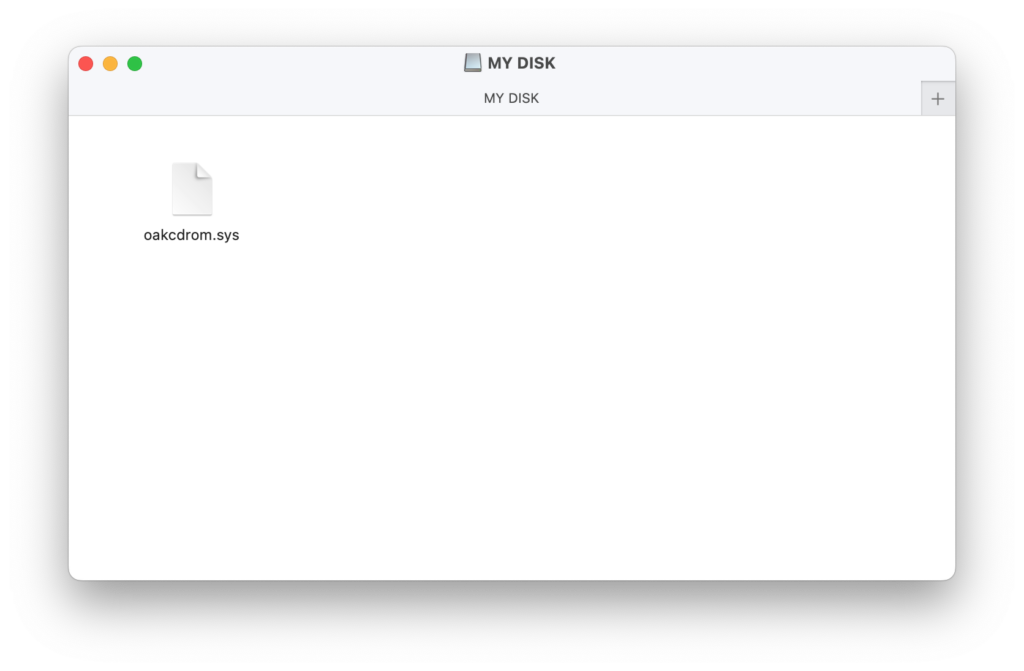
The other thing we downloaded was mouse.zip. When we unzip this file, we get mouse.com. Let’s put this on the disk, too.
Now, let’s go back to the virtual machine and try to access the drive.
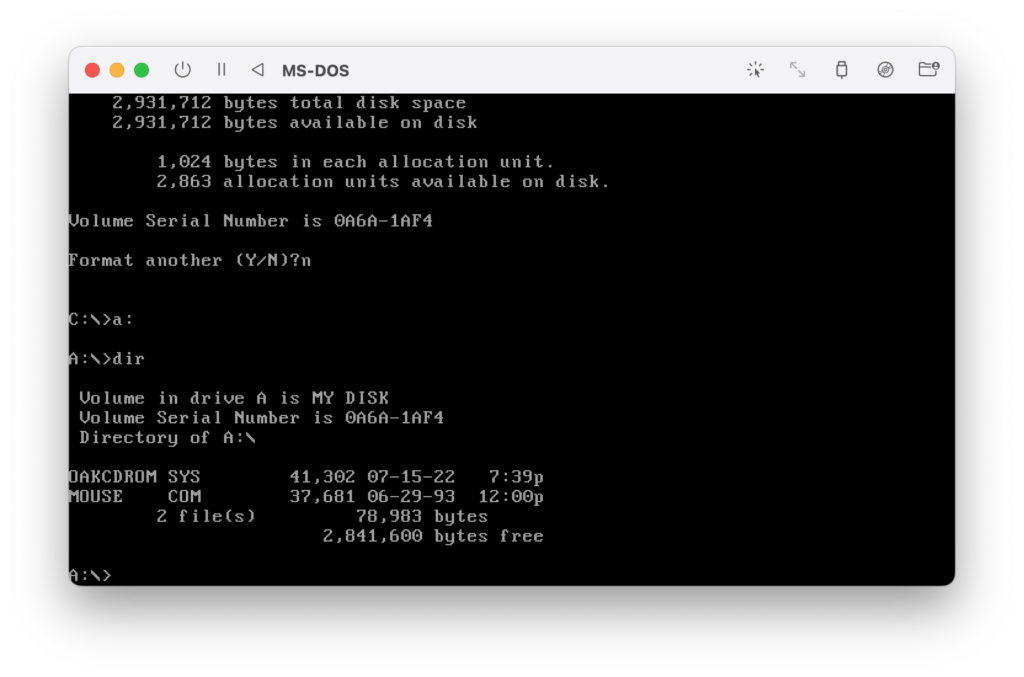
At the DOS prompt, type in A: and press Enter. The prompt should change to A:\>
Now, if we enter the dir command, we should see the two files that we added:
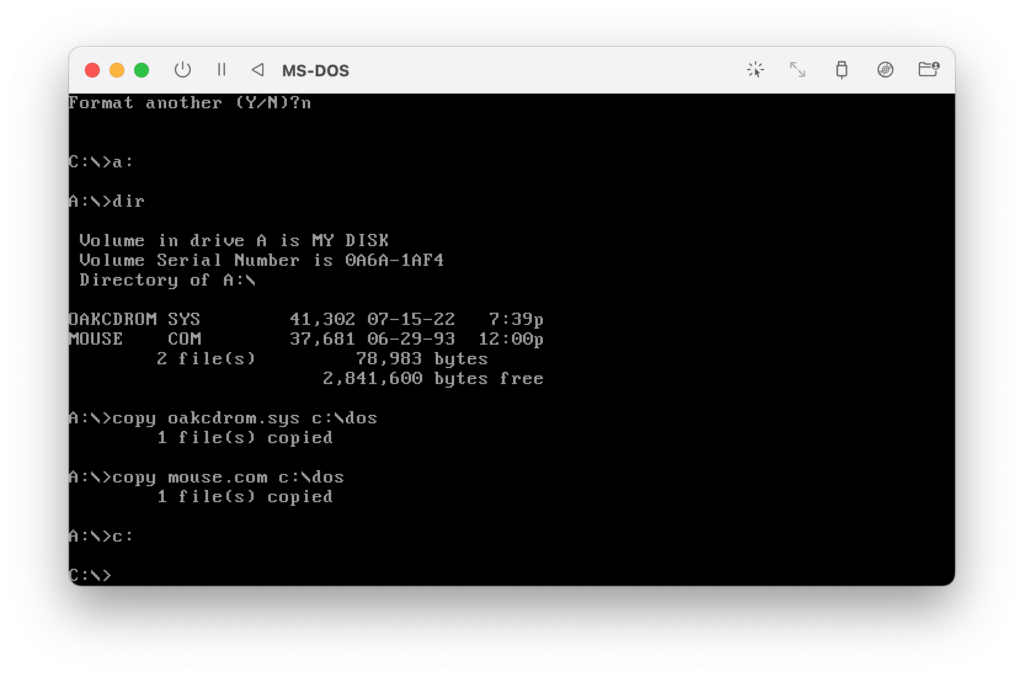
Let’s copy these two files into the DOS folder. After typing in each of the following lines, press enter:
copy oakcdrom.sys c:\dos
copy mouse.com c:\dos
Then, type in C: and press Enter to switch back to the hard drive (also known as Drive C).
Now, let’s go edit CONFIG.SYS again by typing edit config.sys and pressing Enter.
After the line for EMM386.EXE, but before the line for POWER.EXE, add the following line:
DEVICEHIGH=C:\DOS\OAKCDROM.SYS /D:MSCD001This will tell the computer to load the CD-ROM driver into high memory. The bit at the end gives the device a name. I’m not entirely sure why, but “mscd001” seems to be the standard name used in pretty much every reference I’ve read, so let’s go with it. The file should now look like this:
Let’s save the file and exit back to the prompt.
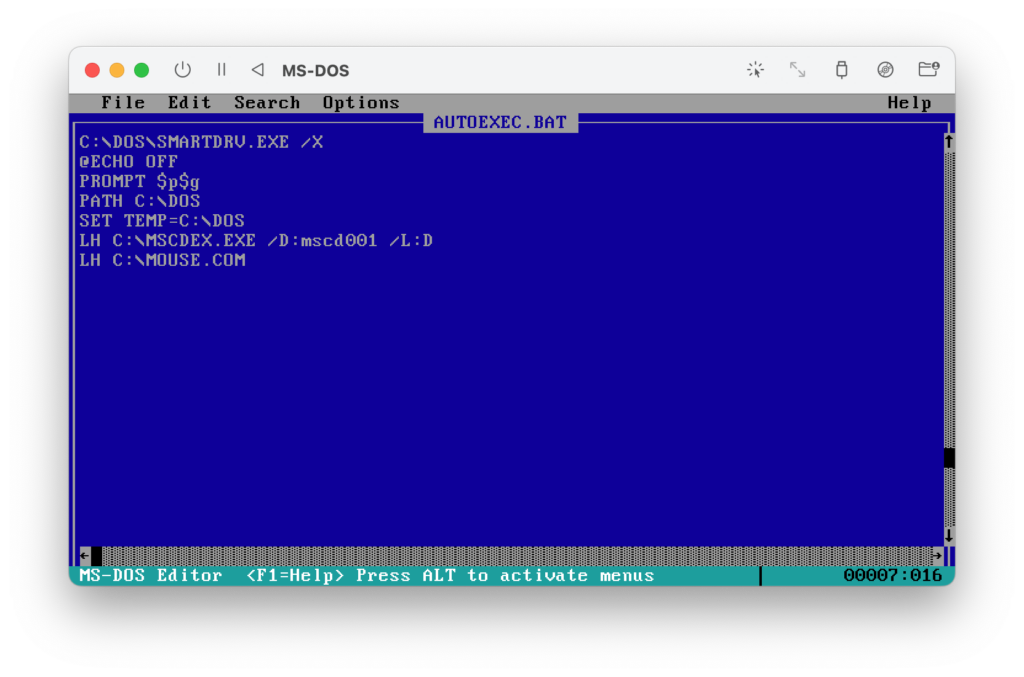
Next, we need to edit a different configuration file: AUTOEXEC.BAT. This is less a configuration file and more like a script. (Technically, if we’re using DOS parlance, it’s called a “batch” file.) AUTOEXEC.BAT is essentially a startup file; it’s a series of DOS commands that the operating system issues right before it turns things over to the user.
So let’s edit the file by typing edit autoexec.bat and pressing Enter.
We’re going to add two lines to the end of this file:
LH C:\DOS\MSCDEX.EXE /D:MSCD001 /L:D
LH C:\DOS\MOUSE.COM
LH is as shortcut for the LOADHIGH command, which work similarly to DEVICEHIGH in CONFIG.SYS. It attempts to load a program into the high memory region (rather than the low or “conventional”) memory region. The idea is to keep the conventional memory (the first 640 kilobytes) as clear as possible to make more room to load actual applications.
Whereas OAKCDROM.SYS is a third-party driver that tells the computer how to talk to the CD-ROM hardware, MSCDEX.EXE is a program included with MS-DOS that helps the operating system read the actual data on the CD. The part of the line that begins “/D:” refers to the name we added in the CONFIG.SYS file. The part that says “/L:D” tells the computer to assign letter D to the CD-ROM drive.
Meanwhile, MOUSE.COM, as the name might suggest, is a mouse driver; it lets the computer respond to input from a mouse.
With these two lines added, the file should now look like this:
We should now save the file and reboot the virtual machine. If we look carefully at the status messages that show up while the machine is starting up, we should see indications that an Oak Technology CD-ROM driver, the Microsoft Power Manager, the MSCDEX program, and the Microsoft Mouse Drier have all been loaded.

We can see that the mouse actually works by trying to edit a file again. Let’s type in edit autoexec.bat and press Enter. Now, see what happens if you move your mouse around or play with your laptop’s touchpad.
(If nothing notable happens, you may need to tell the virtual machine to “capture” the mouse. You do this by clicking the first icon on the right side of the virtual machine’s toolbar—the one that looks like a mouse pointer with some lines around it. Now try moving the mouse around.)
With any luck, you should see a square-shaped box moving around the screen. You can use this cursor to select different locations in the file just like you would in a modern-day word processor. You can even use it to open the different menus at the top of the screen and select the various commands. Let’s go ahead and use the cursor to click on the File menu and select Exit.
(Reminder: If your cursor gets stuck inside the virtual machine, press CTRL+ALT or CTRL+Option to release it back to your host computer.)
Step 11: Have Fun!
Our basic DOS system is finally all set up. All that’s left is to install any of our favorite programs and, well, have at it!
In my case, I’ve been wanting to play SimCity 2000. My father bought the game for me some 25 years ago, and I just so happen to have an image file for the CD-ROM the game would have originally come on. Now that the virtual machine has a working CD-ROM driver, I can use the DOS command prompt to access this virtual CD.
First, I need to “insert” the CD. I’ll do this using that same icon in the toolbar that we’ve used a few times now to access floppy disks. This time, I’m going to hover over “CD/DVD (ISO) Image” and select “Change.” Then I’ll find the disk image on my host computer and select it.
One the disk is selected, I can type D: at the command prompt and press Enter. Then, I can type dir and press Enter to view the contents.
For some reason, it takes a really long time for the virtual machine to read the virtual CD the first time. I don’t know why, but it does eventually work.
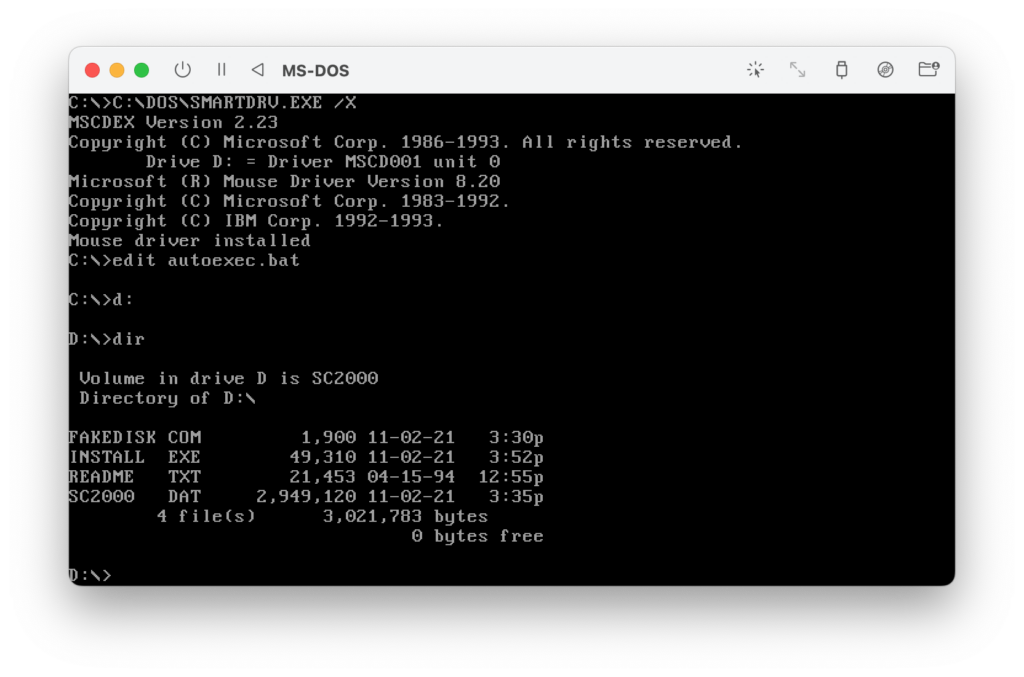
From here, I can see that there is a file named INSTALL.EXE, which is presumably the game’s installer. So, I’ll go ahead and type install, followed by Enter, to run it. (DOS will attempt to run any file that ends with .EXE or .COM, even if you don’t type that part in.)

And here’s the installer! It pops up this weird error message about not having enough RAM, which is not true. The good news is, I’ve tested this and the program works anyway.
After following all the instructions in the installer, I’m dropped back to the command prompt.
The installer automatically puts me in the game’s directory (or folder). If it didn’t, I could return to the hard drive by typing C: and then enter the program’s folder by typing cd\sc2000. (Here are a couple helpful primers on DOS commands if you’re new to the operating system or need a refresher.)
Finally, I’ll run the main program (SC2000.EXE) by entering sc2000.
And…
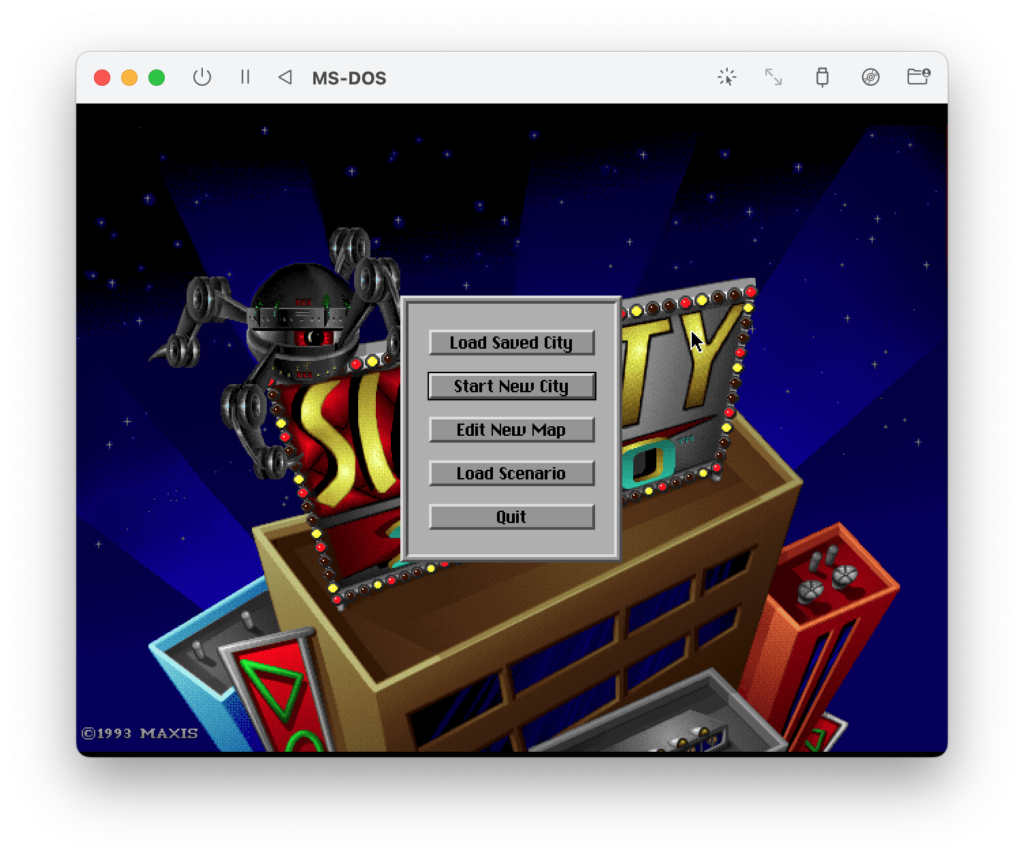
…it works!
If you have a game or other program on a CD you’d like to access, go ahead and try it. If your application comes on a floppy, then you’ll access it the same way we did our blank floppy. And if you have the application files themselves, but they’re not on a CD or floppy image, then you can add them to the floppy image that we created together to load them into the virtual machine.
Wrapping Up
If you’re not sure what to do next, I suggest some Googling. There are a number of archives of old DOS software out there on the internet. As I think I made it clear earlier, I don’t condone piracy, but the good news is that many programs have been officially placed into the public domain by their original authors, were available for free in the first place, or are considered “abandonware,” which means no one is really responsible for them anymore. (As always, proceed at your own risk, both in terms of the legal implications of your decisions and the possibility of obtaining viruses and other malware from random stuff on the internet.)
If you’re interested in a serious deep dive into the land of MS-DOS, complete with internet connectivity (of a rudimentary sort), command prompt customization, more advanced memory management, and then some, do check out the LegRoom.net tutorial that I’ve cited a few times. If you’re feeling especially bold, you can even try installing Windows 3.1 on top of your DOS setup. (I haven’t done it on this computer yet, but I’ve managed it in the past.)
As for me, my next step may be to figure out if I can get sound working—and then maybe I’ll move on to Windows 😉
If you’ve made it this far, you’re definitely a trooper. Now go build yourself some virtual skyscrapers!