This post is the final installment of a multi-part series:
- How to Digitize Your Old Home Movies on a Mac: Equipment and Considerations
- How to Digitize Your Old Home Movies on a Mac: Doing the Video Conversion
- How to Digitize Your Old Home Movies on a Mac: Cleaning Up the Captured Footage
So where are we now?
At this point in time, if you’ve been following this guide with your own movies, you should have one or more files on your computer ending in the extension .m2ts. These are your captured videos.
In case you’re curious, the file extension stands for “MPEG-2 Transport Stream.” The technical details here are complicated; what you mainly need to know is that an MPEG-2 Transport Stream is essentially a kind of container for storing audio and video information along with relevant metadata. In the “real world,” M2TS is the format used for commercial Blu-ray Discs.
Apple’s QuickTime player, which comes pre-installed with the Mac operating system, appears to be capable of playing these files natively. Unfortunately, I ran into a lot of trouble when trying to do so. Videos would occasionally hang, seeking backwards and forwards was extremely jerky, and I think the application even crashed a few times. I ran into even more trouble when I tried to edit the video in iMovie. The symptoms were basically the same, but it would take even longer to recover. (I also encountered similar issues in just about every other piece of software I threw the files at.)
In short, something about the video produced by the conversion software was buggy and/or corrupted.
Through trial and error, I determined that simply outputting the video into a different container format was not enough. The only way I could make it usable was to re-encode it entirely. Purists would say that this is a terrible idea; each time you encode or re-encode, you’re degrading the original video quality. They’re not technically wrong, but I found the results to still be acceptable to my eye. (Ultimately, I had no choice since the initial output was otherwise unusable.)
So the remainder of this guide will show you my method for re-encoding the output as well as how to break it up into smaller, more manageable parts.
Step 7: Wading into the Command Line
There are tons of programs out there that can do this for you. But because I was having so much trouble with playback, I decided it was best to avoid anything too fancy that might get hung up trying to preview the video.
In order to guarantee a conversion experience free from trouble, we’re going to have to take a trip into Nerd Territory and use a command line tool—the type of program that has no user interface and runs solely in the Terminal. The command line may not be for the faint of heart, but it’s actually not that scary once you get used to it.
The tool you’re going to use here is ffmpeg, one of the most low-level and powerful video manipulators I’m aware of. (There are others, but this has gotten the job done for me time and time again over the years.)
This tool is most commonly used in open source operating systems like Linux, but it can be made to work in macOS as well. I used version 4.1.4; you can download a copy built for the Mac here. (If you want to try out a more recent version, you can go here, but I warn you: that page is kind of confusing).
If you use the recommended link above, you’ll get a standard Mac disk image. Open that up, and you’ll find a single file (ffmpeg) inside. Go ahead and drag ffmpeg into the folder where you stored your video captures.
Step 8: Okay, Actually Wading into the Command Line
It’s time to get your hands a bit dirty. To actually use ffmpeg, you’ll need to open up the Terminal app. Terminal is located in the Utilities folder, which is itself located in the Applications folder on your Mac. If you’d like, you can browse to it directly using Finder and then double click to open it.
Alternatively, you can search for Terminal using Spotlight (the magnifying glass in the menu bar), or if you have a reasonably recent version of macOS, you can find it in Launchpad (the rocket ship icon in your Dock).
So go ahead and open the app whichever way works for you.
Now, you need to navigate to your capture folder. We’re going to use the cd command, which stands for “change directory.”
Click on the Terminal window to make sure it has the focus. Then, type the following code on the command line. It’s hard to see here, but be sure to follow the letters with a space!
cd Next, open up your capture folder using Finder. Once you’ve done that, click and hold the folder icon in the window’s title bar. The color should darken. After that, drag the icon into the Terminal window and let go. This will add the folder’s path to your command, making it look something like this:
cd /Users/yourname/Movies/CapturesHit the enter key, and you should now be inside your capture folder (or “directory,” as it’s known in the command line world). You can test this by typing the following and hitting enter:
./ffmpegThis will attempt to run the ffmpeg program. If it works, you should see a whole bunch of text scroll by. If you don’t, you either haven’t copied ffmpeg into the folder or you haven’t properly changed the directory from the Terminal. If so, go back to Step 7 and try again.
Next, we’re going to create a new folder in which to store our converted videos. Type the following and hit enter:
mkdir convertedAs you might guess, mkdir stands for “Make Directory.” So in this case, you’re making a new directory named “converted.” If you want to prove that it worked, you can go back to that Finder window for your capture folder and you should see the new folder somewhere inside it.
Now the fun part! In a moment, you’re going to copy and paste the following line into the terminal and hit enter:
for i in *.m2ts; do ./ffmpeg -i "$i" -c:v h264_videotoolbox -vf yadif=1 -b:v 5M -c:a copy "./converted/${i%.*}.mp4"; doneI say, “In a moment,” because you should never copy and paste a line of code that long (or honestly, any line of code) without knowing what it does. There are horror stories out there on the internet of people “suggesting” a line of code to solve one problem or another that, in reality, deletes all your files. (I will not tell you what that line is—though it’s remarkably simple.)
So anyway, here’s the breakdown:
-
for i in *.m2ts;
- This creates a loop—a way of processing each file in the folder, one by one.
- The letter i acts as a placeholder for each file name.
- The *.m2ts identifies the group of files you want to work on—in this case, all files ending in the “m2ts” extension.
- The semicolon stands for the end of a line. (The overall command is technically three separate lines of code.)
-
do
- When you create a for-loop, do literally tells the computer what to “do” with each item in the set.
- ./ffmpeg
- This runs the video processing program that you downloaded earlier.
- The “dot-slash” at the beginning tells the computer to look for ffmpeg inside the current directory.
-
-i
- In the world of command line tools, a dash followed by one or more characters is called an “option” or sometimes a “switch.”
- This particular switch tells ffmpeg to use a particular file as an input. In other words, it says, “Whatever comes next is the file I want you to process.”
-
“$i”
- Sometimes, a switch just tells a program to do something and that’s it. However, sometimes a switch needs its own parameter (or argument).
- In this case, the input switch needs to know what it’s supposed to be inputting. This thing with the dollar sign basically says to use whatever file we’re up to in the loop.
-
-c:v h264_videotoolbox
- This is another switch/argument combination. In this case -c:v tells the program that we are setting the video codec (i.e. the fancy algorithm you want to use to process and store the video).
- In this case, we’re using the h264_videotoolbox codec. This is a special codec that uses the power of your Mac’s built-in graphics processor to do the video conversion much faster than it would take using the regular processor (a/k/a the CPU). Most Macs from the last few years should be able to do this.
-
-vf yadif=1
- The -vf switch tells the program we want to use a video filter.
- In this case, we’re using a filter called “yadif.” This is a de-interlacer. De-interlacing is really complicated, so I’m just going to give you a rough (and probably not fully accurate) sketch. What you need to know is that video stored on film is not stored 100% sequentially. Essentially, when an analog video camera records a single frame (or visual snapshot), it only records every other line of visual “information.” When recording the next snapshot, it records just the lines that it skipped the first time around. These two particular snapshots are interwoven to create a single frame of content on the physical film.
- This whole interlacing thing sounds insane, but when paired with old-fashioned television screens, this process essentially doubles the frame rate (the speed at which the TV switches from snapshot to snapshot) without increasing the amount of space this all takes up. The result is smoother motion with less flicker. This works because of the technicalities of how old TV technology works. But when you try to use interlaced images on a computer, which doesn’t work that way, it just looks weird. Many video playback applications can detect interlaced video automatically and correct this, but sometimes they don’t.
- In order to ensure that your old video always looks good no matter what software or device you use to play it back, this yadif thing will de-interlace the video for you in advance by using a super-complicated algorithm (essentially, very well-educated guesses).
-
-b:v 5M
- This tells ffmpeg to convert the video at a rate of 5 megabits per second. (See Part 2 for a brief discussion of bitrates).
-
-c:a copy
- Here, we’re telling ffmpeg which audio codec to use. There’s most likely nothing wrong with the original audio stream, so instead of reconverting/re-encoding it, this argument tells the program to copy the original audio in the new file.
-
“./converted/${i%.*}.mp4”
- We’re done with options now. This last bit is an argument that tells ffmpeg where to save the final product. This mishmosh of text strips the m2ts extension from the original filename, adds mp4 as the new extension, and places the file in the “converted” folder.
- How exactly that all works is a bit complicated, but you’ll notice that there’s a letter i in there. You’ll recall from earlier that this stands for each file name in the set. From there, you might be able to get a sense of what’s going on here. If not, don’t worry too much about it. It confuses me, too!
-
;
- Like before, the semicolon ends a line of code.
-
done
- This statement ends the loop. It says that there’s nothing left to do with this item, so it’s time to look at the next one.
Now that you know what it all does, go ahead and run the full line of code! Just paste it in and hit the enter key. What should happen next is that ffmpeg will go through and reconvert each one of your video files, showing you all kinds of technical status info along the way. A full two-hour cassette tape will take a few minutes to process. If the command completes instantaneously, you’ll know something went wrong (unless the video is only a few minutes long or you’re using a supercomputer).
When all is said and done, if the command worked successfully, you can use Finder to go into your “converted” folder and should see your new video files there.
And that’s it! You should now have usable, non-corrupted versions of your captured videos. You can watch them right now, share them with friends and family, or use them in your favorite video editing software.
If you want, you can stop here. Or, you can keep reading and learn how to break the files up into smaller pieces (say, one file for each recorded event) and improve the audio/video synchronization.
Step 9: Bite-sized Pieces
So when I did this project, I decided to go one step further. You see, while my family may have recorded a lot of home video, they were were not very good at organizing it. Individual events on each tape, of course, were in chronological order, but the tapes themselves were not. It sometimes seemed like the tape used for any given event was chosen at random.
Moreover, any given tape was filled with a mix of serious, pointless, and irredeemably strange content. Finding what you were looking for amidst a whole bunch of two-hour-long files would not be very easy. Instead, I wanted to break each giant file down into multiple files, each holding a single event. That way, I could give them descriptive titles, rearrange them as needed, and ultimately organize them into a new set of folders (one for each year).
There are lots of tools that could accomplish this cutting-up job. I eventually settled on a piece of software called Avidemux, which you can download here. (Scroll down to the Mac OS X section and click the link that says “FossHub.”
Avidemux is sort of like a graphical version of ffmpeg. (In fact, it uses bits of ffmpeg under the hood for at least some of its functionality.) I liked how the app made it easy to scrub through the video at various speeds, including frame by frame if necessary. I also found it quite easy to mark the beginning and end of each video segment.
Here’s a quick overview of the user interface:
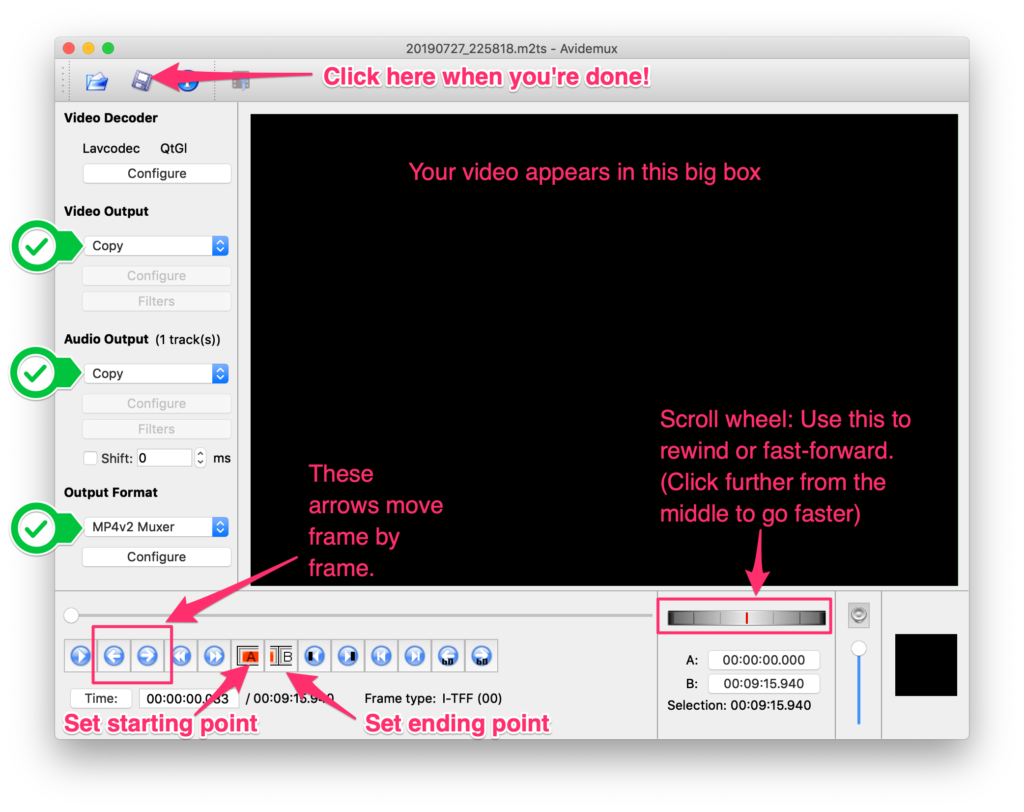
To split a video into separate files, first open one of the MP4 files produced by ffmpeg in Step 8. (Don’t try opening one of the original M2TS files. As I mentioned earlier, you’ll likely run into trouble.) You can drag the file onto the app window or use the “Open” button (the first icon in the toolbar.)
Then, make sure the the options on the lefthand side are set to the same choices as in the picture above. (See the three green checkmarks.)
Now use the scroll features to find the start of an event. Click the button to set the starting point (see above). Then, find the end of that event and click the button to set the ending point (see above).
Finally, click the “Save” button in the toolbar. Give this file an appropriate name and save it. I recommend placing all your split-up files in a new folder somewhere on your hard drive so they don’t get mixed in with the original footage.
Once you’ve saved the event, you can specify a new set of starting and ending points and then save again. Keep doing this until you’ve separated out all the individual events. After you finish one file, you can move on to the next if you have more.
Step 10: Final Adjustments
After separating out the files as described above, I discovered that the audio and video in the smaller files were ever-so-slightly out of sync. I’m not sure if this was something caused by Avidemux or if it was always the case. It’s possible that I didn’t notice it until then. In any case, it was only barely off, but it was off enough that it bothered me. So I needed to put the video files through one last round of processing.
In my case, the audio was approximately 0.15 seconds ahead of the video. How did I figure this out? I used a video player called VLC. This program is available on nearly every operating system (including mobile phones) and has tons of features, from multiple de-interlacing filters to network streaming capabilities. But most importantly, it allows you to adjust the audio/video synchronization on the fly using keyboard shortcuts. This makes it fairly simple to figure out just how far off the synchronization is using trial and error. For instructions on how to do this, check out this tutorial.
Once you know by how many seconds you need to delay the video, you can fire up ffmpeg again to make the adjustment permanent. Like before, you’ll need to copy ffmpeg into the folder with your videos and use the cd command to get inside. (There are ways to avoid copying ffmpeg each time, but I’m not getting into them because this guide is already long and complicated…)
Here’s some code similar to what I used to do the final modification:
for i in .mp4; do ./ffmpeg -i "$i" -itsoffset 0.150 -i "$i" -map 0:v -map 1:a -c copy "./delayed/${i%.}.mp4"; doneLike earlier, we’re using a for-loop to adjust every file in a folder. (Recall that I suggested putting the converted files in their own new folder.) This time, however, we’re targeting MP4 files.
Another big difference this time around is that I used the -i switch twice. To make this work, we’re sort of opening the file twice—once to access the video stream and once to access the audio stream.
Another new option you’ll see is -itsoffset 0.150. This tells ffmpeg to delay the video stream by 0.150 seconds. You’ll also see a couple occurrences of the -map switch. The first time around, it’s followed by 0:v, which means to take the video stream from the first input. The second time around, it’s followed by 1:a, which means to take the audio stream from the second input. (Recall that we opened our input file twice!)
And finally, we have -c copy. This tells ffmpeg not to do any re-encoding. Other than delaying the video stream, it’s copying all the content from the input file into the output file exactly as it originally appeared.
After entering this command, ffmpeg will loop through the folder and apply the video delay to each file. The end result is a properly synchronized video!
And We’re Done!
Seriously! That’s it! If you’ve made it this far, congratulations! You should now have a bunch of properly synchronized, reasonably non-buggy digital versions of your home video collection. You can enjoy them as is, use a non-linear editor like iMovie to remix them into new creations, upload them to YouTube, or whatever else you might have in mind.
If you’ve got questions or comments about the process, feel free to share them below. Or if you have a different combination of hardware/software that worked well for you, I’d be happy to hear about it. Just remember what I said at the beginning: there are all kinds of ways to approach this project. My method is not the most lossless, perfect, or even “correct” approach. It’s just a process that worked for me and provided an opportunity to learn about some interesting tools while discovering some of the particular challenges associated with analog-to-digital conversions.
Thanks for following along, and happy editing!