This post is the final installment of a multi-part series:
- How to Install Windows and Linux on a Mac: Materials
- How to Install Windows and Linux on a Mac: Installing Windows 10 Externally
- How to Install Windows and Linux on a Mac: Adding Linux to the Mix
If you followed the first 11 steps of this tutorial, you should have a working dual-boot system. Your computer should be able to run macOS off of its internal hard drive and Windows off of the external hard drive.
To take things up a level of geekiness while also opening up a whole additional realm of software possibilities, the next part of this tutorial will add a third operating system to the setup: Linux.
There was a lot of false information going around the internet when Apple first released the 2018 Mac mini and other computers with its T2 security chip. Lots of folks on forums and Reddit were saying that the security protections implemented by Apple’s custom co-processor made it impossible to run Linux or pretty much any operating system other than macOS or Windows.
It turns out, this isn’t really true. It can be challenging to get Linux to work on a modern Mac, especially if you want it to run off of the internal hard drive, but it’s not impossible.
You might recall that way back at the beginning of this project, we actually disabled some of the T2’s security features. This takes care of the first hurdle. To address the second hurdle (the difficulty of using the internal hard drive), we’re just going to run around it instead! Rather than install Linux internally, we’ll put it on the external hard drive alongside Windows.
For this third and final installment in the series, I’ll guide you through all the steps and workarounds necessary to get Linux up and running effectively.
(Note: Unlike the previous installment in this series, which I’ve reproduced multiple times, this article falls very much into the “your mileage may vary” category. I’ve done this a few times, including while writing the tutorial. But weird things always go wrong. This article is my attempt to account for all of those weird things and provide a hopefully definitive walk-through.)
Step 12: Prepping the Hard Drive
Before we can actually do anything with Linux, we need to get our external hard drive ready. Right now, unless you deviated from the tutorial, the Windows partition is most likely taking up the entire drive. So we need to resize it to make some room for Linux.
The safest way to resize a Windows partition is from within Windows itself. (In fact, macOS will flat-out refuse.) So, if you aren’t already booted into Windows, go ahead and do so using the procedure described previously.
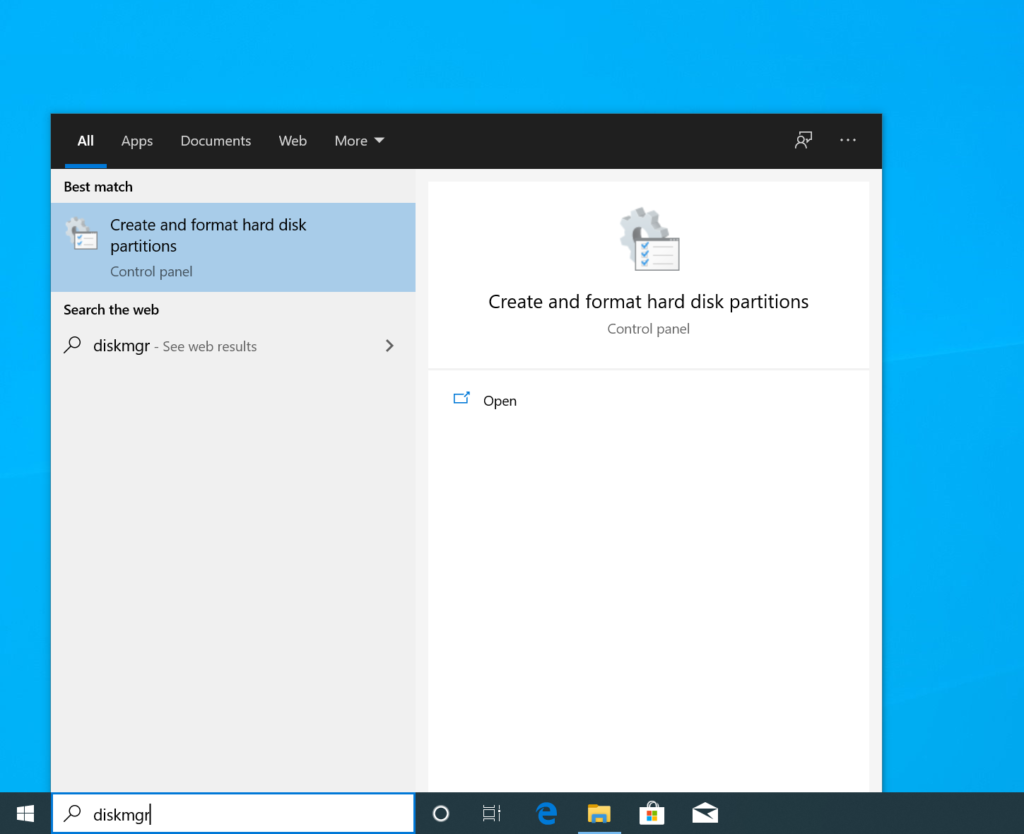
Once Windows is up and running, we need to enter the partition manager. The easiest way to do this is to click on the Start menu and start typing diskmgmt . Pretty quickly, you’ll see “Create and format hard disk partitions” pop up as an option. Go ahead and click on that.
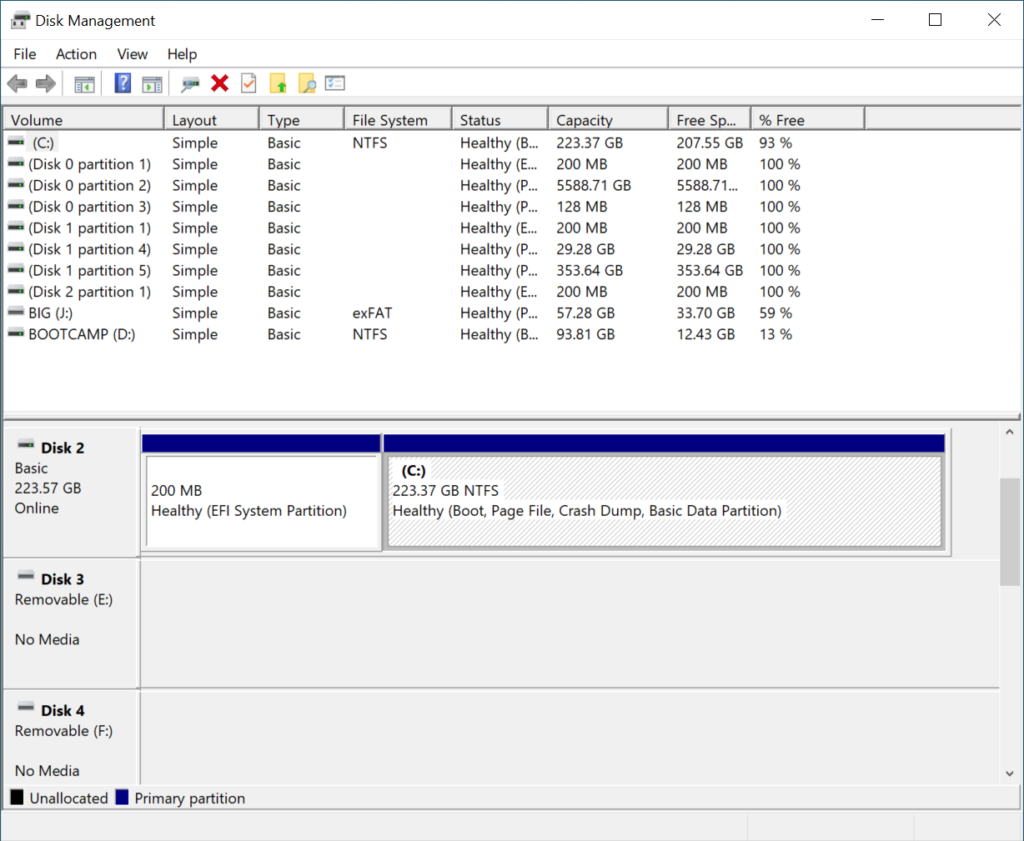
Now, you need to find your Windows partition. Unless you did something strange when setting things up, it should be labeled (C:). You will need to select this partition either via the list in the top half of the window or via the graphic in the bottom half. Double-check that the size of the partition looks correct. It should also have “Boot” and possibly some other indicators listed underneath the size. (See screenshot below.)
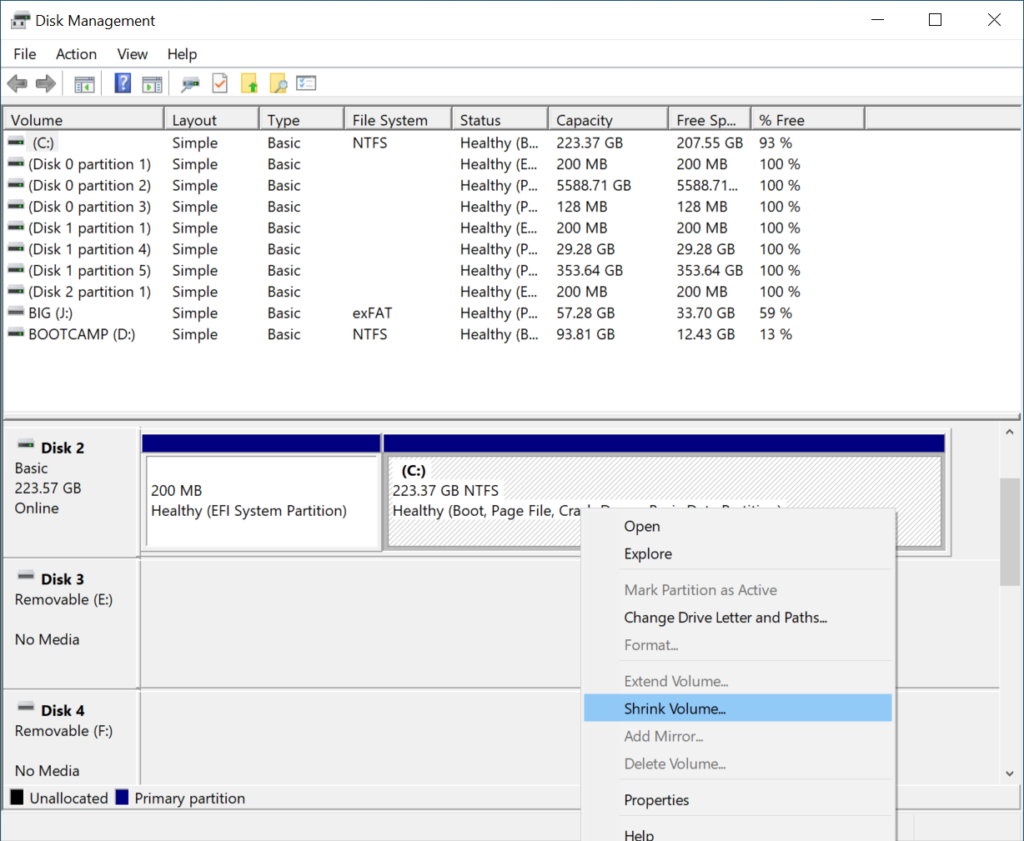
Next, right-click on the partition and choose “Shrink Volume…”
When the volume shrinking interface pops up, you will see an input field where you can tell it how much smaller you want the existing partition to be. For instance, if I wanted to free up 60 gigabytes of space for Linux, I would type in 61440 since that’s the equivalent amount in megabytes.
The partition manager will not let you choose a size that is smaller than the “available shrink space.” So find a number that feels right to you (remember that Linux distributions usually don’t need nearly as much space as Windows), and then click the button labeled “Shrink.”
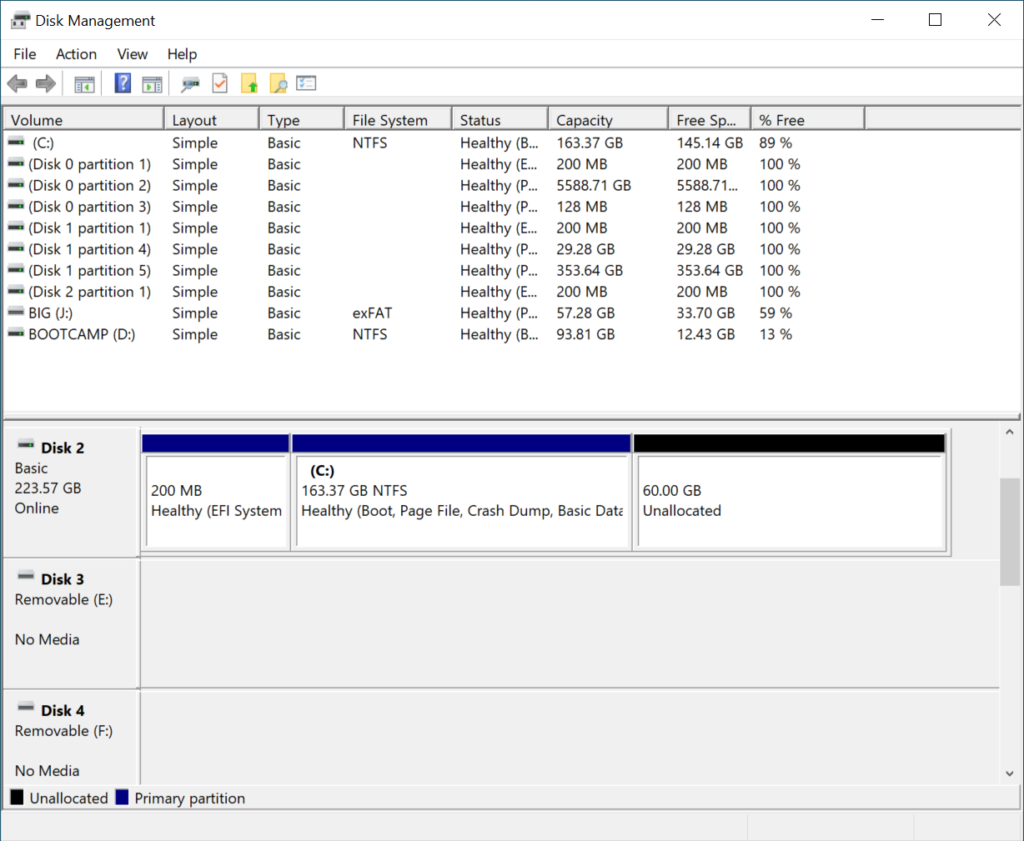
If the operation completes itself successfully, you will now see a new chunk of “Unallocated” space at the end of the graphic representing your external hard drive.
With that taken care of, let’s boot back into macOS and get the rest of the software we need.
Step 13: Getting Linux
My favorite Linux distribution is Ubuntu, so we’re going to use its latest-and-greatest release: Ubuntu 20.04 LTS. Ubuntu’s LTS (i.e. “long-term support”) releases are particular valuable because Ubuntu guarantees five years of security and maintenance updates. They’re great for a user who prefers stability and consistency over cutting-edge new features.
So let’s download a copy. We’re going to use the 64-bit version of the Ubuntu 20.04 Live CD. (The CD image should start downloading as soon as you click that link.)
Step 14: Creating the Installation Media
In theory, the image we downloaded can be burned to a CD or DVD and then used to try out the Ubuntu Linux experience or to install the OS on any computer. I say “in theory” because Macs haven’t had CD or DVD drives for years—and honestly, neither have lots of PCs. Nevertheless, this is how the maintainers of Ubuntu (and plenty of other distributions) continue to distribute their installer.
Instead, to properly install the OS on our Mac, we’re going to need to create a bootable USB flash drive. Canonical (the folks who officially distribute Ubuntu) have created a great tutorial of their own explaining how to do this. It’s got step-by-step instructions and a bevy of helpful screenshots, so go ahead and follow their directions. You can come back here when you’re done!
Step 15: Rebooting into the Live “CD”
The final step of the Canonical tutorial above has you reboot your computer while holding down the Option key (or Alt on a Windows keyboard). If you haven’t already done that, you should do so now.
The Canonical tutorial tells you to select the USB stick from Apple’s boot picker. I found that their advice didn’t work. In fact, when I tried to do that, the Apple Recovery system launched instead and presented me with the following Very Strange Error Message:
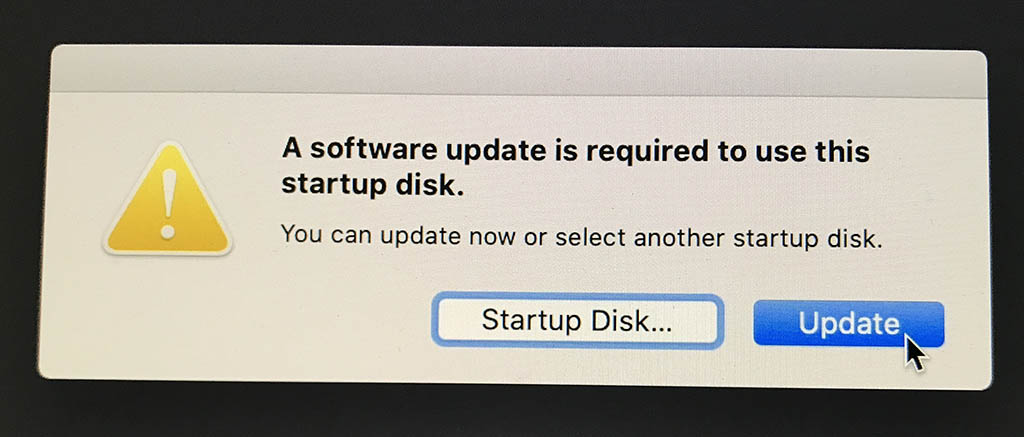
For the record, downloading the “update” does not help.
Instead, I needed to use rEFInd to boot into Ubuntu. As you’ll recall from earlier, in order to start up rEFInd you need to select it from Apple’s boot picker. You may also recall that it shows up as a yellow icon with the words “EFI Boot” beneath it. The only problem is you will probably see several options that look like that.
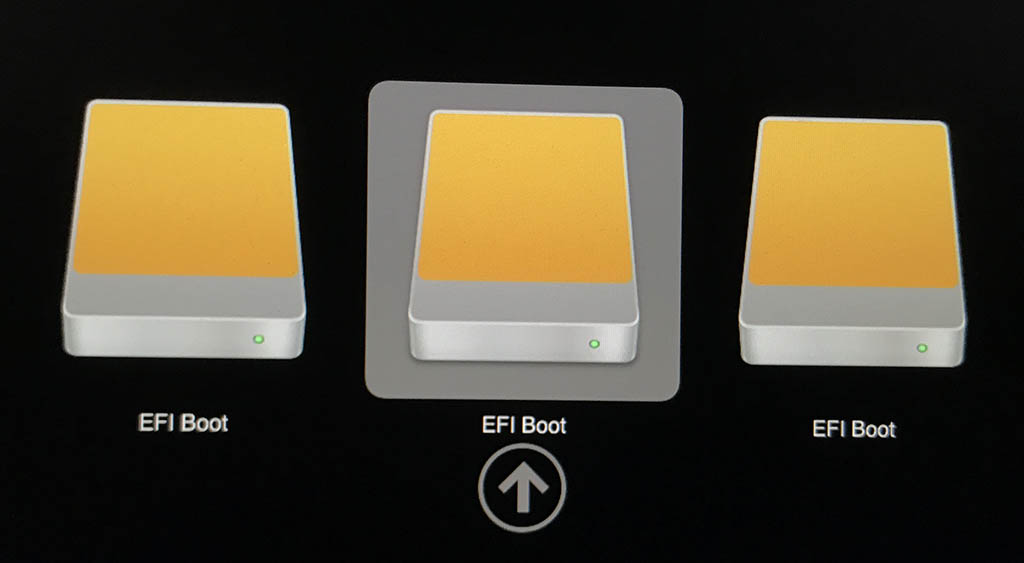
That’s because the USB stick you just created and the external hard drive all have boot loaders installed on them. If you’re not sure which is the right one, unplug the USB stick and plug it back in. You’ll see it disappear and then reappear. Now you know which icon to choose! Go ahead and use the arrow keys on your keyboard to select the icon, and then press Enter.
After a moment of thinking, the computer should enter the rEFInd interface, which will look something like this:
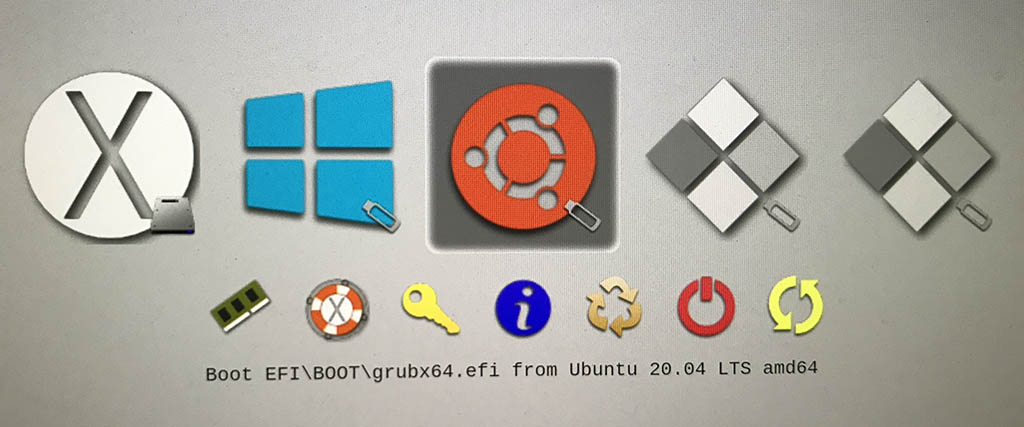
Use your arrow keys to select the orange Ubuntu logo. If you see more than one, just make sure that you see something like this beneath the logo while it’s selected: “Boot EFI\BOOT\grubx64.efi from Ubuntu 20.04 LTS amd64”. If not, try the other one. (Note: If you don’t see an orange logo, like the one above, you might see a penguin logo instead. As long as the you see the “grubx64” text, you’ll know you’ve selected the right one.)
Once you’ve selected the Ubuntu logo, press Enter. The screen will likely go blank, and you may see some weird diagnostic messages pop up. Just wait patiently for a minute or so while Ubuntu boots off the USB stick.
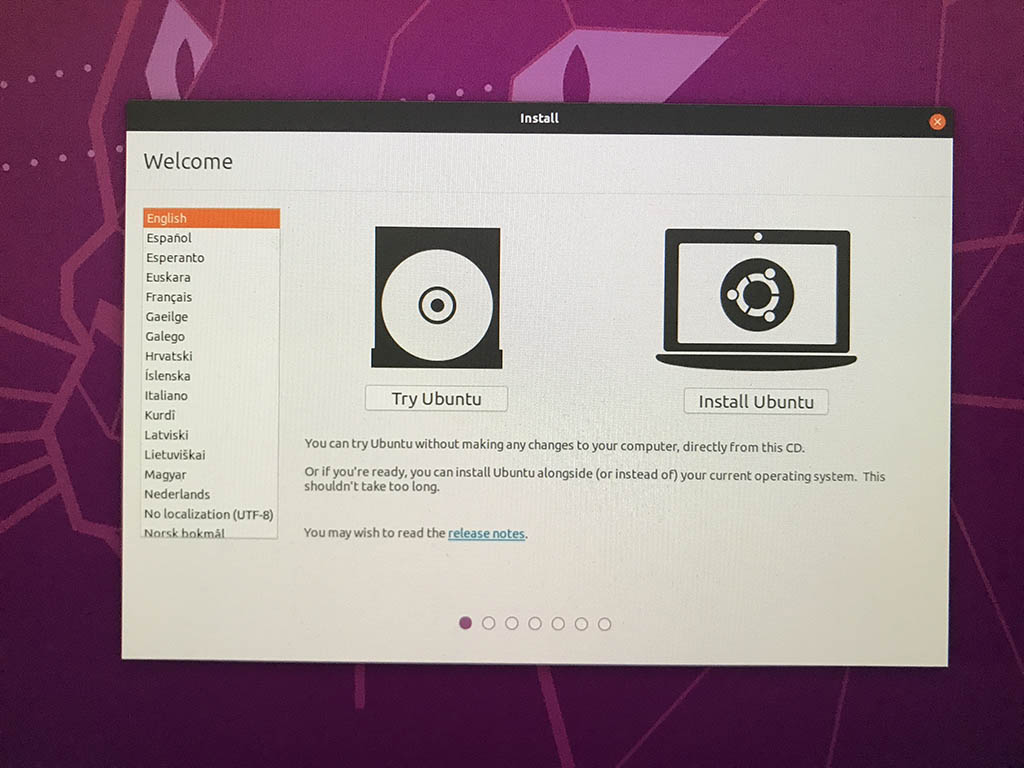
Eventually, you’ll be greeted with a window that asks whether you want to “Try Ubuntu” or “Install Ubuntu.” Although we eventually want to install the operating system, right now we just want to try it. So choose the first option.
Now, finally, we are fully booted into Ubuntu’s live environment. Feel free to play with some of the applications or, if you have an Ethernet connection, browse the internet. (WiFi will probably not work.)
Step 16: Starting the Installer
Remember how, just a moment ago, we didn’t choose the option to install Ubuntu? That’s because we actually need to start the installer manually in order to pass it a very important command line argument. Let me try to give you some background…
At some point during the installation routine, Ubuntu attempts to install the fairly ubiquitous Grub boot loader. Grub is a great tool for choosing among various operating systems installed on a computer, and pretty much every Linux distribution uses it. Unfortunately, during the installation routine, Grub attempts to communicate with the computer’s firmware to set up the boot routine. On a normal PC, this shouldn’t be a problem. But on the Mac, the T2 security chip freaks out and causes the installer to crash. So to get the installation to work, we need to bypass Grub altogether. This actually isn’t a problem because we already have a robust boot loader installed on the computer: rEFInd. And it just so happens that rEFInd is able to boot Linux distributions directly, without needing the help of Grub.
So, that command line argument I was talking about before is the trick that gets Ubuntu’s installer to skip over the Grub installation.
What you need to do is open up Ubuntu’s terminal application by clicking on the “Activities” menu in the top right corner…
…and then typing in the following letters: term.
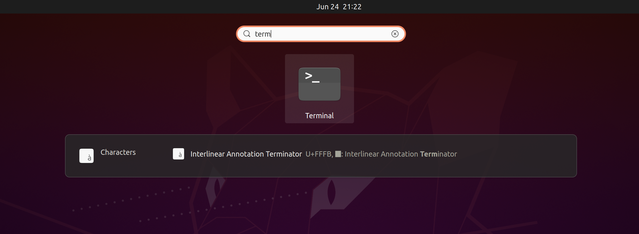
This should automatically select the terminal app. Just press the Enter key to open it.
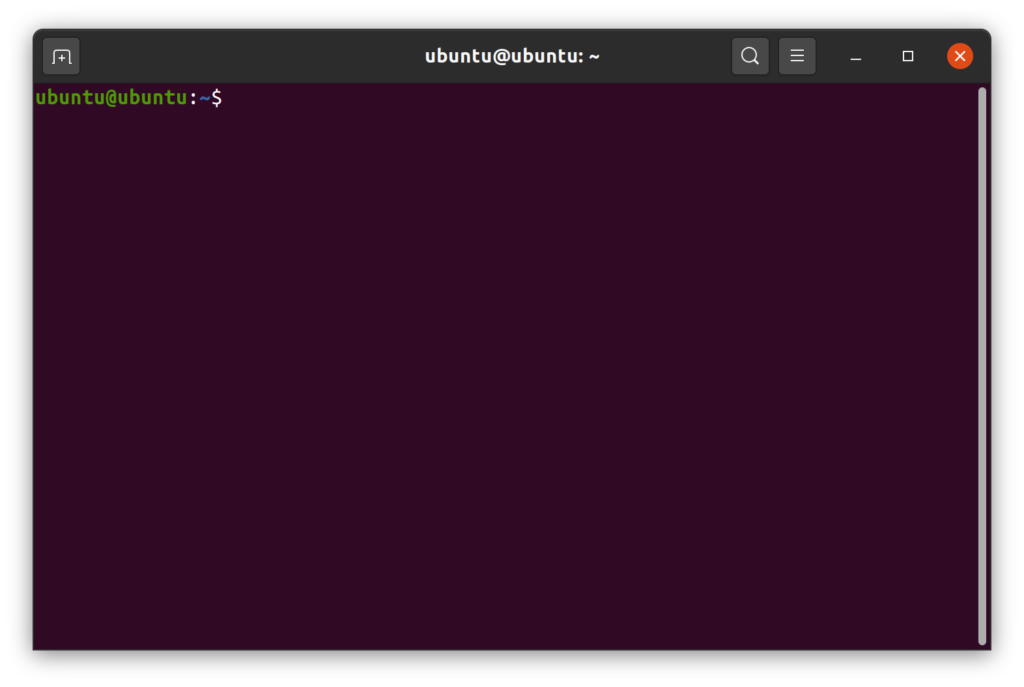
Then, type in the following code at the command line:
ubiquity -bAnd finally, press Enter one last time. After some thinking, you should see Ubuntu’s installer interface pop up.
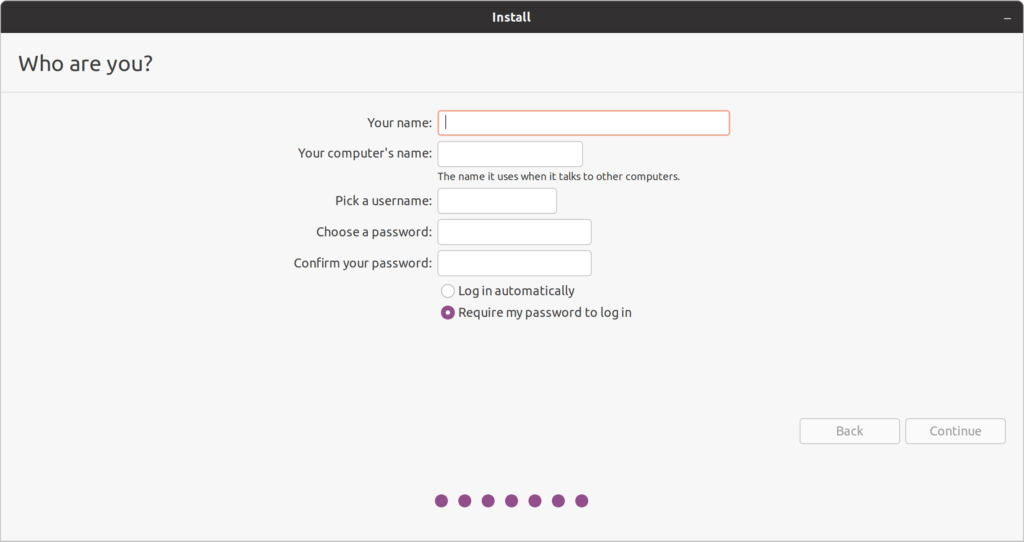
Step 17: Configuring the Installer
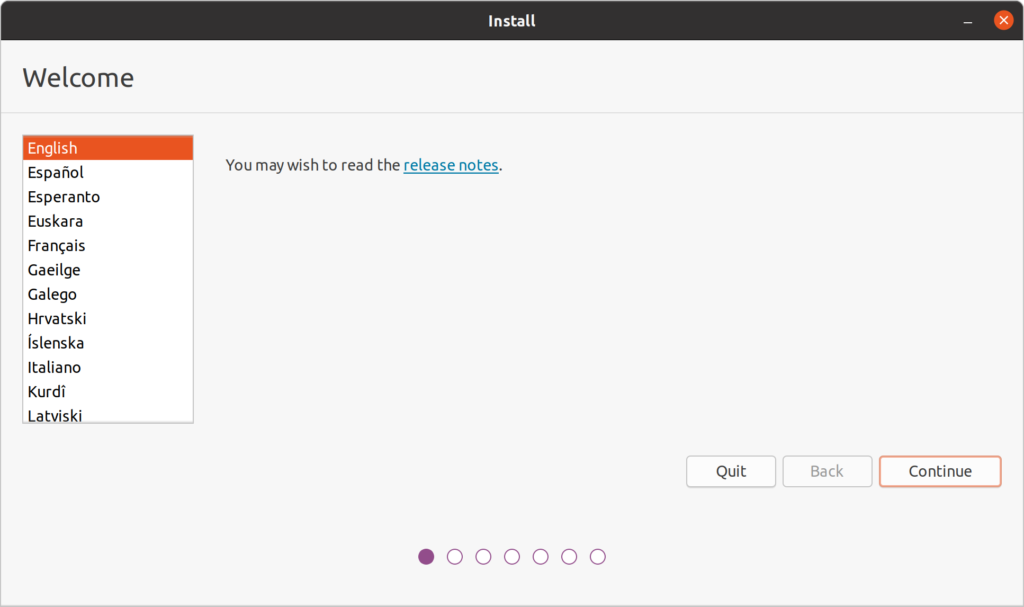
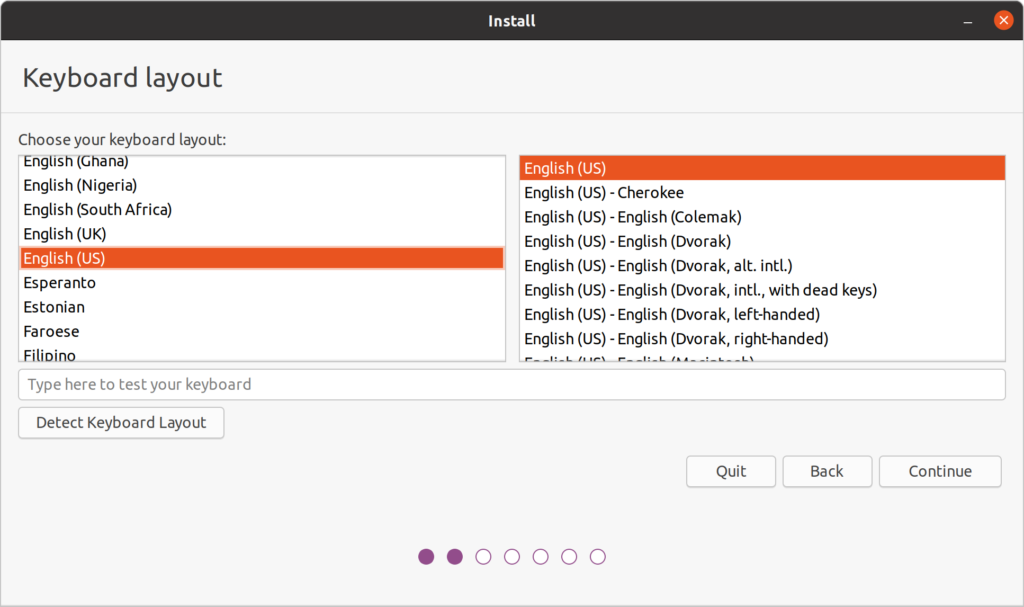
Choose your language, and click “Continue.” Then, on the next screen, you’ll choose your keyboard layout:
On the third screen, you’ll be asked a few questions about updates and software:
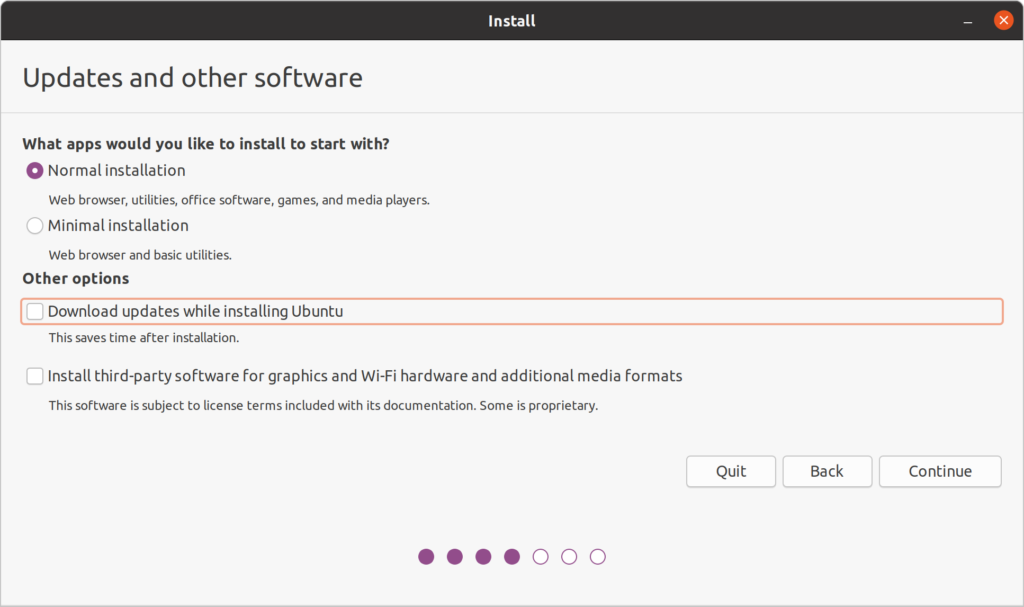
I like using the “Normal” installation so that I have immediate access to all of Ubuntu’s apps. But if “Minimal” makes more sense for you, go with whatever feels comfortable. Only check the box for downloading updates if you have a direct Ethernet connection. Finally, it’s up to you whether to install third-party software and additional media formats.
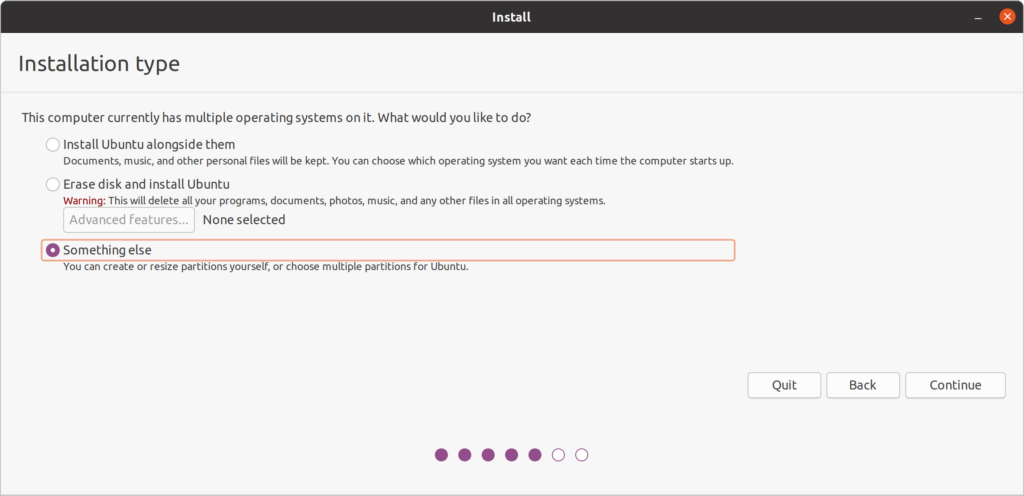
After you’ve answered these questions, Ubuntu will ask about your installation type. It’s very important that you choose “Something else.” This will ensure that we have full control over what hard drive partition Ubuntu gets installed to.
After you click continue, you will be presented with the installer’s partition manager.
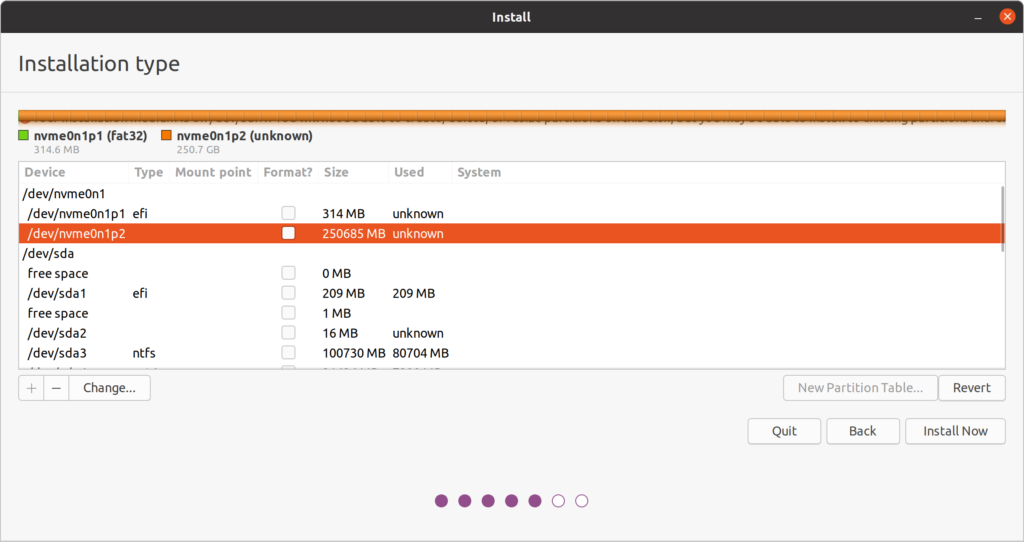
The first drive listed on my machine is labeled /dev/nvme0n1. This is my Mac mini’s internal hard drive. I was actually surprised to see this show up because earlier versions of Ubuntu that I have installed on this machine were unable to see it. That suggests that it may now be possible to install Ubuntu internally.
Nevertheless, for the purposes of this tutorial, I’m going to assume that we still want to install Ubuntu on the external hard drive.
You’ll need to examine all of the options carefully and look for the large chunk of free space that you created when you resized the Windows partition.
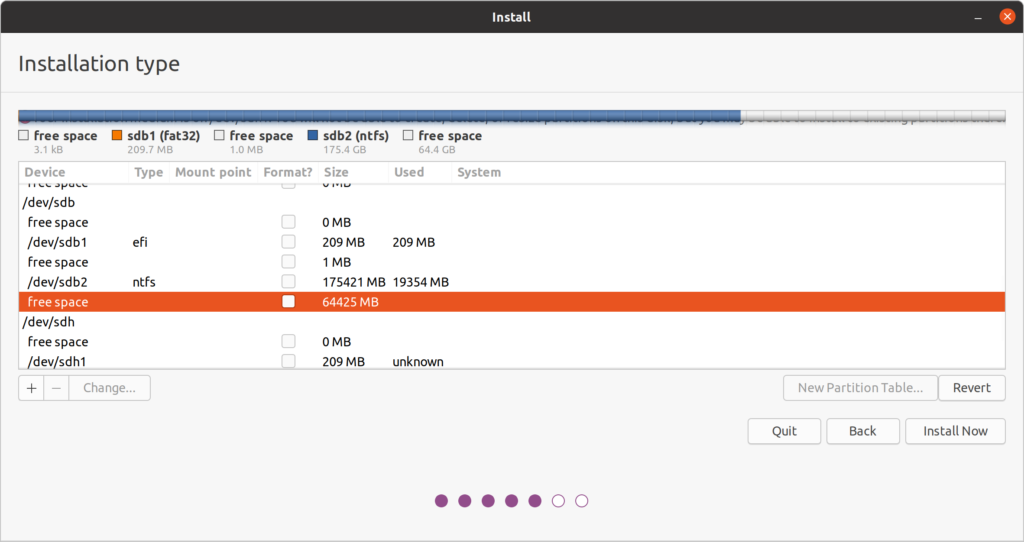
As you can see in the screenshot above, it showed up for me as a partition labeled “free space” on the hard drive labeled “sdb.” This device has a size of 64425 MB, which is pretty close to what I put in when I resized it in Windows. The only other partitions on sdb are the system partition (labeled EFI) and the Windows partition (labeled NTFS). All these things work together to make me feel pretty confident that I’m looking at the right partition.
So, I’m going to click on it to make sure it’s highlighted, and then I’m going to click on the button with the plus sign. (Go ahead and do the same for your own empty space.)
This pops up a dialog allowing us to create a new partition in the free space.

We’re going to make this a Primary partition, tell it to start at the beginning of the space, use it as an Ext4 file system, and choose “/” (without the quotes) as the mount point. You should be able to leave the size as the default. After you’ve entered all the details, click “OK.”
The installer will think for a moment, and then you’ll see the new partition show up in the list:
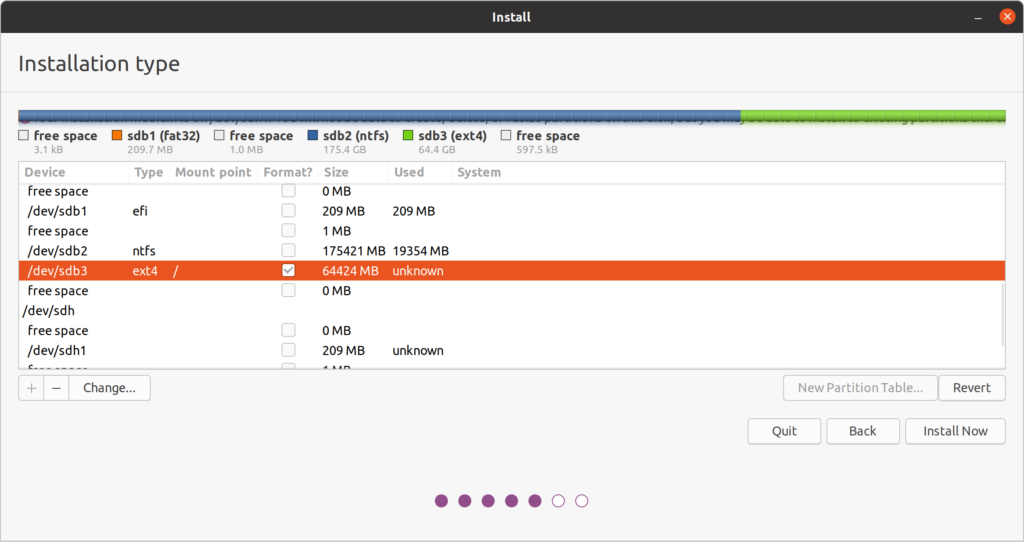
(Note for advanced Linux users: Feel free to configure additional partitions if your needs require it. However, for a novice, this single partition will suffice. There’s also no need to set up a swap partition as Ubuntu will use a file on the main partition as the swap area by default.)
Now, it’s finally time to click the “Install Now” button!
Step 18: Letting the Installer Do Its Thing
As soon as you click “Install Now,” the installer will pop up once last warning before making any changes to the disk.
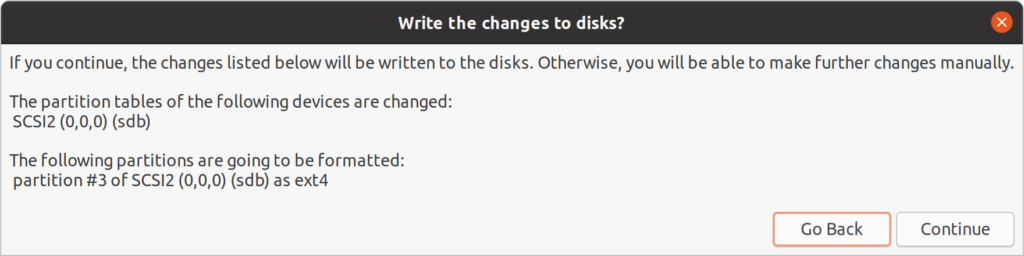
This gives you a chance to make sure that only the partitions you expect to be changed are the ones that will actually be changed. In my case, it’s telling me that a single partition will be formatted as ext4, which is exactly what I asked for earlier. So I’m going to click “Continue.”
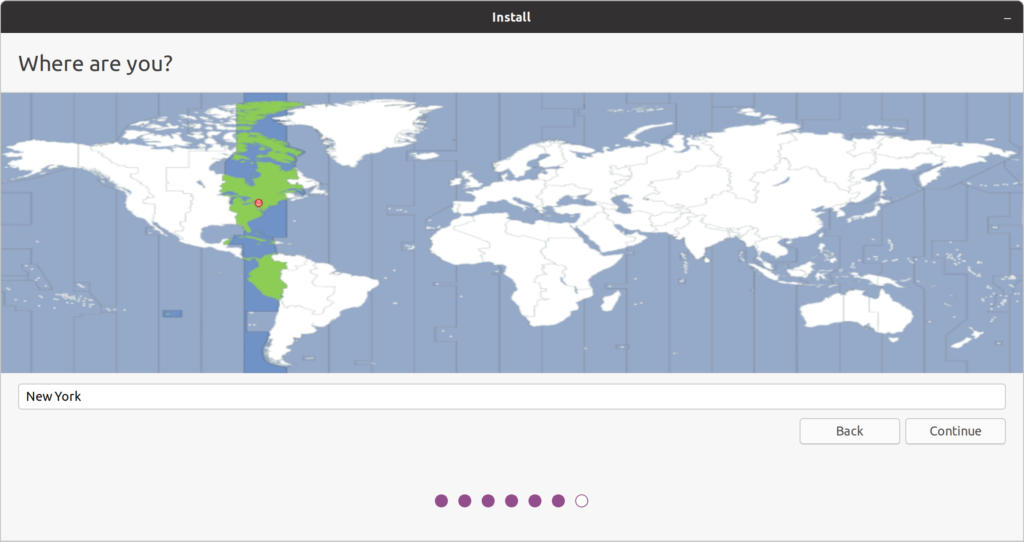
Now it’s time to pick a time zone.
And finally, we choose our account info.
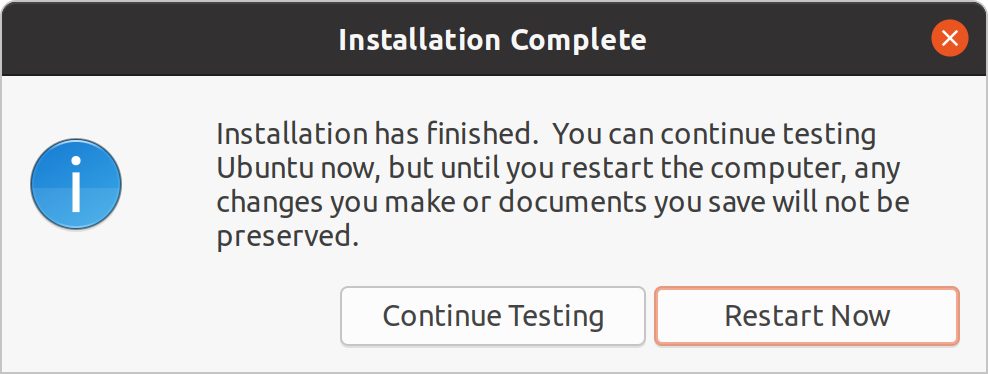
After that, we let the installer do its thing!

At the end of the installation, you’ll be given a choice to continue testing or restart the computer. Choose to continue testing.
Step 19: Doing Some rEFInd Magic
Before we attempt to restart the computer and boot into our newly installed Ubuntu environment, we need to create a special configuration file. This file will help rEFInd recognize our Ubuntu installation. This is the “magic” that allows us to do without the Grub boot loader.
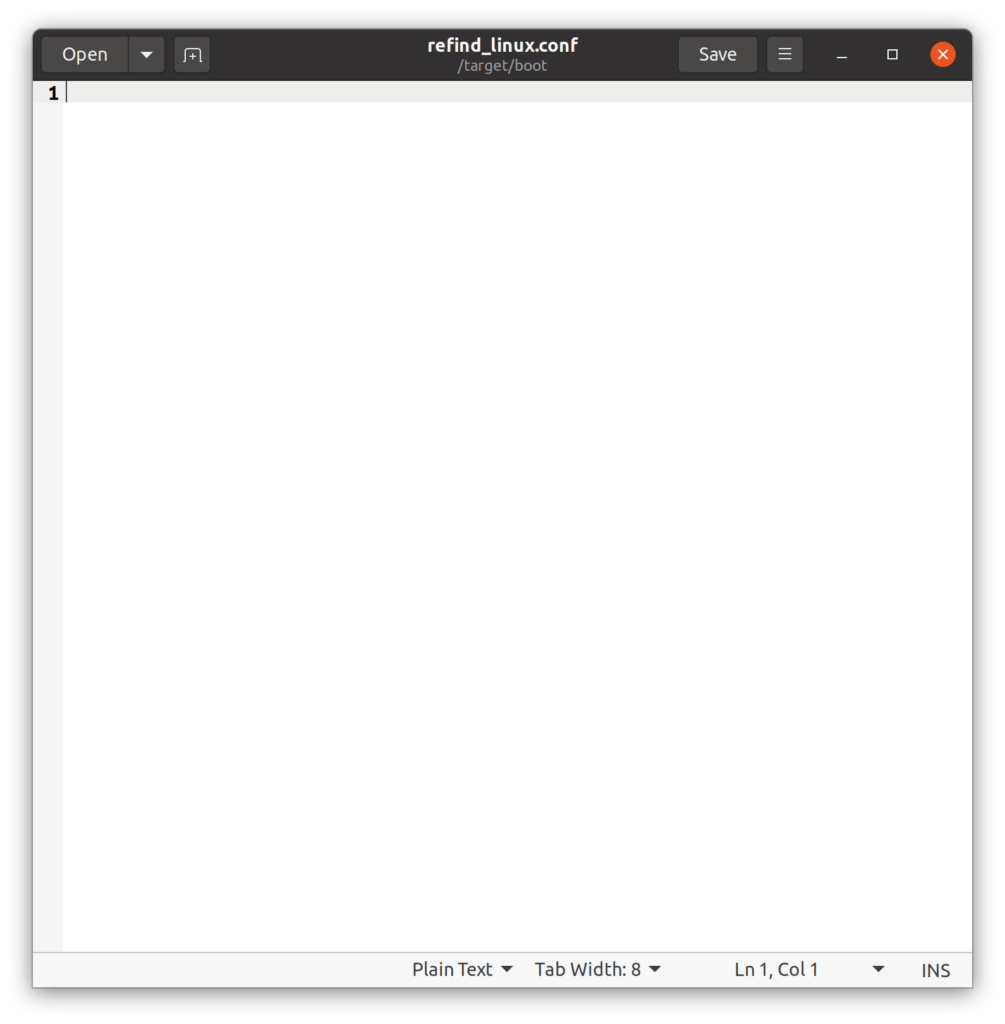
What you need to do is reopen the terminal and enter the following command:
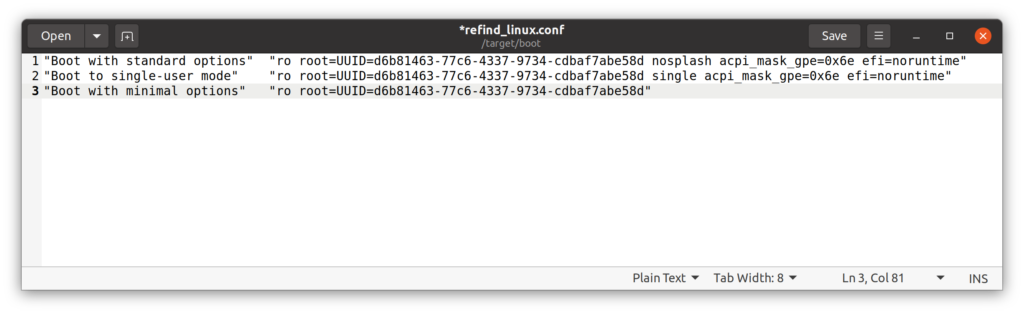
sudo gedit /target/boot/refind_linux.confThis will open up a blank file (with administrator privileges) in Ubuntu’s text editor. Once we save it, the file will be located in the boot folder on the target partition (i.e. the one we installed Ubuntu to).
Then, copy and paste the following text into the document:
"Boot with standard options"  "ro root=UUID=a694d3b0-345c-480d-8875-12e7d3444cde nosplash acpi_mask_gpe=0x6e efi=noruntime"
"Boot to single-user mode"    "ro root=UUID=a694d3b0-345c-480d-8875-12e7d3444cde single acpi_mask_gpe=0x6e efi=noruntime"
"Boot with minimal options"   "ro root=UUID=a694d3b0-345c-480d-8875-12e7d3444cde"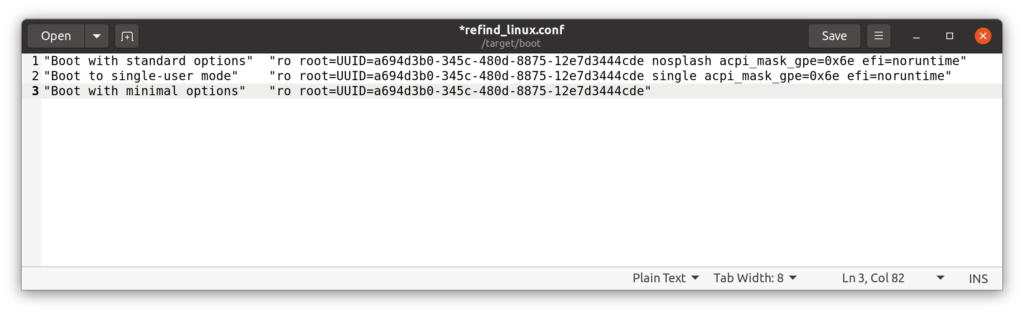
Next, you need to replace the long device identifier code (a694d3b0-345c-480d-8875-12e7d3444cde) that shows up on all three lines with the identifier belonging to your own Ubuntu partition. (The sample code came from one of my partitions and will definitely not work for you!)
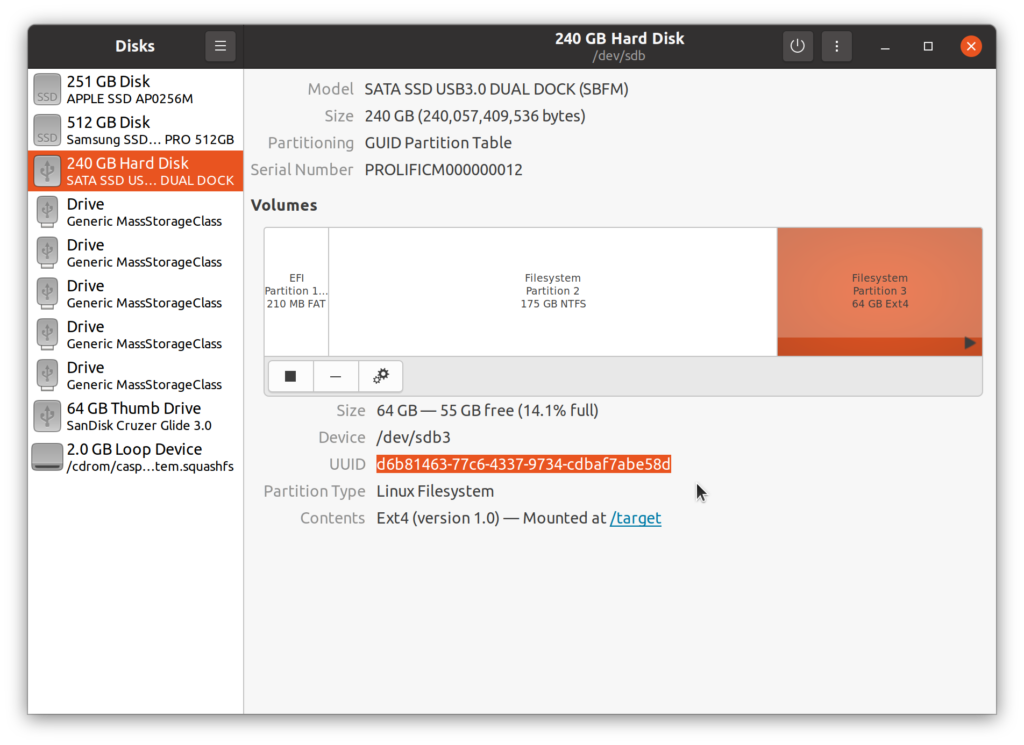
To find this, click on the “Activities” menu in the top-left corner of your computer screen, and type in disks. Then press the Enter key. This opens Ubuntu’s disk manager.

Find your physical hard drive in the sidebar and then find your Ubuntu partition in the main window. My Ubuntu partition is already selected in the Window above. You’ll notice that it is listed as a 64 GB Ext4 partition, which is consistent with the choices we made earlier. The other big giveaway is that it’s mounted at /target.
Now, click and drag to highlight the long string of text next to UUID.
Then, right-click the highlighted text and click on Copy. Next, go back to your editor window, and paste that string into the configuration file in place of the original code. (Be careful not to delete any spaces or parentheses, and remember to change it on all three lines!)
Finally, click on the Save button in the toolbar. Now you can close the file.
Step 20: Rebooting into Linux
Everything should be ready to go now! Click on the power button in the top-right corner of your computer screen, and find the option to power off your computer. The shutdown sequence will pause to remind you to remove your USB stick. Follow the directions on the screen and let the computer turn itself off.
Now, turn the computer back on while being sure to hold down the Option or Alt key again. (Remember, this tells the computer to bring up Apple’s boot picker.) Then, choose the option for rEFInd just like before. (Remember that it will most likely be a yellow icon with the words “EFI Boot” beneath it.)
Once you’re in rEFInd, you should see an option for Ubuntu. It will have an orange logo. Navigate to this option and press the Enter key. You will see a lot of diagnostic messages flash across the screen. The computer may even hang for a minute or two. But with any luck, the computer will eventually finish booting into the Ubuntu desktop, running off of your external hard drive.
Troubleshooting Tip: The first couple times I tried to boot the system, it didn’t work. After fiddling with some settings, I was able to get it to boot reliably. Those settings adjustments have already been incorporated into this guide. So hopefully this will work on the first attempt for you. If not, just try again. Seriously. I don’t know why, but sometimes it works on the third or fourth go-round. Just hold down the power button to get the comptuer to turn off, and then try again. One other thing you can try is to boot into macOS and then restart the computer. I have found that sometimes booting into Ubuntu works more reliably when the computer was already running. Again, I have no idea why this is the case. It could also just be a coincidence…
Wrapping Up
Assuming you were able to get Ubuntu to boot, you have now succeeded at setting up a triple-boot environment on your Mac! By holding down the Option or Alt key upon startup, you can enter rEFInd and choose either your Windows or Ubuntu partition to boot from. And if you do nothing during startup, the computer should automatically boot to your Mac partition. (It is possible to modify this behavior, but I’ll leave that–as well as additional rEFInd optimizations–as an exercise for the reader. If you choose to go down that road, the rEFInd documentation is an invaluable, albeit overwhelming, resource!)
I’ll also leave it to you to deal with updating and installing Linux software.
As I mentioned earlier, you may not be able to get access to the internet unless you use a direct Ethernet connection. (WiFi drivers for many Mac models can be hard to come by.) Indeed, while Ubuntu does mostly work, Linux support for modern Mac hardware, especially machines with the T2 chips, is an ongoing project. The community has made a ton of progress, and for the most part, things run pretty smoothly. Just don’t expect everything to be perfect. (For instance, while making this guide, I ran into trouble shutting down at one point.)
Thanks for following along. It can be tough to find reliable information about dual- and triple-booting Macs, so I hope this has been informative, whether you’ve been attempting to do this project yourself or were just interested in learning about the process.