This post is the final installment of a multi-part series:
- How to Use Automation to Conveniently Relink and Export Dozens of Yearbook Spreads: Introduction
- How to Use Automation to Conveniently Relink and Export Dozens of Yearbook Spreads: Exporting the Yearbook’s Photos
- How to Use Automation to Conveniently Relink and Export Dozens of Yearbook Spreads: Exporting the Spreads to PDF
- How to Use Automation to Conveniently Relink and Export Dozens of Yearbook Spreads: Creating JPEG “Slides” of Each Spread
By the end of the previous post in this series, we had accomplished quite a bit. We gathered up all the images from the yearbook into a single folder, organized by page; we exported every spread into its own properly cropped PDF; and we even combined all those PDFs into one master document.
PDFs are a great choice for digitally archiving the book since they can be viewed without expensive software and don’t depend on properly-placed external links. But PDFs are of only limited use when it comes to sharing and exchanging examples of student work; JPEG images are much more suited for including in slideshows, web galleries, and other collections. So for the last part of this tutorial, I’m going to walk you through one last bulk conversion operation, where we’ll take those PDFs we already created and turn them into JPEGs.
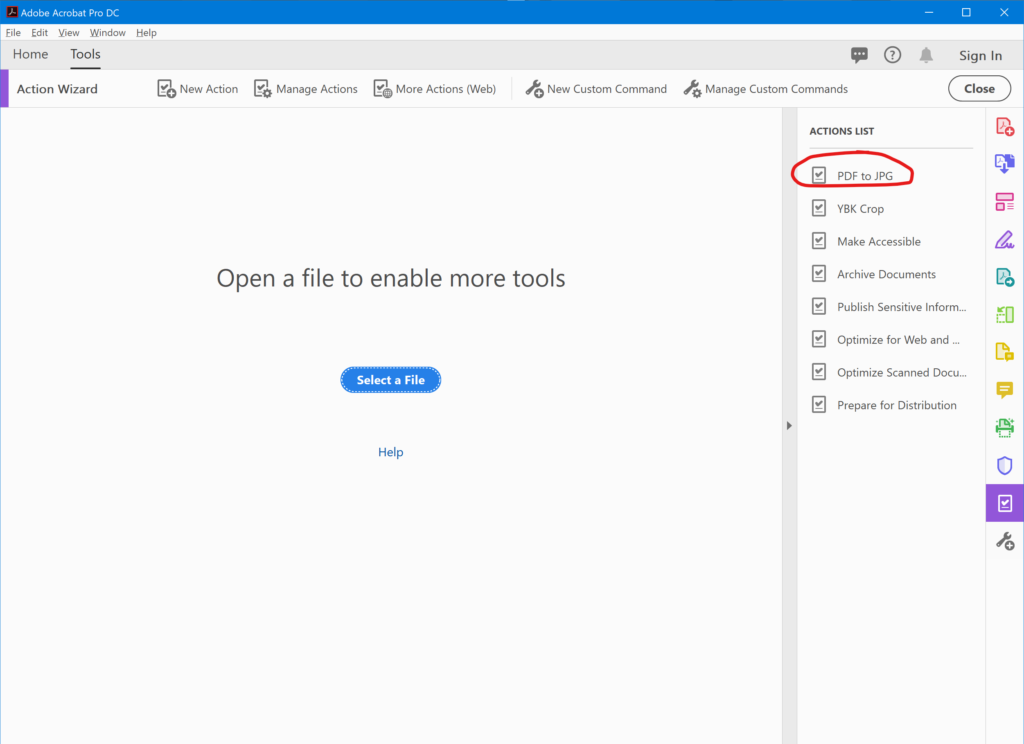
Step 17: Create Another Acrobat Action
Since we need to convert a bunch of pre-existing PDFs, this is another job for the Acrobat Action Wizard. So go ahead and open Adobe Acrobat again, click on the Tools tab, and select the Action Wizard.
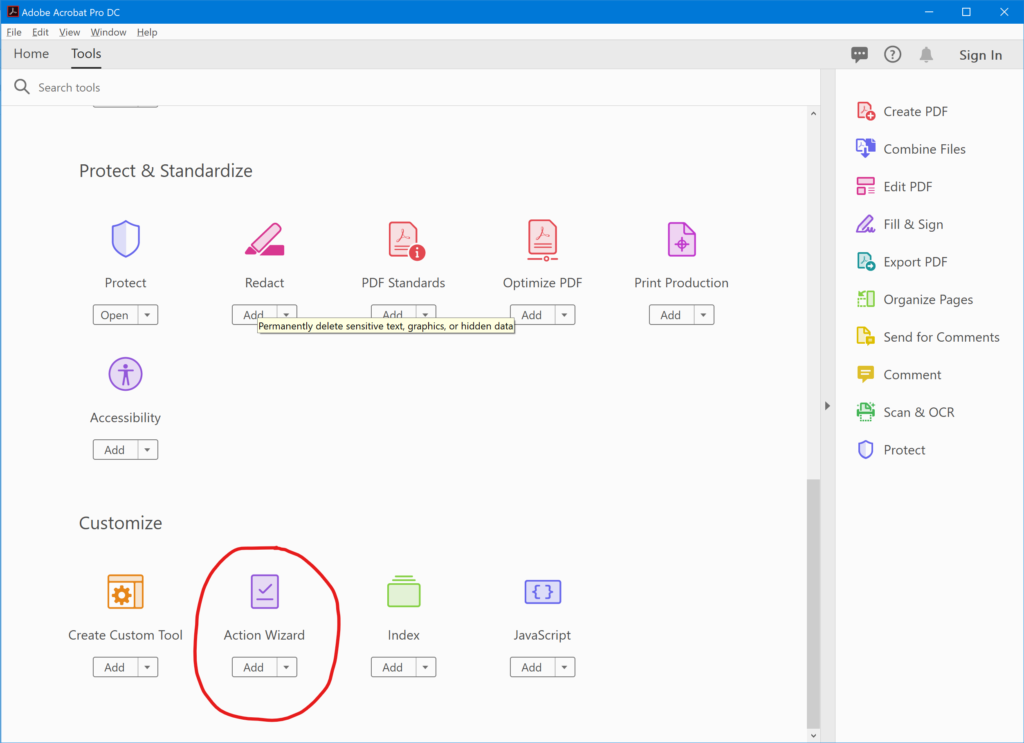
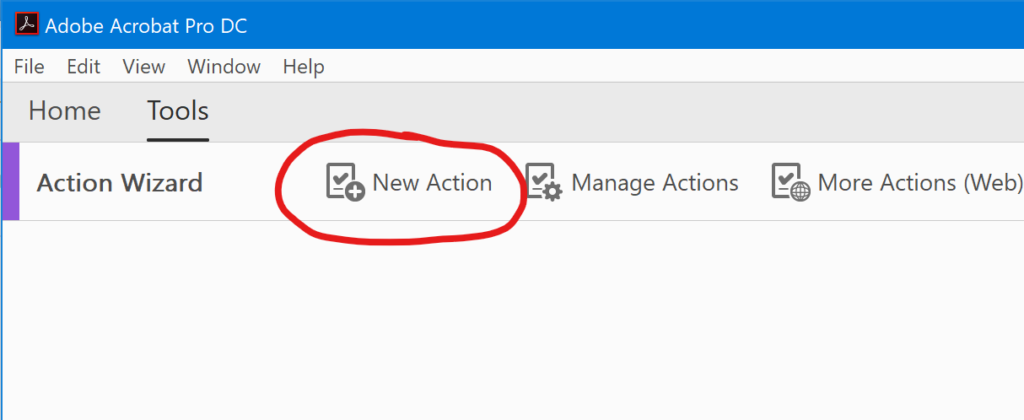
Just like earlier, you’ll need to click on the New Action button in the toolber.
This time around, we’re looking for the Save & Export functions.
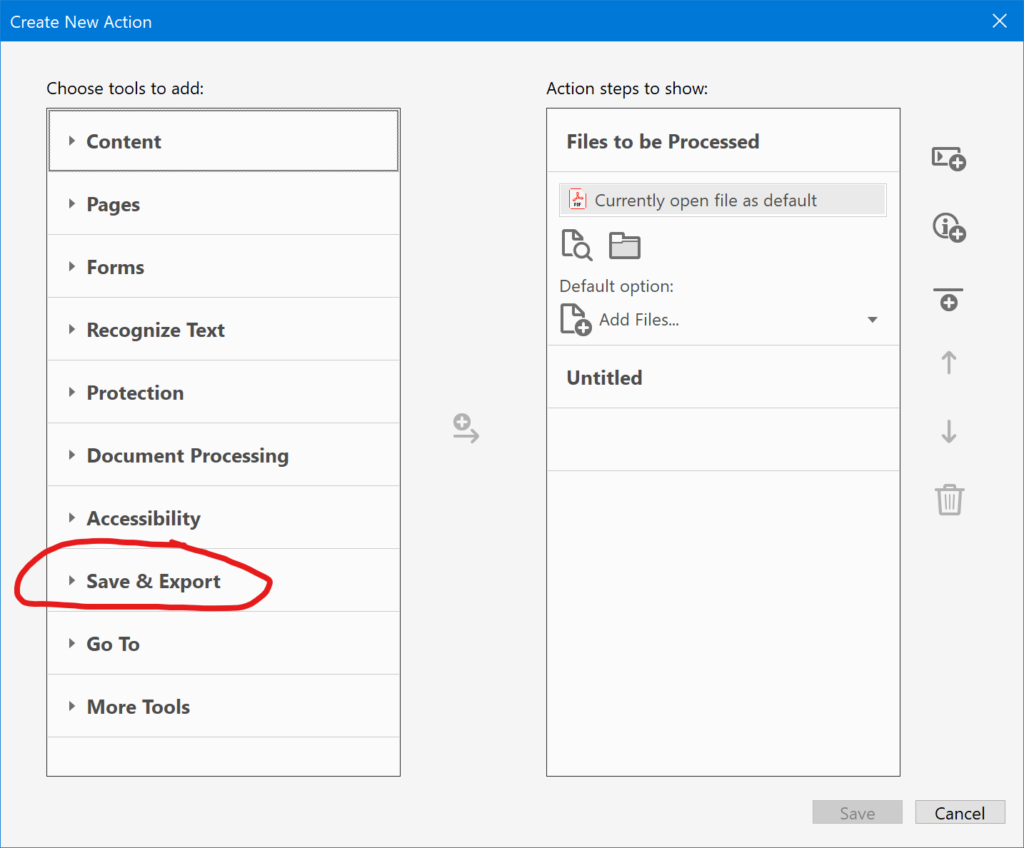
Click on that section and then click twice on Save.
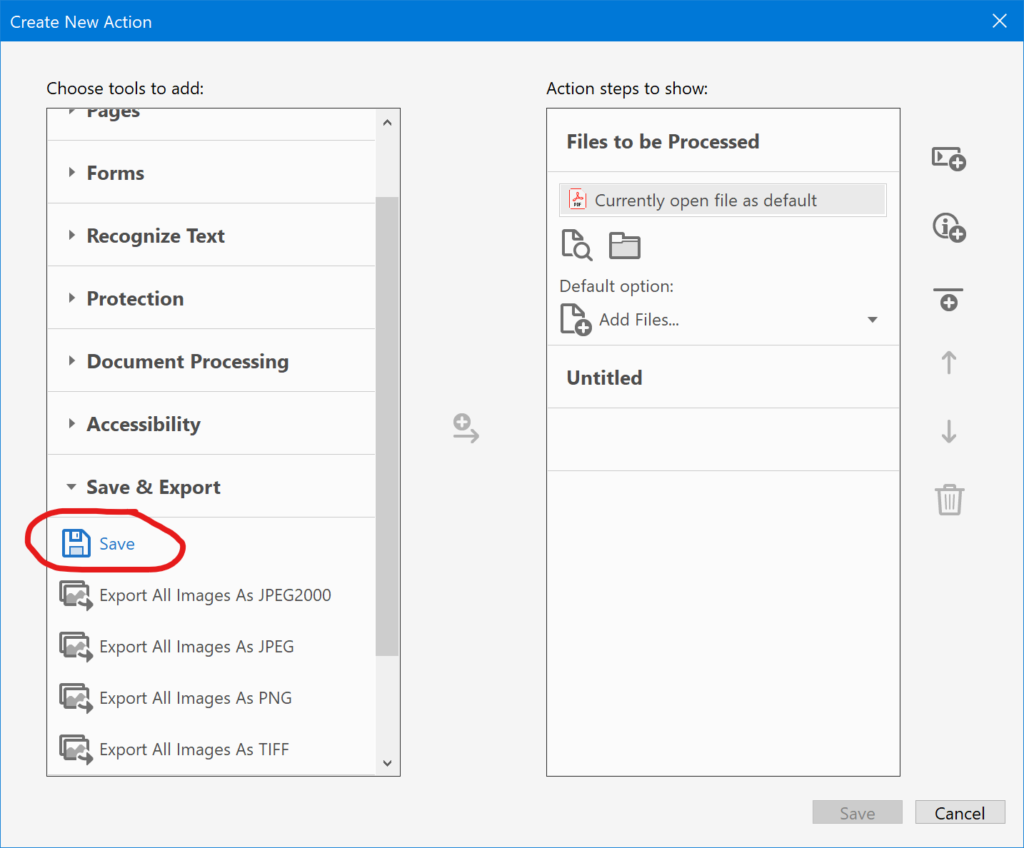
This should cause “Save” to be added to the list of steps on the right-hand side.
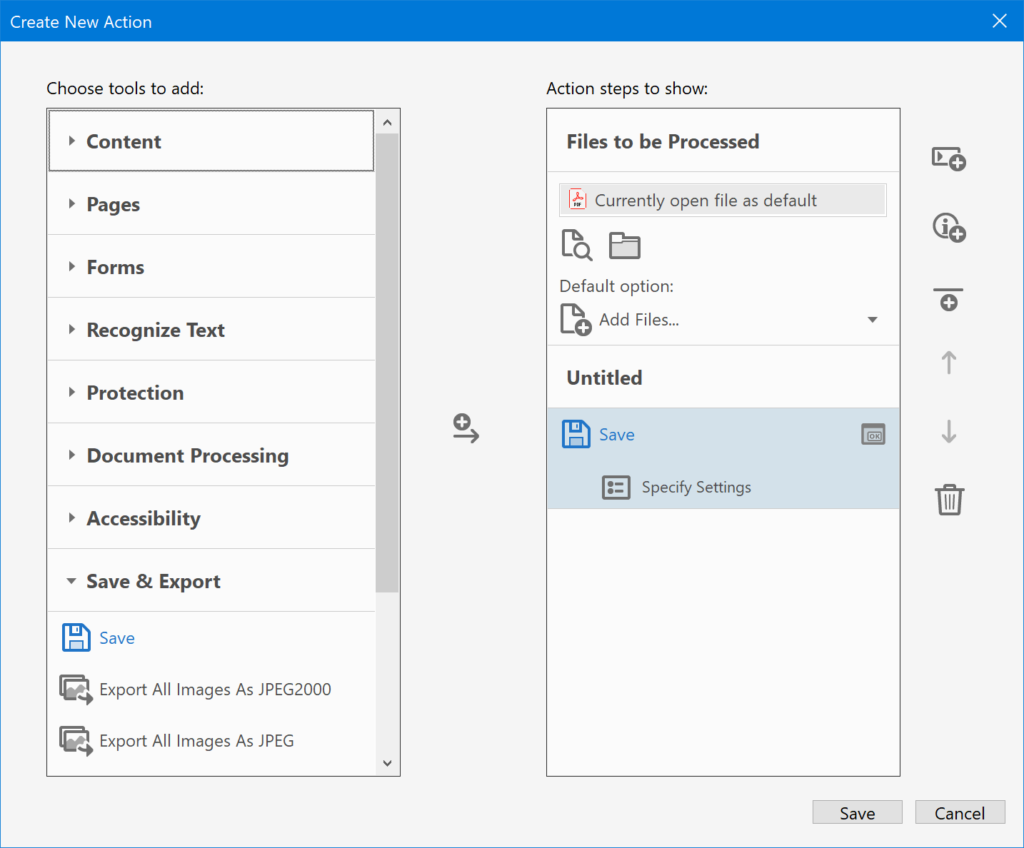
Now, click on Specify Settings right underneath the newly added “Save” function.
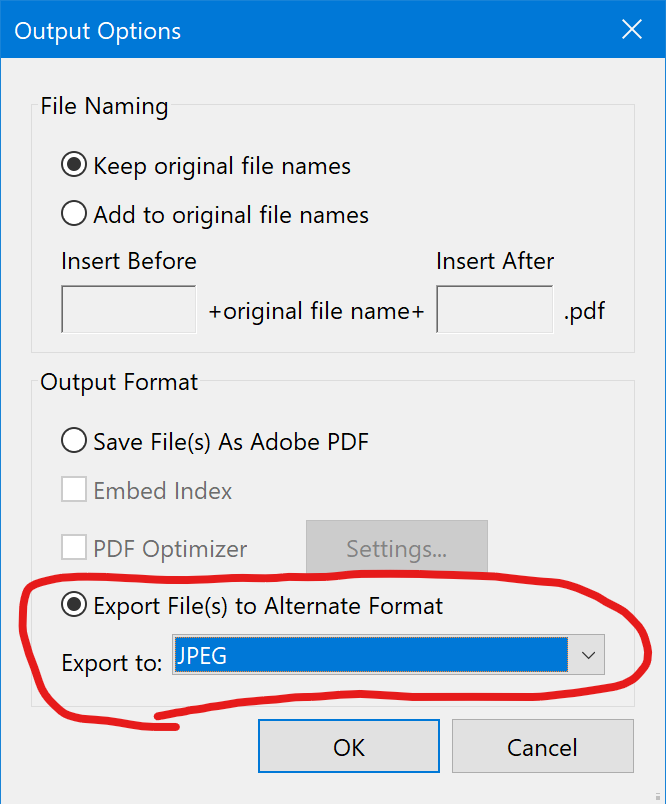
In the settings dialog that pops up, select the option to “Export File(s) to Alternate Format.” Then, choose JPEG from the drop-down list.
Now just click OK and then click the Save button in the action dialog. Give the action a name and hit Save one more time.
Step 18: Adjust the JPEG Settings
This step isn’t strictly necessary, but I’m going to go over it for the sake of detail. Basically, the thing to know is that Acrobat’s batch exporter doesn’t let you change any of the JPEG export settings (e.g. the compression level). Instead, the exporter just uses whatever was set previously.
So, if you want to change the compression level, you need to do one manual export with your own settings. To do this, just open one of the PDFs you created of an individual yearbook spread. Then, click File > Save As…
When you get to the dialog that lets you put in a file name, click the drop-down list next to “Save as type” and choose JPEG.
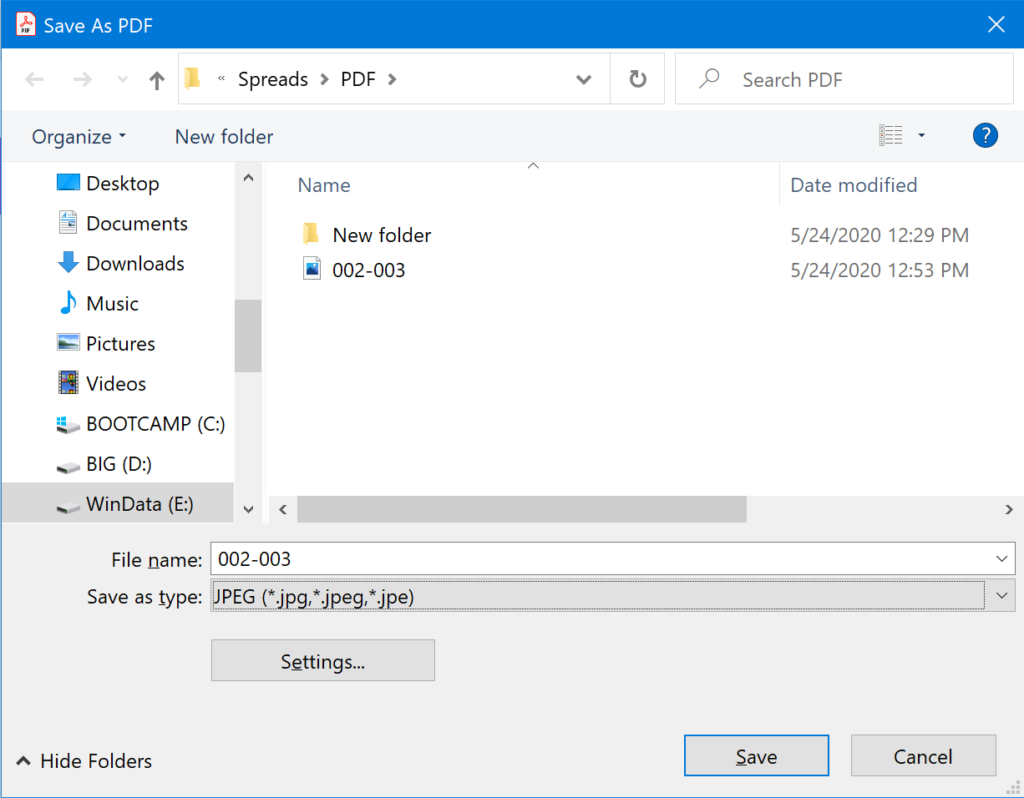
Then, click the Settings… button and pick whatever JPEG settings you want.
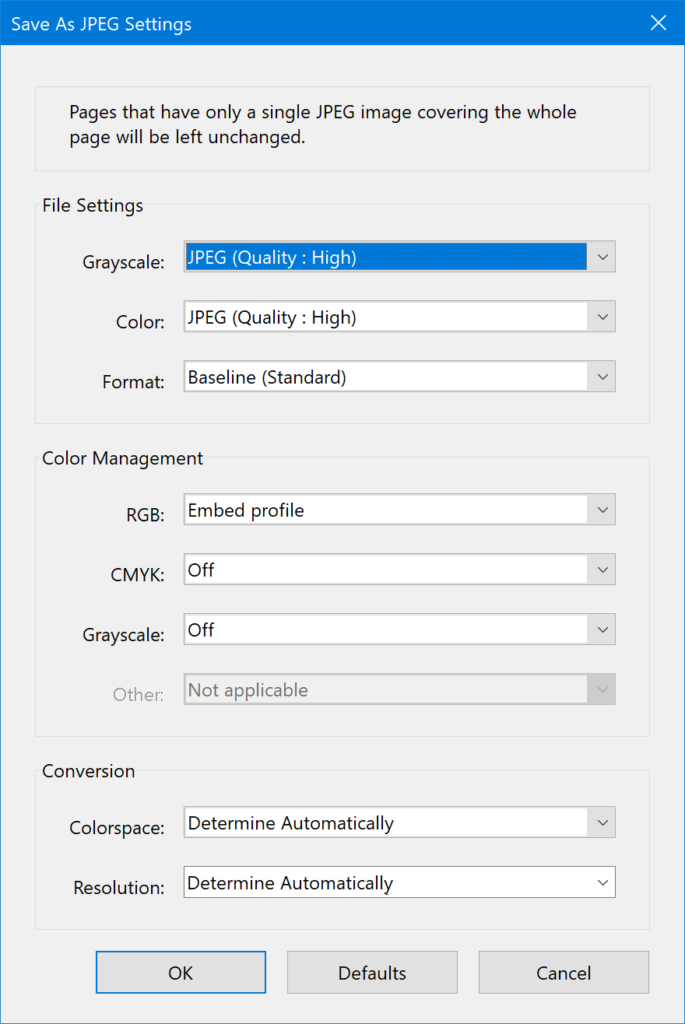
As you can see in the above image, I prefer to use the “High” JPEG quality. (I didn’t need to change anything else.) Once you’re satisfied with everything, click the OK button and then click Save.
You should now be able to find a JPEG version of the spread in whatever folder you chose to save it in. You can keep this file if you want. In my case, I chose to delete it because it’s just going to get created again when I run the bulk action.
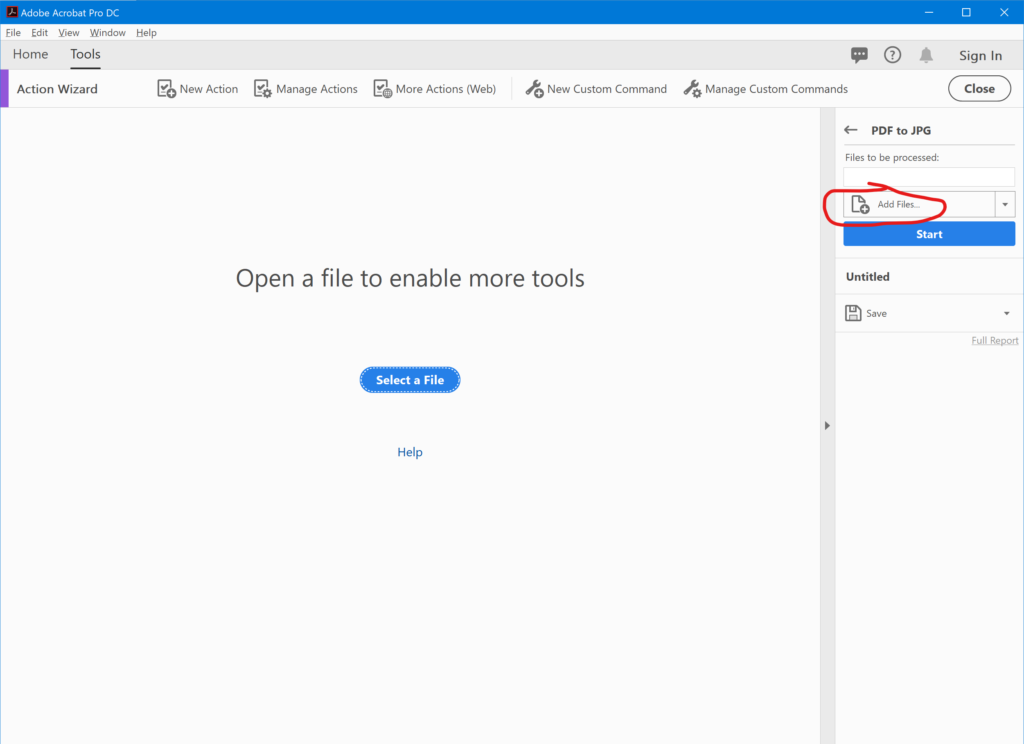
Step 19: Run the Export Action
Now that we have the JPEG settings the way we want them, it’s time to run the action. Make sure you don’t have any PDFs open. Then, open the Action Wizard again (see Step 17). You should see the action you created earlier in the sidebar to the right.
Go ahead and click on it. Then, click the “Add Files” button. (If, for some reason, you don’t see the button or nothing happens when you click it, close the action by hitting the back arrow at the top of the sidebar. Then, open it again. This happened to me once or twice.)
Now, use the file chooser to select all the PDFs you want to convert. (Remember that you can use the CTRL key to select multiple files. Or you can click the first file, scroll down to the last file, hold down SHIFT, and then click the last file to select it and everything in between.)
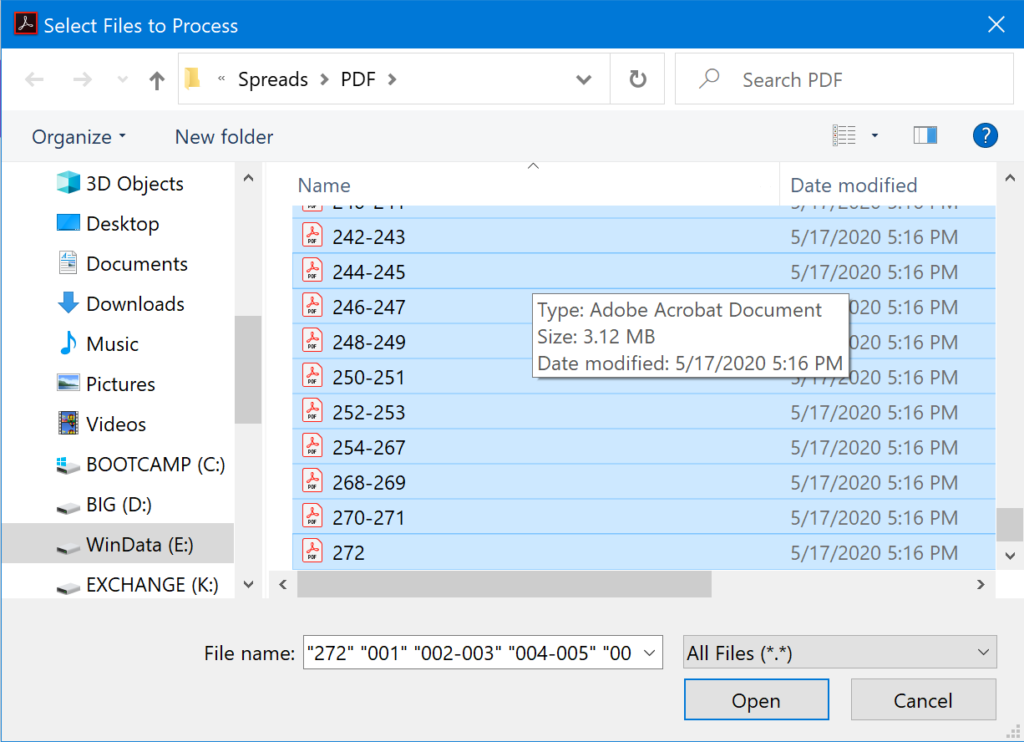
Click Open. When you’re back at the main screen, you can click the Start button on the right-hand side. Acrobat should now cycle through all your files, converting them to JPEG. You’ll find these newly created files in the same folder as your PDFs.
At this point, you should move those newly created JPEGs into their own folder. Otherwise, it will be difficult to do any additional processing on them. (And we do need to do one more round of processing.)
Step 20: Fix the Page Numbers
The one flaw with the above approach is that the JPEG exporter doesn’t know how to handle page numbers for files containing multiple spreads. For example, in my school’s yearbook, each section of portraits (seniors, juniors, etc.) is saved as a single file. This is fine when exporting to PDF. But when we then export that PDF to JPEG, we get this:
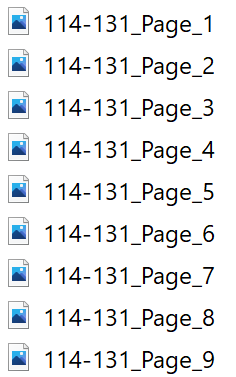
If you do something similar in your own yearbook, you may want to go through the exported JPEGs and make some corrections to the file names.
Step 21: Create a Photoshop Action to Adjust the Size and Resolution
Using the settings that I had specified, the Acrobat action created files with dimensions of 5401×3600 pixels with a resolution of 300 dpi. These are huge files. My publisher recommends that JPEGs be about half this size (no more than 2048 pixels wide, with a resolution of 144 dpi). So I needed to do one last round of processing, this time using Photoshop.
Like Acrobat (but unlike InDesign), Photoshop has some robust bulk processing capabilities built in; however, it has a very different method of creating them.
If you’d like to do this yourself, you need to start by creating a custom action. But instead of choosing a bunch of functions from a list like you did in Acrobat, you’re going to “record” yourself while you do it once on your own.
Here’s how it works: start by opening one of the newly created JPEGs in Photoshop. Then press ALT+F9 to open the Actions panel.
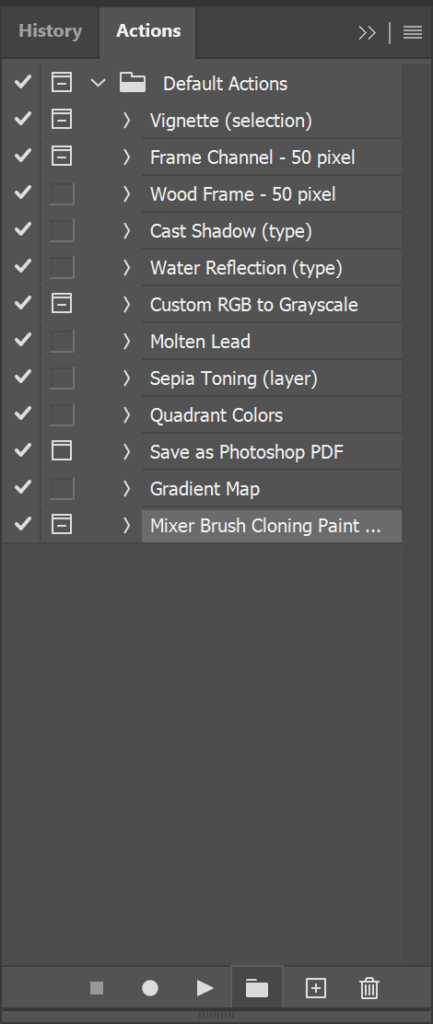
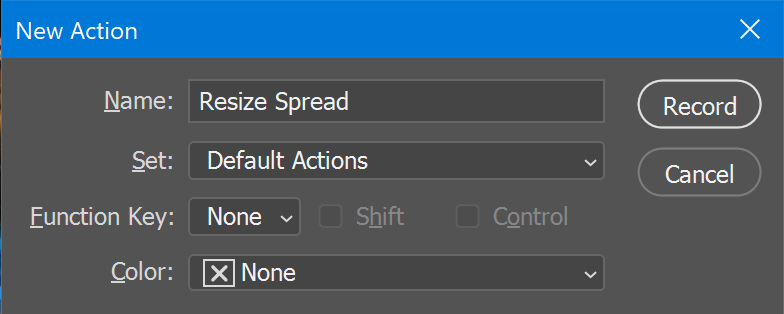
Next, click the button at the bottom of the panel that looks like a plus sign in a box. This the “Create new action” button. After you click it, you’ll need to give your action a name.
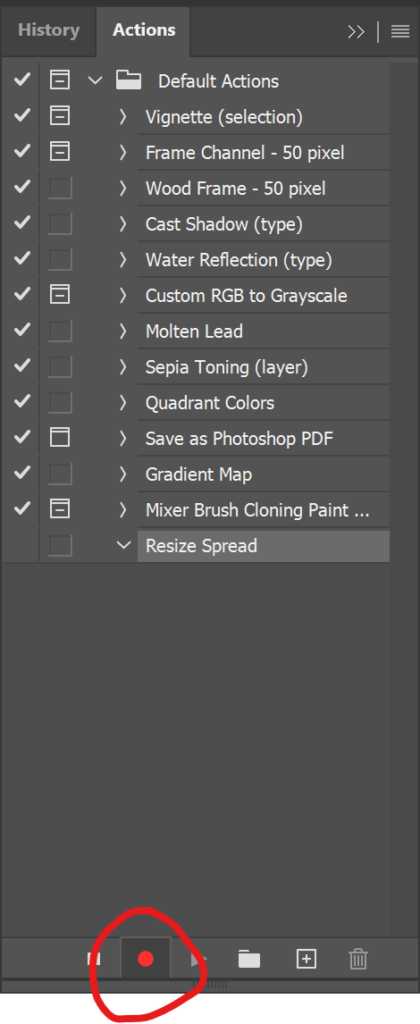
Once you’ve named your action, you can click the Record button. You should now see a red circle at the bottom of the Actions panel to indicate that Photoshop is recording.
Now, you just need to do all the stuff that you want to be part of this action — namely, adjust the size, save the document, and close it.
Start by pressing ALT+CTRL+I to open the image resizer.
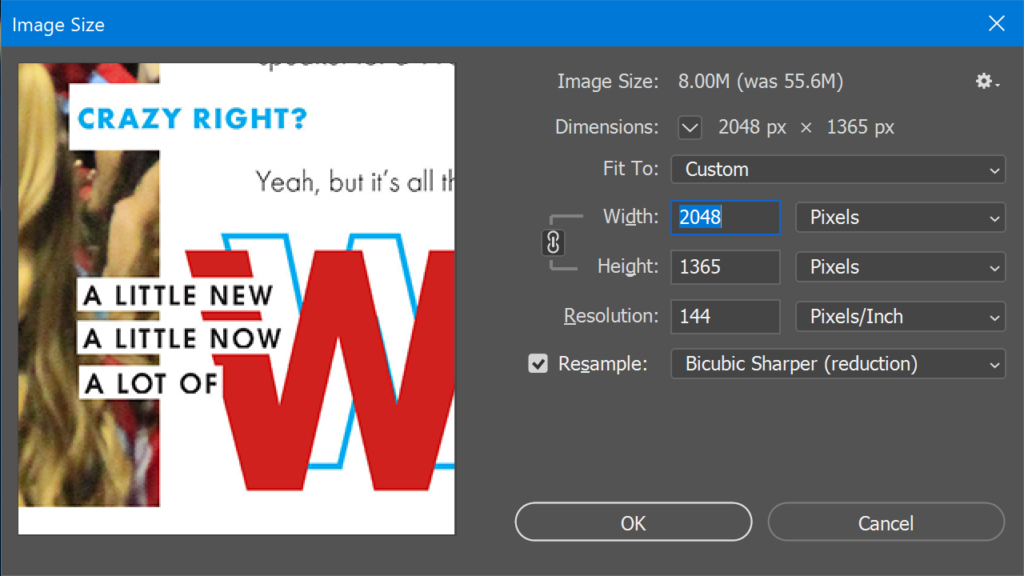
Next, input your desired settings. In my case, I made sure that “Resample” was checked and then put in 144 as the resolution. After that , I set the width to “Pixels” and input 2048. (Photoshop automatically set the height.)
Once this is all set up, you can click OK. After that, you’ll see that this step has been added to your action.
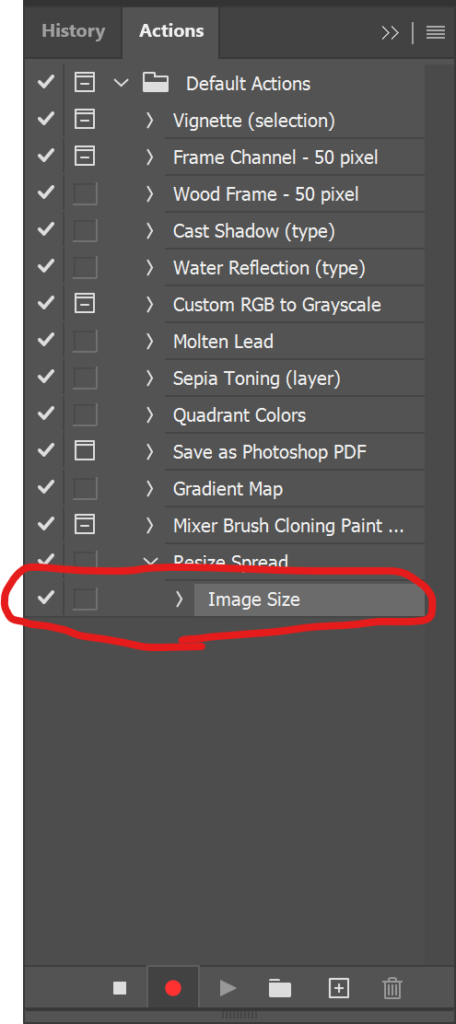
Now we just need to save the resized image by going to Final > Save. Photoshop will ask you to choose your quality. I usually go with 8 or “High.” And then, you need to close the file.
On my computer, when I closed the file, the panel disappeared. So I needed to press ALT+F9 to bring it up again. When I did, I could see that the “Save” and “Close” steps had been added to the list.
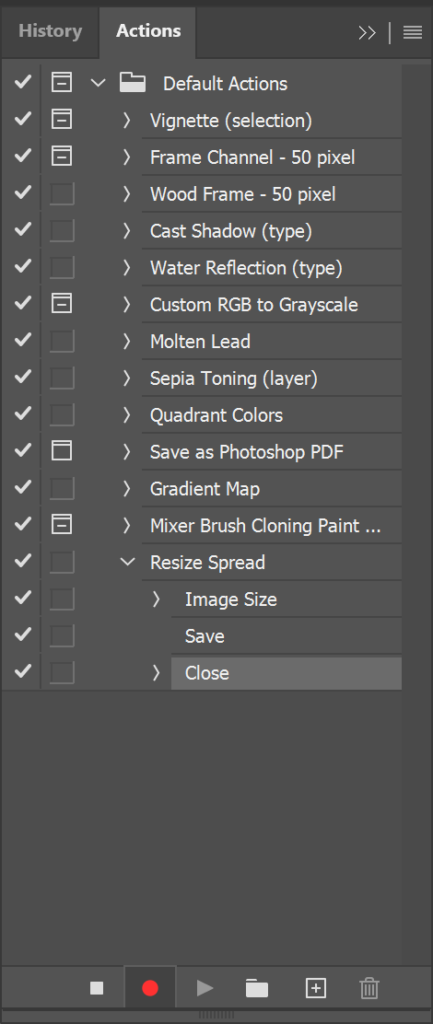
To finish creating the action, click on the stop button (the one shaped like a square).
Step 22: Run Photoshop’s Batch Processor
Now that we’ve got an action, it’s time to perform this action on all of our JPEGs.
Make sure there aren’t any images open in Photoshop. Then, click on File > Automate > Batch… This should open up the “batch processing” interface, which allows you to choose a particular action to perform on a bunch of files.
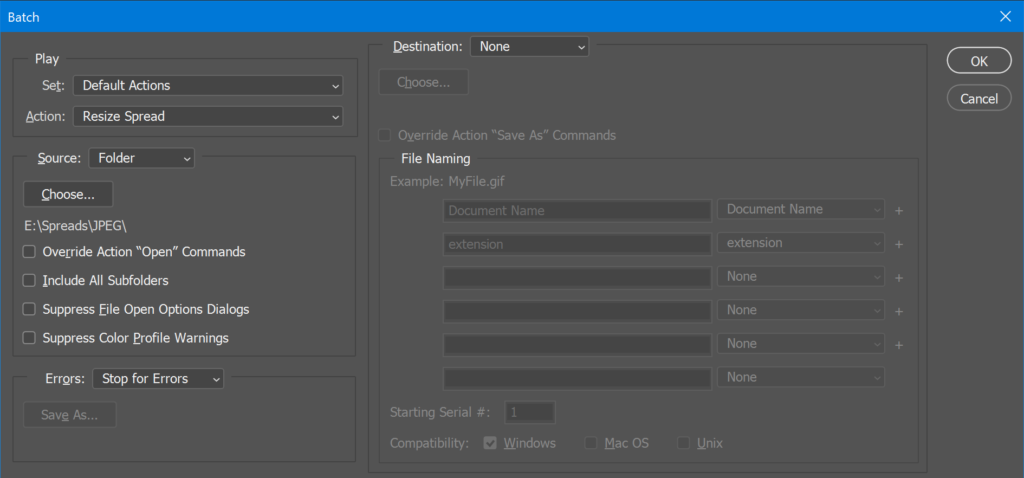
Near the top-left corner, you will see a drop-down list labeled “Action.” Click on this list and find the action you created earlier. Then, make sure Source is set to “Folder” and click on the Choose button. This will pop up a file browser that lets you find and select your desired folder.
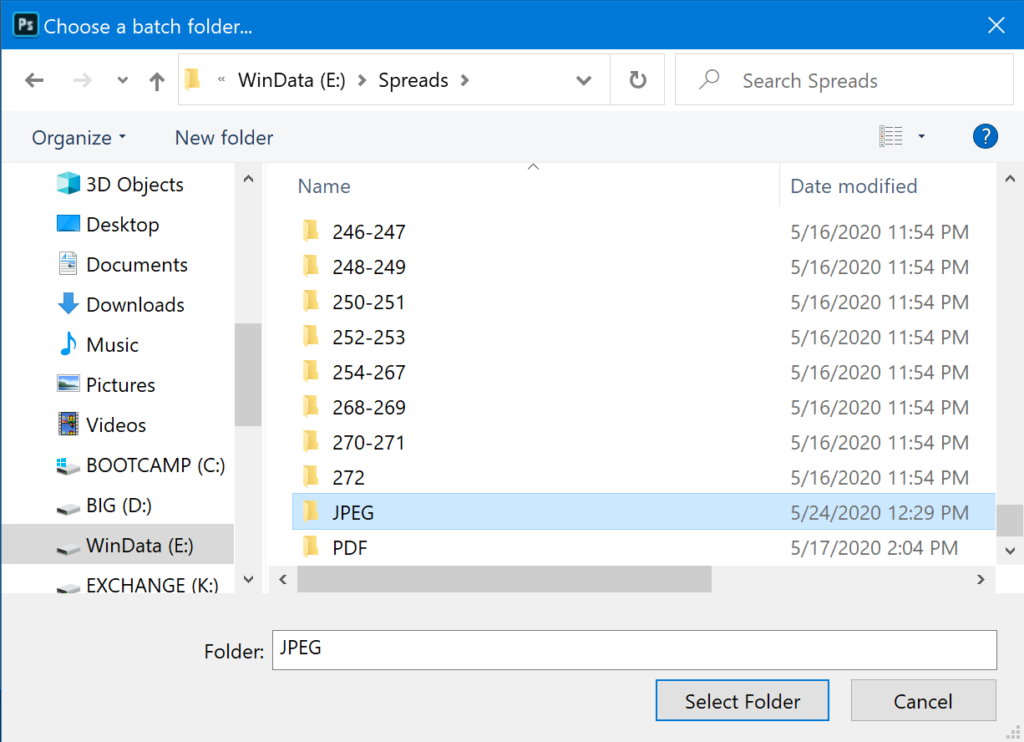
Just click on the folder and then click “Select Folder.”
Make sure the rest of the check boxes in the batch dialog are left blank and that Destination is set to “None.” Then, click OK, and let Photoshop do it’s thing!
You will see Photoshop open (and close) each of your images. When it’s all done, all of your images will have been resized to the appropriate settings. (Feel free to open one of the images and see for yourself.)
Step 23: Wrapping Up
I actually had two files that the above process didn’t work for: the title page and the back page. The files for these pages are not full spreads, so they actually need to be resized to 1024 pixels wide if I want them to have the same scale as the others. So I did need to fix these two manually.
And with that, we’ve made it through the entire workflow. Now that all is said and done, we have created three sets of exports:
- A series of folders, labeled by page numbers, containing all of the images used in the yearbook.
- A series of PDFs, labeled by page numbers, representing each spread (or group of spreads) in the yearbook.
- A series of JPEGs, labeled by page numbers, representing each individual spread in the yearbook.
Although there were quite a few steps involved, what we’ve done is to avoid having to individually open each file and individually perform all of the necessary steps (i.e. relinking, exporting, cropping, converting, and resizing). Along the way, we’ve also explored how to install InDesign scripts and create automation actions in Adobe Acrobat and Adobe Photoshop. These techniques can be used to speed up all kinds of repetitive tasks when working with photos, design files, and other documents.
To my fellow yearbook advisers out there, I wish you a successful and, especially, safe distribution season. To anyone else who might be reading, thanks for taking the time to walk through this process with me. I look forward to sharing more helpful workflows in the future!